The Smell of Warm Tortillas: Our Secret Recipe for Crispy Oven-Baked Chicken Taquitos
There are certain smells that instantly transport you back to childhood, and for me, the scent of warm, lightly crisped corn tortillas always makes me think of my grandmother’s kitchen in Texas. She’d make these incredible rolled tacos, sometimes frying them, sometimes baking them, but always filling them with the most seasoned, tender chicken. Adams, my 12-year-old, recently gave me a challenge: “Dad, I need something crunchier than a taco, but easier than a chimichanga.” Challenge accepted.
That’s how this recipe for Crunchy Oven-Baked Chicken Taquitos was born. It’s got all the flavor of the classic comfort food, but skips the messy, heavy deep fryer. Instead, we use a touch of oil and high heat to achieve that perfect golden-brown, shattering crunch that the kids, and my wife Emily, simply adore. They are truly the perfect easy chicken taquitos for a busy weeknight. We are making Baked Chicken Taquitos today, ensuring every bite is crispy on the outside and wonderfully creamy on the inside, especially because we use a secret ingredient: cream cheese! If you’re looking for easy shredded chicken taquitos baked not fried, you’ve come to the right place. Grab your apron, this one is a keeper!
Table of Contents
- The Smell of Warm Tortillas: Our Secret Recipe for Crispy Oven-Baked Chicken Taquitos
- Why You’ll Love This Crunchy Oven-Baked Chicken Taquitos
- Ingredients for Crunchy Oven-Baked Chicken Taquitos
- How to Make Crunchy Oven-Baked Chicken Taquitos
- Pro Tips & Variations
- Crunchy Oven-Baked Chicken Taquitos Serving Suggestions
- Crunchy Oven-Baked Chicken Taquitos Storage & Reheating
- FAQ about Crunchy Oven-Baked Chicken Taquitos
- Final Thoughts
Why You’ll Love This Crunchy Oven-Baked Chicken Taquitos
In the world of weeknight cooking, we need recipes that are simple, satisfying, and deliver big on flavor without requiring a dozen prep steps. These Crispy Baked Chicken Taquitos check every single box, making them a staple in my house, and I promise, they’ll become one in yours too. We’ve even included steps below to make these oven taquitos using rotisserie chicken taquitos baked, streamlining the process even further!
Perfect Weeknight Speed: If you use pre-cooked chicken (rotisserie is my go-to time saver!), you can have the filling mixed, rolled, and these Baked Chicken Taquitos in the oven in under 20 minutes. It’s faster than ordering takeout, and about a thousand times more wholesome. This makes it an ideal easy chicken taquitos solution after a long day.
No Fryer, All Crunch: We achieve maximum crunch without deep-frying. A light brushing of olive oil or cooking spray does the trick. The result is a lighter, less greasy taquito that still gives you that satisfying, audible crunch that Adams demands. This is the definition of the perfect Oven Baked Chicken Taquitos.
A True Crowd-Pleaser: From Jana’s 9-year-old troop of friends to the adults watching the game, everyone loves these. They are customizable with dips, and their size makes them non-intimidating and easy to manage, unlike messy enchiladas or huge burritos. If you need a great party appetizer, these are the ones.
Creamy Filling Secret: The difference between a dry taquito and a spectacular one is the filling. We use cream cheese, alongside seasoning and a bit of shredded cheddar or pepper jack. The cream cheese melts perfectly, binding the shredded chicken and spices, keeping the inside incredibly moist and flavorful while the outside gets wonderfully crisp.
Freezer Friendly Prep: These are amazing as a meal-prep option. You can assemble them entirely, freeze them, and then bake them right from frozen when the craving hits. They make fantastic freezer-friendly meals, perfect for when life gets chaotic. In fact, many people search specifically for baked chicken taquitos freezer friendly instructions, and we’ve got you covered in the tips section! For more great freezer meals, check out this recipe for Baked Chicken Recipes, which pairs great with a side of rice.
Ingredients for Crunchy Oven-Baked Chicken Taquitos
The beauty of this recipe is its simplicity. Most ingredients you probably already have, especially if you grabbed a rotisserie chicken the other day.
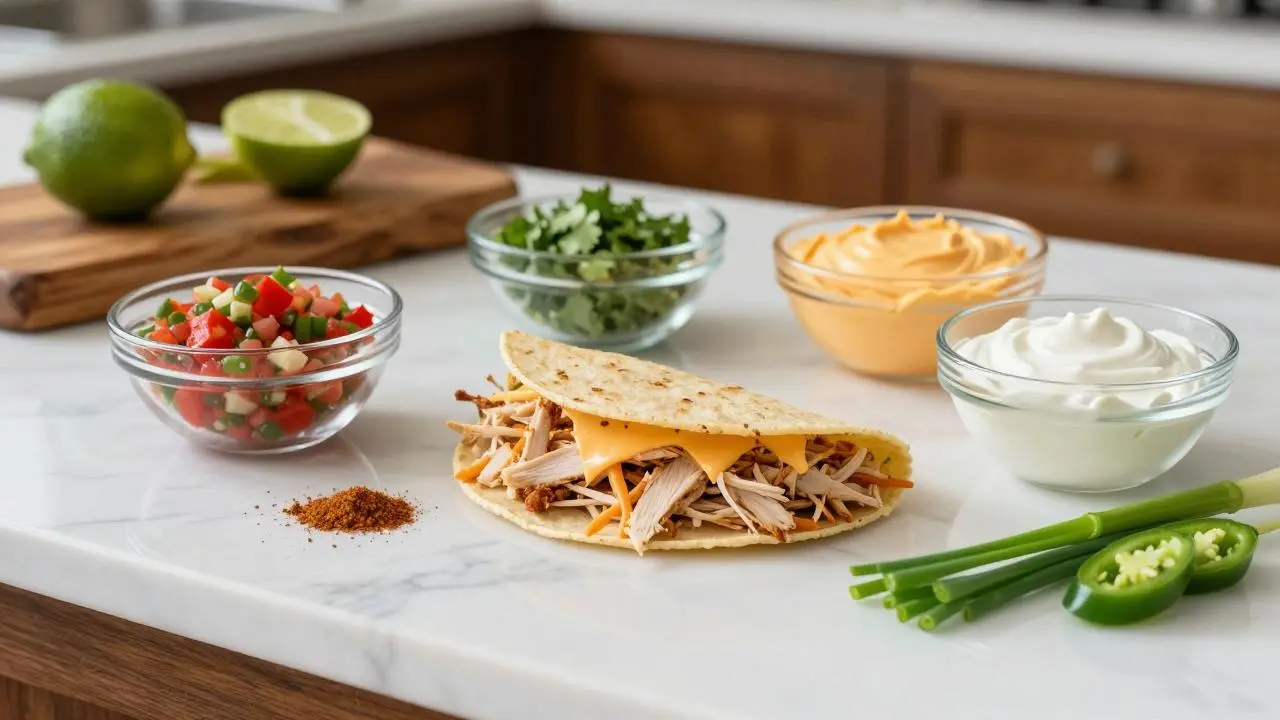 Crispy Oven-Baked Chicken Taquitos: Easy Family Dinner!
- The Star, Shredded Chicken: 3 cups worth. Use slow-cooked chicken breasts, boiled chicken, or a pre-cooked rotisserie chicken taquitos baked base.
- The Cream Base: 4 oz (half a block) of cream cheese, softened. This is what makes the filling creamy and prevents dryness.
- Cheese Please: 1 cup shredded cheese (Cheddar, Monterey Jack, or Pepper Jack for a little kick).
- Flavor Boosters: 1/2 cup salsa (use mild for kids, medium for adults), 1/4 cup chopped cilantro (if you like it!), and 1 small can of diced green chiles (optional, but excellent).
- Spices: 1 teaspoon cumin, 1 teaspoon chili powder, 1/2 teaspoon onion powder, 1/2 teaspoon garlic powder, and salt/pepper to taste.
- The Wrapper: 12-16 small tortillas (I use corn tortilla chicken taquitos oven style for maximum crunch, or small flour tortillas for a softer, easier roll. See tips for how to handle corn tortillas).
- Crisping Agent: Olive oil or non-stick cooking spray for brushing.
Substitutions & Notes
- Dairy-Free Option: You can substitute the cream cheese for Greek yogurt with great success, or use a vegan cream cheese or plant-based sour cream alternative for similar creaminess. Make sure to use dairy-free shredded cheese.
- Tortilla Choice: While corn tortillas provide the most authentic crunch (perfect for Crispy Baked Chicken Taquitos), flour tortillas are incredibly easy to roll without breaking. If you use corn, you MUST warm them first (see instructions below).
- Vegetarian Option: Substitute the shredded chicken with shredded, sautéed sweet potatoes, black beans, and corn for a great flavor profile.
How to Make Crunchy Oven-Baked Chicken Taquitos
This method focuses entirely on streamlining the filling and guaranteeing that the taquitos come out truly crispy, without tasting greasy. It’s the perfect blend of texture and flavor.
Step-by-Step Instructions
Preheat & Prep: Preheat your oven to 425°F (220°C). Line a large baking sheet with parchment paper for easy cleanup. This high heat is key to achieving that maximum crunch that Adams loves in his Baked Chicken Taquitos. Trust me, the higher temperature is worth the quick crisp.
Mix the Filling: In a large mixing bowl, combine the 3 cups of shredded chicken, softened cream cheese, shredded cheese, salsa, cilantro, and green chiles (if using). Add the spices: cumin, chili powder, onion powder, and garlic powder. Mix everything thoroughly. I like to use my hands for this part, or a sturdy wooden spoon, to ensure the cream cheese is fully distributed and every strand of chicken is coated. The filling should be moist and very flavorful. If you want a fun alternative, use the filling from our spicy chicken tacos!
Warm the Tortillas (Critical Step!): If you are using corn tortilla chicken taquitos oven preparation is tricky if they are cold, and they will crack. Even if using flour, a quick warm-up makes rolling much easier. Wrap the stack of tortillas loosely in a damp paper towel and microwave them for 30–60 seconds. Alternatively, heat them in a dry skillet for 10 seconds per side. They need to be flexible. This step is non-negotiable for smooth rolling.
Fill and Roll: Working on a flat surface, lay out one warmed tortilla. Place about 2 generous tablespoons of the chicken mixture in a line slightly off-center of the tortilla. Don’t overfill, or the filling will spill out the sides when rolled, but you want a substantive bite. Start at the edge closest to the filling and roll it up tightly, like a cigar. The tighter the roll, the better the taquito will hold its shape and the crispier the final product will be.
Secure and Oil: Place the rolled taquito seam-side down on the prepared baking sheet. Repeat until all the filling or tortillas are used up. Once they are all arranged, lightly brush the tops and sides of the taquitos with olive oil. This is the secret to guaranteed crunchiness!
Bake to Crispy Perfection: Bake the Oven Taquitos for 12–18 minutes. Halfway through (around the 8-minute mark), I like to quickly flip them to ensure even browning on all sides. When they are done, they should be golden brown, stiff, and clearly crispy. Keep a close eye on them, as oven temperatures can vary.
Serve Immediately: Remove these magnificent Crunchy Oven-Baked Chicken Taquitos from the oven and serve immediately with your favorite toppings, such as sour cream, fresh salsa, or guacamole. This is where the happiness begins!
Pro Tips & Variations
I learned quickly that while the recipe is sound, a few subtle tweaks can elevate it from \’good dinner\’ to \’family legend.\’ These tips will help you manage everything from prep to dietary restrictions, especially when making easy shredded chicken taquitos baked not fried.
Tip 1: Utilizing Rotisserie Chicken
If you have zero time, purchasing a pre-cooked rotisserie chicken is your ultimate move. It is perfectly seasoned and the meat shreds beautifully. This is a hack Emily and I use constantly when shuttling the kids between soccer practice and Jana’s piano lessons. Simply shred the meat and it’s ready to mix into the cream cheese base. Using rotisserie chicken taquitos baked saves about 30 minutes of prep time, making this an even quicker dinner solution.
Tip 2: Securing the Seam
Sometimes, if the taquitos aren’t rolled tightly enough, or if the tortilla is a bit under-warmed, the seam can open while baking. If this happens, or if you are preparing a dish for a party, you can anchor the seam lightly with a wooden toothpick. Just make sure to remove it before serving, especially if serving to children!
Tip 3: The Air Fryer Option (Niche Keyword Integration)
Need them faster and even crispier? The air fryer is your friend. This recipe works perfectly for Chipotle chicken taquitos air fryer option. Prepare the taquitos as instructed, lightly oil them, and place them in the air fryer basket in a single layer. Air fry at 375°F (190°C) for 6–8 minutes, flipping halfway, until they are golden brown and fully crunchy. This method often results in a spectacular, quick crisp that rivals deep frying.
Tip 4: Flavor Profile Variations
- Spicy Chipotle: For a deeper, smoky flavor, mix 1 teaspoon of chipotle powder into the shredded chicken filling. You can also use a smoky shredded chicken filling like the one used in my popular Chicken Fajita Skillet recipe.
- Cheesy Bacon Ranch: Mix in a few tablespoons of ranch seasoning and 1/2 cup of cooked, crumbled bacon into the filling mixture. This variation is a guaranteed winner with the younger crowd.
- Greek Yogurt Swap: If you are counting calories or just prefer a lighter taste, swap out the cream cheese for an equal amount of full-fat Greek yogurt. It will still bind the ingredients, but the flavor profile will be slightly tangier, which is delicious especially with lime juice and cilantro.
Crunchy Oven-Baked Chicken Taquitos Serving Suggestions
A taquito isn’t complete without the proper supporting cast. While they are usually served as a side to a larger meal or as a great party appetizer, these oven taquitos can form the centerpiece of a wonderful family feast. When I made these recently, Jana insisted on having them with ‘green dip’, which is just guacamole, but I decided to elevate the dining experience for my wife, Emily.
Here are my favorite ways to present these amazing Crispy Baked Chicken Taquitos:
1. The Classic Dipping Platter
You can’t go wrong with classic Tex-Mex dips. Serve these piping hot taquitos alongside small bowls of:
- Fresh Guacamole: Creamy, cool, and a perfect contrast to the spicy filling.
- Smoked Salsa: Use your favorite red or green chunky salsa. Sometimes I make a fresh pico de gallo, but for busy nights, store-bought works just fine.
- Sour Cream (or Greek Yogurt): A cool dollop on the seam side is heaven.
- Queso Blanco: If you have time to melt some white cheese (like Monterey Jack or Asadero) with a splash of milk and some pickled jalapeños, it makes an incredible, luxurious dip.
2. The Mexican Rice & Beans Combo
For a full, hearty meal, serve these taquitos alongside traditional sides. This transforms them from a simple snack into a complete and satisfying dinner experience for the family. Try pairing them with a simple lime cilantro rice or a quick-cooked batch of black beans seasoned with cumin and garlic. This brings a balanced texture contrast to the crunchy oven-baked chicken taquitos.
3. Side Salad Pairing
To lighten things up, or when Emily and I are looking for a fresher taste, we serve these with a crispy, simple salad. A Southwestern Chopped Salad with corn, black beans, red onion, and a light lime vinaigrette is the perfect complement. It adds necessary freshness and greens to the plate, making the meal feel more balanced.
4. Soup & Taquitos: The Ultimate Comfort Pairing
For chilly nights, I love pairing these crispy treats with a warm, comforting bowl of soup, such as the Slow Cooker Chicken Taco Soup. The crunch of the taquito dipped into the brothy, flavorful soup is a perfect textural contrast and really harks back to that sense of comfort food I associate with my childhood.
Crunchy Oven-Baked Chicken Taquitos Storage & Reheating
One of the best things about making Oven Baked Chicken Taquitos is how well they store. They are designed for meal-prepping, freezing, and rapid reheating, ensuring you can enjoy that delicious filling (and the crunch!) days later.
Storing Cooked Taquitos
Allow the remaining taquitos to cool completely to room temperature. This is crucial; if you put hot taquitos in a container, the steam will make them soggy. Place them in an airtight container lined with a piece of paper towel, separating layers with more paper towel if necessary. Store in the refrigerator for up to 3–4 days.
Freezing Taquitos (Baked or Unbaked)
These are fantastic prepared as baked chicken taquitos freezer friendly. You can freeze them either pre-baked or post-baked.
- Unbaked: Assemble the taquitos and place them in a single layer on a baking sheet. Flash-freeze for 1 hour until firm, then transfer to a freezer-safe bag or container. They will last for up to 3 months. When ready to eat, lightly oil and bake them straight from frozen, adding an additional 5–10 minutes to the baking time.
- Baked: Cool the taquitos completely, then flash-freeze and store.
Reheating for Maximum Crunch
Do NOT use the microwave if you want the crunch back. The microwave will turn your taquitos into sad, floppy things.
- Best Method (Air Fryer): I use the air fryer every single time. Reheat at 350°F (175°C) for 3–5 minutes until warm and crispy again.
- Oven Method: Reheat on a baking sheet at 400°F (200°C) for 8–10 minutes. The high, dry heat restores the texture, leaving you with wonderfully crispy taquitos.
I found a great resource on the science of achieving ultimate crispiness in baked taquitos over at Bellyfull.net, which emphasizes the moisture control in the filling.
FAQ about Crunchy Oven-Baked Chicken Taquitos
Q1: Can I make these easy shredded chicken taquitos baked not fried, using flour tortillas instead of corn?
Absolutely! I often use flour tortillas when I need an even softer filling-to-shell ratio. They are much easier to roll than corn tortillas and rarely require extensive warming to prevent cracking. However, for maximum Crispy Baked Chicken Taquitos flavor, the corn tortilla provides a more authentic, deep crunch. If you use flour, ensure you brush generously with oil and bake until very golden brown.
Q2: Why did my taquitos crack, and how do I prevent this?
Cracking is almost always an issue with corn tortilla chicken taquitos oven preparation. Corn tortillas are drier and less pliable than flour. The key is to introduce moisture and heat. You must wrap them in a damp paper towel and microwave them for at least 30 seconds until they are hot and steamy. This steam makes them flexible enough to roll. Also, ensure your filling is moist (thanks to the cream cheese!) but not watery.
Q3: What kind of shredded chicken works best for this taquitos recipe?
Any pre-cooked, plain, shredded chicken works. As mentioned, rotisserie chicken taquitos baked are the easiest and fastest choice. You can also boil or pressure cook chicken breasts. We prefer white meat, but dark meat will yield an even richer, moister filling if that is your preference. The goal is easy, tender chicken that mixes well with the cream cheese and spices.
Q4: How important is the oil/cooking spray to make these truly crispy?
It is vital! Without a little fat on the surface, the tortillas dry out and become brittle, but they won’t achieve that satisfying golden-brown blistered texture you expect from Oven Baked Chicken Taquitos. A light, even coating of oil is what mimics the result of frying, delivering crunchy taquitos without the mess or extra calories. You can also check out this great guide on Iwashyoudry for more tips on baking for crispiness.
Q5: Can I prepare these baked chicken taquitos with cream cheese ahead of time for a party?
Yes, prepping ahead is highly recommended! You can prepare the filling entirely up to two days ahead and keep it stored in the fridge. You can even assemble the unbaked taquitos, cover them tightly, and refrigerate them overnight. When your guests arrive, simply brush with oil and bake! This is the perfect way to manage party prep stress. If you need other great family-friendly baked chicken dishes, try my Creamy Cajun Chicken Pasta.
Final Thoughts
Cooking isn’t just about food, it’s about making people happy. When I see Jana grab her third taquito and Adams praise the ‘next-level crunch,’ I know I’ve done my job. These Crunchy Oven-Baked Chicken Taquitos are more than a filling dinner, they are a moment of connection, a simple, delicious way to bring everyone around the table for a few precious minutes. This recipe embodies comfort food that doesn’t burden you with hours of cooking or deep-frying clean-up. It’s flavor, it’s crunch, it’s everything we want in an easy weeknight dinner.
I hope your family loves this one as much as mine does. Don’t forget to save this recipe on Pinterest for your next Tex-Mex night, leave a comment below telling me your favorite topping, and subscribe to MisterRecipes.com for more wholesome, family-tested meals.

Crunchy Oven-Baked Chicken Taquitos
Ingredients
Equipment
Method
- Preheat your oven to 425°F (220°C). Line a large baking sheet with parchment paper for easy cleanup.
- In a large mixing bowl, combine the shredded chicken, softened cream cheese, shredded cheese, salsa, cilantro (if using), diced green chiles (if using), cumin, chili powder, onion powder, garlic powder, salt, and pepper. Mix thoroughly until the cream cheese is fully distributed and everything is well combined.
- Wrap the stack of tortillas loosely in a damp paper towel and microwave them for 30-60 seconds until they are hot and flexible. Alternatively, heat them in a dry skillet for 10 seconds per side. This is crucial for corn tortillas to prevent cracking.
- Lay out one warmed tortilla on a flat surface. Place about 2 generous tablespoons of the chicken mixture in a line slightly off-center. Roll it up tightly towards the filling, like a cigar. Place seam-side down on the prepared baking sheet. Repeat with remaining tortillas and filling.
- Lightly brush the tops and sides of the taquitos with olive oil or spray with cooking spray. Bake for 12-18 minutes, flipping halfway through, until golden brown and crispy.
- Remove from the oven and serve immediately with your favorite dips like salsa, guacamole, or sour cream.