Did you know that a homemade gift can feel more personal and cherished than almost any store bought item? It’s true! There’s a special kind of magic that happens when you create something with your own hands, especially for someone you love. I still remember the look on my wife Emily’s face when I baked her first birthday cake after we got married. It wasn’t perfect, but it was made with love, and that’s a memory we both treasure. This year, I want to help you create that same magic for the most important woman in your life. With this Mother’s Day Pink Velvet Cake recipe, we’re not just baking a dessert; we’re crafting a beautiful, delicious symbol of appreciation. It’s more than a cake; it’s a centerpiece for your celebration, a conversation starter, and a sweet, tangible way to say, “I love you, Mom.” This recipe is designed to be straightforward, even if you’re not a seasoned baker. I believe that anyone can create a showstopping cake, and I’m here to walk you through every step. So, let’s roll up our sleeves and bake a memory together.
Why You’ll Love This Mother’s Day Pink Velvet Cake
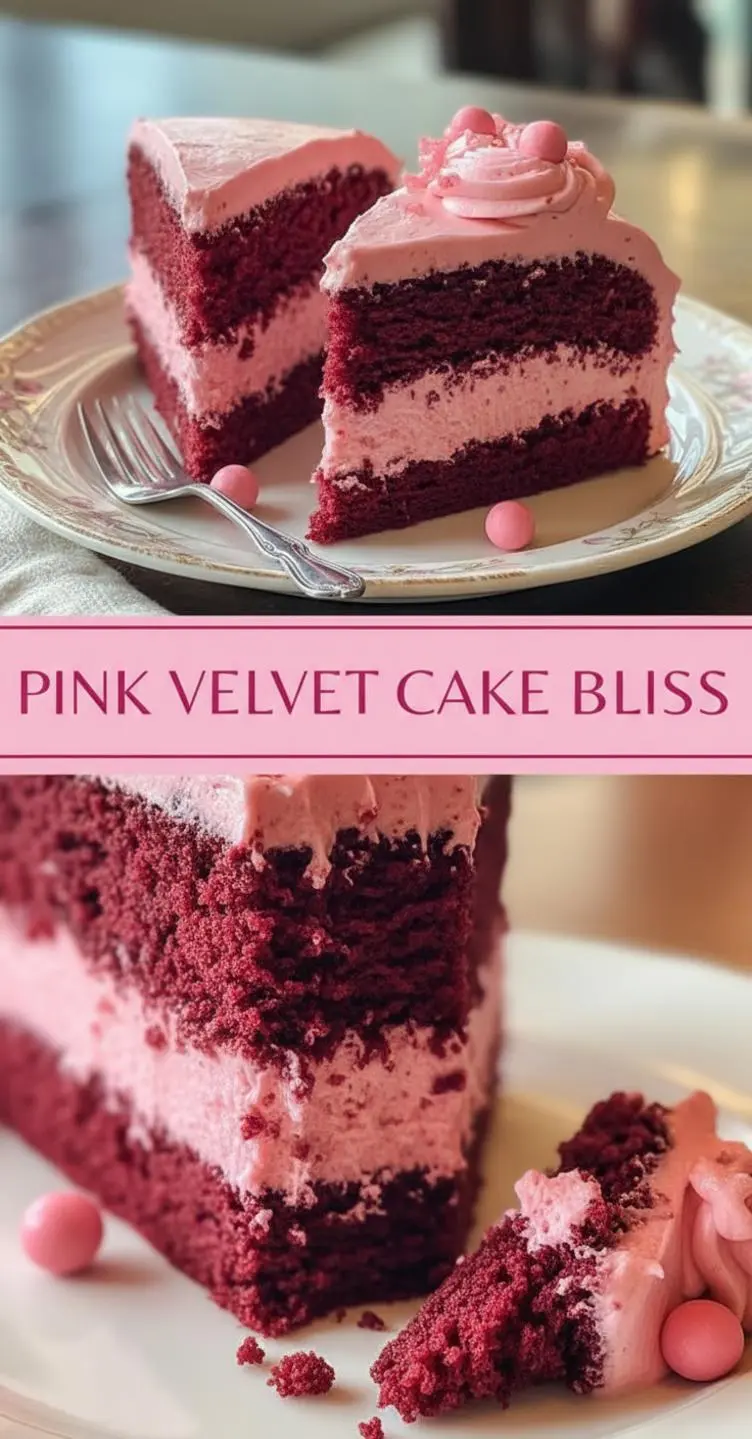
This isn’t just another cake recipe. This is a recipe designed to make your Mother’s Day celebration truly special and stress free. I’ve poured all my love for family baking into this one, ensuring it’s not only breathtakingly beautiful but also incredibly delicious and easy to make. It has a wonderfully soft, moist crumb and that classic, tangy flavor you expect from a velvet cake, but with a lovely pink twist that’s perfect for the occasion. It’s a forgiving recipe, ideal for bakers of all skill levels who want to present a genuinely impressive homemade cake. Similar to the beloved red velvet, this pink version offers a subtle hint of chocolate and a smooth vanilla aroma that pairs perfectly with the rich cream cheese frosting. Many bakers have their own take on this classic, with some wonderful versions out there like this Pink Velvet Cake from The Recipe Critic that also celebrates its vibrant color and tender texture. Here’s why this particular recipe will become your go to for celebrating Mom:
- Visually Stunning: The soft pink hue of the cake layers contrasted with the bright white cream cheese frosting makes for an absolutely gorgeous dessert. It’s an edible work of art that says “special occasion” the moment you see it, and it looks fantastic on any dessert table.
- Incredibly Moist & Flavorful: The combination of buttermilk, a touch of cocoa powder, and vinegar creates a tender, velvety crumb that is simply irresistible. This isn’t a dry, crumbly cake; each bite is perfectly moist and melts in your mouth with a slight tang that balances the sweetness.
- Surprisingly Simple to Make: While it looks like it came from a high end bakery, the steps are straightforward and easy to follow. I’ve broken everything down so that even beginner bakers can feel confident and create a masterpiece without stress. You don’t need any professional equipment, just a love for baking.
- The Perfect Cream Cheese Frosting: Let’s be honest, a velvet cake is only as good as its frosting. This recipe includes my foolproof cream cheese frosting that is the perfect blend of tangy, sweet, and creamy. It’s stable enough for layering and decorating but light enough that it doesn’t overpower the cake itself.
- Customizable for Mom: This cake is a perfect canvas for decoration. You can top it with fresh berries, edible flowers, or even some decorative Pink Chocolate Dipped Strawberries to make it even more personal and special for your mom.
Ingredients for Mother’s Day Pink Velvet Cake
For the Pink Velvet Cake:
- 2 1/2 cups all purpose flour
- 1 1/2 cups granulated sugar
- 1 teaspoon baking soda
- 1 tablespoon unsweetened cocoa powder
- 1/2 teaspoon salt
- 2 large eggs, at room temperature
- 1 1/2 cups vegetable oil
- 1 cup buttermilk, at room temperature
- 1 tablespoon white vinegar
- 2 teaspoons vanilla extract
- 1-2 teaspoons pink or red food coloring (gel preferred)
For the Cream Cheese Frosting:
- 16 ounces cream cheese, softened
- 1 cup unsalted butter, softened
- 4 cups powdered sugar, sifted
- 2 teaspoons vanilla extract
- 1/4 teaspoon salt
Substitutions: If you don’t have buttermilk, you can easily make your own! Just add 1 tablespoon of lemon juice or white vinegar to 1 cup of regular milk and let it sit for 5-10 minutes.

How to Make Mother’s Day Pink Velvet Cake
Step by Step Instructions
For the Cake Layers:
- Preparation: First things first, preheat your oven to 350°F (175°C). Grease and flour two 9 inch round cake pans. I also like to place a parchment paper circle on the bottom of each pan to guarantee the cakes come out cleanly.
- Combine Dry Ingredients: In a large bowl, whisk together the all purpose flour, granulated sugar, baking soda, cocoa powder, and salt. Whisking helps to aerate the flour and break up any lumps, which is key for a light cake.
- Combine Wet Ingredients: In a separate medium bowl, whisk together the eggs, vegetable oil, buttermilk, white vinegar, and vanilla extract until well combined.
- Add Food Coloring: Add your pink food coloring to the wet ingredients. I recommend using gel food coloring as it provides a vibrant color without adding too much extra liquid. Start with a small amount and add more until you reach your desired shade of pink.
- Mix Batter: Pour the wet ingredients into the dry ingredients. Mix with a spatula or on a low speed with an electric mixer until just combined. Be careful not to overmix! Overmixing can lead to a tough, dense cake, and we want a light, velvety texture. Stop as soon as you no longer see streaks of flour.
- Bake the Cakes: Divide the batter evenly between your two prepared pans. Bake for 30 to 35 minutes, or until a wooden skewer inserted into the center of the cakes comes out clean.
- Cool Completely: Let the cakes cool in the pans for about 15 minutes before inverting them onto a wire rack to cool completely. It is very important that the cakes are fully cooled before you try to frost them, otherwise, the frosting will melt right off.
For the Cream Cheese Frosting & Assembly:
- Beat Cream Cheese and Butter: In a large mixing bowl, use an electric mixer to beat the softened cream cheese and softened butter together on medium high speed until smooth and creamy, about 2-3 minutes.
- Add Sugar and Vanilla: Reduce the mixer speed to low and gradually add the sifted powdered sugar. Once it’s mostly incorporated, add the vanilla extract and salt.
- Whip Until Fluffy: Increase the mixer speed to medium high and beat for another 2-3 minutes until the frosting is light, fluffy, and smooth.
- Assemble the Cake: Place one of the cooled cake layers on your serving plate or cake stand. Spread about 1 to 1.5 cups of frosting evenly over the top. Place the second cake layer on top.
- Frost the Cake: Use the remaining frosting to cover the top and sides of the cake. For a beautiful, rustic look, you can use the back of a spoon to create lovely swirls. For a sharper finish, a crumb coat is a great idea. Just apply a thin layer of frosting all over and chill for 30 minutes before the final layer. For another great tutorial on getting that perfect velvet texture, check out this guide from All Things Mamma.
- Decorate and Chill: Decorate your cake with fresh berries, sprinkles, or edible flowers. I suggest chilling the cake for at least 30 minutes before slicing. This helps the frosting set and makes for cleaner slices.
Pro Tips & Variations
After making this cake for countless family gatherings, I’ve picked up a few tricks to ensure it comes out perfectly every single time. Here are my best tips for success, plus a few fun variations to make the recipe your own.
- Room Temperature Ingredients are Key: I cannot stress this enough! Using room temperature eggs, buttermilk, butter, and cream cheese is crucial for a smooth batter and a creamy, lump free frosting. It helps all the ingredients emulsify properly, which results in a more uniform texture in your final cake.
- Do Not Overmix the Batter: To get that signature “velvet” crumb, you need to be gentle when mixing. Mix the wet and dry ingredients only until they are just combined. A few small lumps are perfectly fine. Overmixing develops the gluten in the flour, which will make your cake tough and dense instead of soft and tender.
- The Magic of a Crumb Coat: If you want a pristine, professional looking cake with no crumbs in the final layer of frosting, a crumb coat is your best friend. After assembling the layers, apply a very thin layer of frosting all over the cake to trap any loose crumbs. Refrigerate the cake for about 30 minutes until the frosting is firm, and then apply your final, beautiful layer.
- Sift Your Dry Ingredients: This includes the flour, cocoa powder, AND powdered sugar for the frosting. Sifting aerates the ingredients and removes any lumps, ensuring a super smooth cake batter and a silky frosting. It’s a small step that makes a big difference. For a fun decorative topping, you could even crumble some Soft and Chewy Pink Velvet Sugar Cookies over the top.
Variations:
- Raspberry Pink Velvet Cake: Add a layer of raspberry jam between the cake layers for a delicious fruity tang that complements the pink theme beautifully. You can also add a ½ cup of fresh raspberries into the batter.
- Gluten Free Version: To make this cake gluten free, simply substitute the all purpose flour with a high quality, 1 to 1 gluten free baking flour blend. Ensure your blend contains xanthan gum for the best structure.
- Add a Heart Surprise: For an extra special touch, you can make a small batch of a more deeply colored pink cake, crumble it up, and mix it with a bit of frosting to make cake pop dough. Shape it into a log, freeze it, and place it in the center of your cake batter before baking to create a heart shape in every slice. You can find a similar fun idea in my Vintage Heart Lambeth Cake tutorial.
Serving Suggestions
This Mother’s Day Pink Velvet Cake is a true showstopper and stands beautifully on its own, but pairing it with the right accompaniments can elevate the entire experience. When I bake this for my family, especially for a celebration, I love to create a full dessert spread that makes the moment feel even more special. The cake’s subtle vanilla and cocoa notes, along with the tangy cream cheese frosting, make it wonderfully versatile. A simple cup of freshly brewed coffee or a fragrant Earl Grey tea is a classic pairing that never fails. The warmth and slight bitterness of the beverage cut through the sweetness of the cake, creating a perfect balance.
For a truly celebratory feel, especially for Mother’s Day brunch, why not serve a slice with a glass of chilled Prosecco or a sparkling rosé? The bubbles and crisp acidity of the wine provide a delightful contrast to the rich, moist cake. If you want to add more texture and freshness to the plate, a small handful of fresh berries like raspberries, strawberries, or even blueberries works wonders. Their natural tartness complements the cake beautifully and adds a pop of vibrant color. For an extra touch of elegance and a fun project with the kids, you can serve it alongside some beautiful Pink Chocolate Dipped Strawberries. The combination of creamy cake and juicy, chocolate covered fruit is absolutely divine and feels extra luxurious.
Storage & Reheating for Mother’s Day Pink Velvet Cake
Proper storage is key to keeping your beautiful cake fresh and delicious. If you have any leftover cake (which is rare in my house!), you can store it in an airtight container in the refrigerator for up to 4 to 5 days. The cream cheese frosting needs to be kept chilled. I actually think the cake tastes even better the next day, as the flavors have time to meld together.
When you’re ready to serve, I recommend taking the cake out of the refrigerator about 30 to 60 minutes beforehand. Allowing it to come to room temperature really brings back the soft, velvety texture of the cake and the creamy consistency of the frosting. A cold cake can taste dense and muted.
If you want to freeze the cake, it’s best to do so before frosting. Wrap the completely cooled cake layers individually and tightly in plastic wrap, then a layer of aluminum foil. They can be frozen for up to 2 months. When you’re ready to assemble, thaw the layers at room temperature before frosting and serving. You can also freeze individual slices the same way for a quick and easy future treat!
FAQ about Mother’s Day Pink Velvet Cake
- What is the flavor of pink velvet cake?
- Pink velvet cake has a flavor profile that is very similar to red velvet cake. The primary flavors are a subtle tang from the buttermilk and vinegar, a hint of chocolate from the cocoa powder, and a rich, sweet vanilla undertone. The dominant flavor, however, is the tangy and sweet cream cheese frosting, which is the classic pairing.
- Can I make this Mother’s Day Pink Velvet Cake ahead of time?
- Absolutely! This is a great cake to make in advance, which helps reduce stress on the day of the celebration. You can bake the cake layers up to two days ahead. Allow them to cool completely, then wrap them tightly in plastic wrap and store them at room temperature. The frosting can also be made a day or two ahead and stored in an airtight container in the refrigerator. You can assemble and frost the cake the day before serving for the best flavor and texture.
- What is the difference between red velvet and pink velvet cake?
- The main difference is simply the color! Both cakes use the same base ingredients: buttermilk, vinegar, and a small amount of cocoa powder, which creates the signature “velvet” texture. Red velvet traditionally uses red food coloring, while pink velvet uses pink. The flavor is virtually identical. Think of a pink velvet as a fun, creative twist on the classic red velvet, perfect for occasions like Mother’s Day, birthdays, or Valentine’s Day. For another fun sandwich cookie idea that could be adapted for mom, check out these Valentine Cookie Sandwiches.
- My cake came out dry. What did I do wrong?
- There are a few common reasons for a dry cake. The most likely culprit is overbaking. Be sure to check for doneness with a skewer a minute or two before the recipe says to. The second reason could be measuring the flour incorrectly. Be sure to spoon your flour into the measuring cup and level it off, rather than scooping it directly from the bag, which can compact it. Finally, don’t overmix your batter once you combine the wet and dry ingredients, as this can create a tough, dense crumb.
Final Thoughts on Mother’s Day Pink Velvet Cake
Baking for someone you love is one of the greatest joys in life. This Mother’s Day Pink Velvet Cake is more than just a recipe; it’s an opportunity to create a beautiful, heartfelt gift that will be the centerpiece of your celebration. Every time I bake this cake, I’m reminded of my own grandmother’s advice: “Cooking isn’t just about food, Ben. It’s about making people happy.” And this cake is pure happiness.
I hope you and your family love this recipe as much as mine does. If you make it, I would be thrilled to see how it turns out! Please leave a comment below and let me know what you think, or tag me on social media. Your feedback and creations truly make my day.
Don’t forget to save this recipe to your favorite Pinterest board so you can easily find it for the next special occasion! And if you haven’t already, be sure to subscribe to the Mister Recipes newsletter for more family friendly recipes, kitchen tips, and stories delivered straight to your inbox. Happy baking!
Mother's Day Pink Velvet Cake
Ingredients
Equipment
Method
- Preheat your oven to 350°F (175°C). Grease and flour two 9-inch round cake pans. Place a parchment paper circle on the bottom of each pan.
- In a large bowl, whisk together the all-purpose flour, granulated sugar, baking soda, cocoa powder, and salt.
- In a separate medium bowl, whisk together the eggs, vegetable oil, buttermilk, white vinegar, and vanilla extract until well combined.
- Add your pink food coloring to the wet ingredients. Use gel food coloring for vibrant color; start with a small amount and add more to reach desired pink shade.
- Pour the wet ingredients into the dry ingredients. Mix with a spatula or on low speed with an electric mixer until just combined. Do not overmix.
- Divide the batter evenly between the prepared pans. Bake for 30 to 35 minutes, or until a wooden skewer inserted into the center comes out clean.
- Let the cakes cool in the pans for about 15 minutes before inverting onto a wire rack to cool completely.
- In a large mixing bowl, use an electric mixer to beat the softened cream cheese and softened butter together on medium-high speed until smooth and creamy, about 2-3 minutes.
- Reduce the mixer speed to low and gradually add the sifted powdered sugar. Once mostly incorporated, add the vanilla extract and salt.
- Increase the mixer speed to medium-high and beat for another 2-3 minutes until the frosting is light, fluffy, and smooth.
- Place one cooled cake layer on your serving plate. Spread about 1 to 1.5 cups of frosting evenly over the top. Place the second cake layer on top.
- Use the remaining frosting to cover the top and sides of the cake. For a rustic look, create swirls with the back of a spoon. For a sharp finish, apply a crumb coat first.
- Decorate with fresh berries, sprinkles, or edible flowers. Chill for at least 30 minutes before slicing.