Introduction
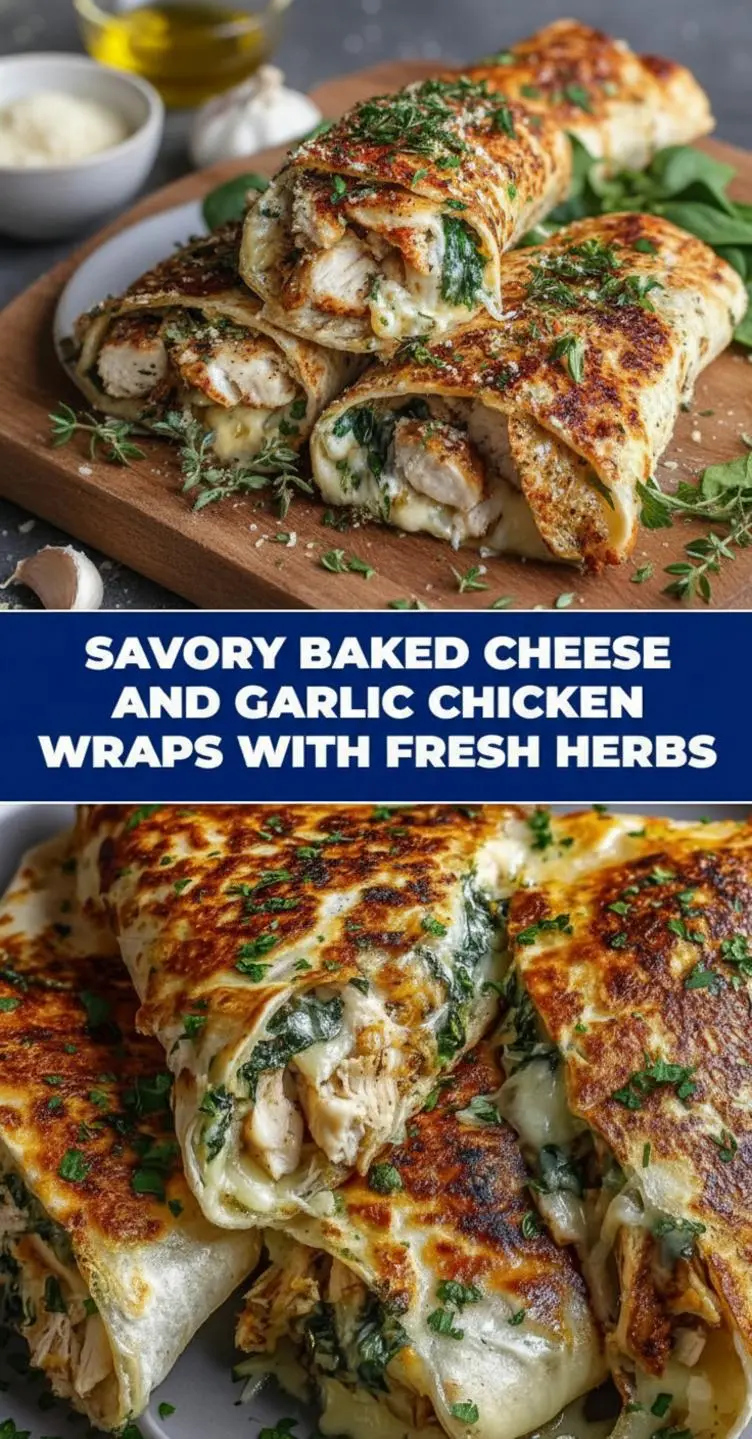
Have you ever wondered if it’s possible to create a restaurant quality meal in under 30 minutes that your whole family will devour? In our busy lives, the dream of a quick, delicious, and satisfying dinner often feels just out of reach. We juggle work, school runs, and everything in between, often resorting to the same tired meals. But what if I told you that a dish bursting with savory garlic, melted cheese, and tender chicken was not only possible but incredibly simple? Today, I’m sharing my recipe for Baked Cheese and Garlic Chicken Wraps with Fresh Herbs. This isn’t just another weeknight meal; it’s a game changer. It’s the kind of dish that brings everyone to the table, eager for that first cheesy, flavorful bite. It combines the comfort of a warm, baked wrap with the vibrant freshness of herbs, creating a truly memorable experience. This recipe proves that you don’t need hours in the kitchen to make something special. It’s about smart techniques and flavor combinations that deliver maximum impact with minimal effort.
Why You’ll Love This Baked Cheese and Garlic Chicken Wraps with Fresh Herbs
This recipe has quickly become a favorite in my house, and I’m confident it will in yours too. When Emily and the kids tried these for the first time, the unanimous verdict was, “Dad, you have to make these again!” It’s that perfect blend of comforting and fresh that makes them so irresistible. Here’s why you’re going to fall in love with these cheesy garlic chicken wraps.
- Incredibly Quick and Easy: This is a true easy weeknight dinner. From start to finish, you can have these wraps on the table in under 30 minutes, making it perfect for those hectic evenings when you’re short on time but still want a home cooked meal.
- Bursting with Flavor: The combination of savory garlic butter, melted mozzarella and cheddar, tender chicken, and a pop of fresh herbs creates a symphony of flavors. It’s a sophisticated taste that even the pickiest eaters will appreciate. It reminds me of the delicious flavors in our Garlic Butter Chicken Bites.
- Family Friendly Meal: Kids and adults alike go crazy for these wraps. They are customizable, so everyone can add their favorite fillings. It’s a fun, hands on meal that gets the whole family involved and excited about dinner.
- Perfectly Portioned & Great for Leftovers: Each wrap is a complete meal. They are satisfying without being too heavy. Plus, they store and reheat beautifully, making them a fantastic option for lunch the next day. No more sad desk lunches!
- Endlessly Customizable: Think of this recipe as a starting point. You can switch up the cheeses, add different vegetables like spinach or bell peppers, or even use a different protein. It’s a versatile recipe that you can adapt to what you have on hand. For another cheesy favorite, check out these Chicken Mozzarella Wraps.
Ingredients for Baked Cheese and Garlic Chicken Wraps with Fresh Herbs
- 2 cups cooked, shredded chicken (rotisserie chicken works great!)
- 8 large flour tortillas
- 1 cup shredded mozzarella cheese
- 1 cup shredded cheddar cheese
- 4 tablespoons unsalted butter, melted
- 3 cloves garlic, minced
- 2 tablespoons chopped fresh parsley
- 1 tablespoon chopped fresh chives
- 1/2 teaspoon garlic powder
- Salt and freshly ground black pepper to taste
Substitutions:
- Chicken: You can use leftover grilled chicken, or quickly sauté some chicken breasts. For a different flavor, try shredded turkey or even pulled pork.
- Cheese: Feel free to use any good melting cheese like Provolone, Monterey Jack, or a Swiss blend.
- Herbs: If you don’t have fresh herbs, you can use 2 teaspoons of dried parsley and 1 teaspoon of dried chives. Fresh basil or dill would also be delicious additions.
- Tortillas: Low carb or whole wheat tortillas work well too. Just be sure to warm them slightly to make them more pliable before rolling.

How to Make Baked Cheese and Garlic Chicken Wraps with Fresh Herbs
Step-by-Step Instructions
Making this chicken wraps recipe is straightforward and perfect for a quick dinner. I love getting the kids involved in assembling their own; it’s a great way to spend time together in the kitchen. Similar to how other great home cooks prepare it, as seen in this cheesy garlic wrap recipe, we will focus on simple steps for a delicious outcome.
- Preheat and Prepare: First, preheat your oven to 400°F (200°C). Lightly grease a baking sheet or line it with parchment paper for easy cleanup. This ensures the wraps get crispy and don’t stick.
- Mix the Garlic Butter: In a small bowl, combine the melted butter, minced garlic, chopped parsley, chopped chives, and garlic powder. Stir it all together. This garlic herb butter is the secret weapon that makes these wraps so flavorful and aromatic. The smell alone is incredible!
- Warm the Tortillas: Briefly warm the tortillas in the microwave for about 20 a 30 seconds. This makes them soft and pliable, which prevents them from cracking when you roll them. It’s a small step that makes a big difference.
- Assemble the Wraps: Lay a tortilla flat. Sprinkle a generous amount of shredded mozzarella and cheddar cheese down the center. Add a portion of the shredded chicken on top of the cheese. Season lightly with salt and pepper.
- Roll Them Up: Tightly roll up the tortilla, tucking in the sides as you go to create a secure burrito style wrap. Place it seam side down on the prepared baking sheet. Repeat this process with the remaining tortillas and fillings.
- Brush with Garlic Butter: Once all the wraps are on the baking sheet, generously brush the tops and sides of each wrap with the garlic herb butter mixture. Make sure to get it into all the nooks and crannies. This not only adds immense flavor but also helps the outside get golden brown and crispy.
- Bake to Perfection: Place the baking sheet in the preheated oven. Bake for 12 to 15 minutes, or until the wraps are golden brown and crispy and the cheese inside is completely melted and gooey. You’ll know they’re ready when your kitchen smells absolutely divine!
- Serve Immediately: Let the wraps cool for a minute or two before serving, as the filling will be very hot. Slice them in half diagonally for a beautiful presentation and enjoy the cheesy pull!
Pro Tips & Variations
As a home cook, I’m all about finding little tricks to make a great recipe even better. Here are some tips and variations to help you master these Baked Cheese and Garlic Chicken Wraps with Fresh Herbs and make them your own.
Pro Tips:
- Don’t Overfill the Wraps: It’s tempting to stuff as much filling in as possible, but this can cause the wraps to burst open while baking. A good rule of thumb is to leave about an inch border around the edges.
- Use Room Temperature Cheese: Allowing your shredded cheese to sit out for about 15 minutes before assembling helps it melt more evenly and quickly in the oven, resulting in that perfect cheesy garlic chicken experience.
- Get a Crispier Exterior: For an extra crispy finish, switch your oven to the broil setting for the last 1 to 2 minutes of cooking. Keep a very close eye on them to prevent burning! The tops will get beautifully browned and crunchy. You can get more ideas for creating crispy wraps from resources like this cheesy garlic chicken wrap guide.
- Make Ahead Option: You can assemble these wraps ahead of time. Simply prepare them up to the point before brushing with garlic butter, cover tightly, and refrigerate for up to 24 hours. When you’re ready to eat, brush with the butter and bake as directed, adding a few extra minutes to the bake time.
Variations:
- Spicy Chicken Wraps: Add a kick by mixing in a pinch of red pepper flakes with the chicken or adding a few slices of jalapeño inside the wrap. A drizzle of hot sauce in the filling also works wonders.
- Add Veggies: Boost the nutritional value by adding a handful of fresh spinach, sautéed mushrooms, or finely diced bell peppers to the chicken filling. For a delicious twist, try our spinach stuffed chicken filling concept.
- Creamy Garlic Sauce Version: For an even more decadent treat, mix a couple of tablespoons of cream cheese or a creamy garlic sauce into the shredded chicken before assembling. It makes the filling incredibly moist and rich. This is a technique we love in our creamy garlic parmesan chicken pasta.
- Gluten-Free Option: Simply substitute the flour tortillas with your favorite gluten free tortillas. Corn tortillas can also work, though they are best when double layered to prevent breaking.
Serving Suggestions
These Baked Cheese and Garlic Chicken Wraps with Fresh Herbs are fantastic on their own, but pairing them with the right sides can turn a simple meal into a full fledged feast. When I make these for my family, I love to offer a few different options to round out the plate. The savory, cheesy goodness of the wraps pairs beautifully with fresh, tangy, and crunchy textures.
A simple green salad with a light vinaigrette is one of my go to choices. The freshness of the greens and the acidity of the dressing cut through the richness of the cheese and garlic butter, creating a perfect balance. A crisp Caesar salad would also be an excellent choice, echoing the savory notes of the wraps.
For a heartier meal, consider serving these wraps with a side of roasted vegetables. Think broccoli, asparagus, or bell peppers tossed with a little olive oil and seasoning. The sweetness from the roasted veggies complements the savory chicken wonderfully. For a fun and family friendly option, a side of sweet potato fries or classic potato wedges is always a winner. Their crispy texture is a great contrast to the soft, cheesy interior of the wraps.
And let’s not forget about dips! While the wraps are delicious as is, setting out a few dipping sauces adds a fun, interactive element to the meal. A cool and creamy ranch dip, a tangy marinara sauce, or even a simple sour cream and chive dip can elevate the experience. My kids, Adams and Jana, absolutely love having different sauces to choose from. It makes dinnertime feel like a special occasion, even on a busy weeknight.
Storage & Reheating for Baked Cheese and Garlic Chicken Wraps with Fresh Herbs
One of the best things about this recipe is how well the wraps store and reheat, making them perfect for meal prep or for enjoying leftovers. There’s nothing better than knowing a delicious lunch for the next day is already taken care of!
Storing in the Refrigerator:
Once the wraps have cooled completely, you can store them in an airtight container in the refrigerator for up to 3 days. I find that placing a paper towel in the container helps absorb any excess moisture and keeps the tortillas from becoming soggy.
Freezing for Later:
Yes, you can freeze these wraps! To freeze, first let them cool completely. Then, wrap each wrap individually in plastic wrap, and then place them all into a larger freezer safe bag or container. They will keep well in the freezer for up to 2 months. This is a fantastic way to have a quick meal ready to go on those nights when you have no time to cook.
Best Reheating Methods:
The goal when reheating is to get the inside warm and cheesy while keeping the outside crispy. Here are my favorite methods:
- Oven or Toaster Oven (Best Method): This is the best way to maintain that crispy texture. Preheat your oven or toaster oven to 350°F (175°C). Place the wraps on a baking sheet and bake for 10 to 15 minutes, or until heated through and crispy again. If reheating from frozen, add an extra 10 to 15 minutes to the baking time.
- Air Fryer: An air fryer works wonders for reheating these wraps! Place the wrap in the air fryer basket and heat at 350°F (175°C) for 5 to 8 minutes until hot and crispy.
- Microwave (In a Pinch): While not my preferred method as it can make the tortilla soft, the microwave is the quickest option. Place the wrap on a microwave safe plate and heat in 30 second intervals until warmed through. To help it crisp up slightly, you can then pop it in a hot, dry skillet for a minute on each side.
FAQ about Baked Cheese and Garlic Chicken Wraps with Fresh Herbs
Can I use raw chicken for this recipe?
It’s best to use cooked chicken for this recipe to ensure everything heats through evenly in the short baking time. Using raw chicken would require a much longer cooking time, which would likely burn the tortillas. A store bought rotisserie chicken is a perfect shortcut for this easy weeknight dinner.
My tortillas keep cracking when I roll them. What am I doing wrong?
This is a common issue! The key is to make sure your tortillas are warm and pliable before rolling. A quick 20 seconds in the microwave usually does the trick. Also, be careful not to overfill them, as this can put too much pressure on the seam.
Can I make these wraps vegetarian?
Absolutely! For a delicious vegetarian version, you can substitute the chicken with a can of drained and rinsed black beans or chickpeas. A mixture of sautéed mushrooms, onions, and bell peppers also makes a fantastic and hearty filling. This makes it an even more versatile family friendly meal.
What other herbs can I use?
This recipe is great for using up whatever fresh herbs you have on hand. Fresh basil would add a lovely Italian flair, especially if you’re using mozzarella. Cilantro can give it a bit of a Tex Mex twist, and fresh dill would be wonderful with a creamy filling. Don’t be afraid to experiment!
How do I prevent the bottoms of the wraps from getting soggy?
Placing the rolled wraps seam side down on the baking sheet is crucial. Additionally, make sure your baking sheet is properly preheated if you’re placing them directly on it, or use a wire rack on top of the baking sheet to allow air to circulate all around the wrap, ensuring a crispy bottom.
Final Thoughts on Baked Cheese and Garlic Chicken Wraps with Fresh Herbs
There is something truly special about a recipe that is both incredibly simple and amazingly delicious. These Baked Cheese and Garlic Chicken Wraps with Fresh Herbs are a testament to that. They represent everything I love about home cooking: fresh ingredients, comforting flavors, and the joy of sharing a meal with my family. This is more than just a recipe; it’s an invitation to create memories in your own kitchen.
If you make this recipe and love it, I would be so grateful if you would leave a comment and a rating below. Hearing your feedback and seeing your creations truly makes my day! Don’t forget to save this recipe to your favorite Pinterest board so you can find it easily later. And for more simple, delicious, and family friendly recipes, be sure to subscribe to our newsletter. Grab your apron, and let’s get cooking!
Baked Cheese and Garlic Chicken Wraps with Fresh Herbs
Ingredients
Equipment
Method
- Preheat your oven to 400°F (200°C). Lightly grease a baking sheet or line it with parchment paper for easy cleanup.
- In a small bowl, combine the melted butter, minced garlic, chopped parsley, chopped chives, and garlic powder. Stir it all together.
- Briefly warm the tortillas in the microwave for about 20-30 seconds. This makes them soft and pliable.
- Lay a tortilla flat. Sprinkle a generous amount of shredded mozzarella and cheddar cheese down the center. Add a portion of the shredded chicken on top of the cheese. Season lightly with salt and pepper.
- Tightly roll up the tortilla, tucking in the sides as you go to create a secure burrito-style wrap. Place it seam side down on the prepared baking sheet. Repeat with the remaining tortillas and fillings.
- Once all the wraps are on the baking sheet, generously brush the tops and sides of each wrap with the garlic herb butter mixture.
- Place the baking sheet in the preheated oven. Bake for 12 to 15 minutes, or until the wraps are golden brown and crispy, and the cheese inside is completely melted and gooey.
- Let the wraps cool for a minute or two before serving, as the filling will be very hot. Slice them in half diagonally for a beautiful presentation and enjoy!