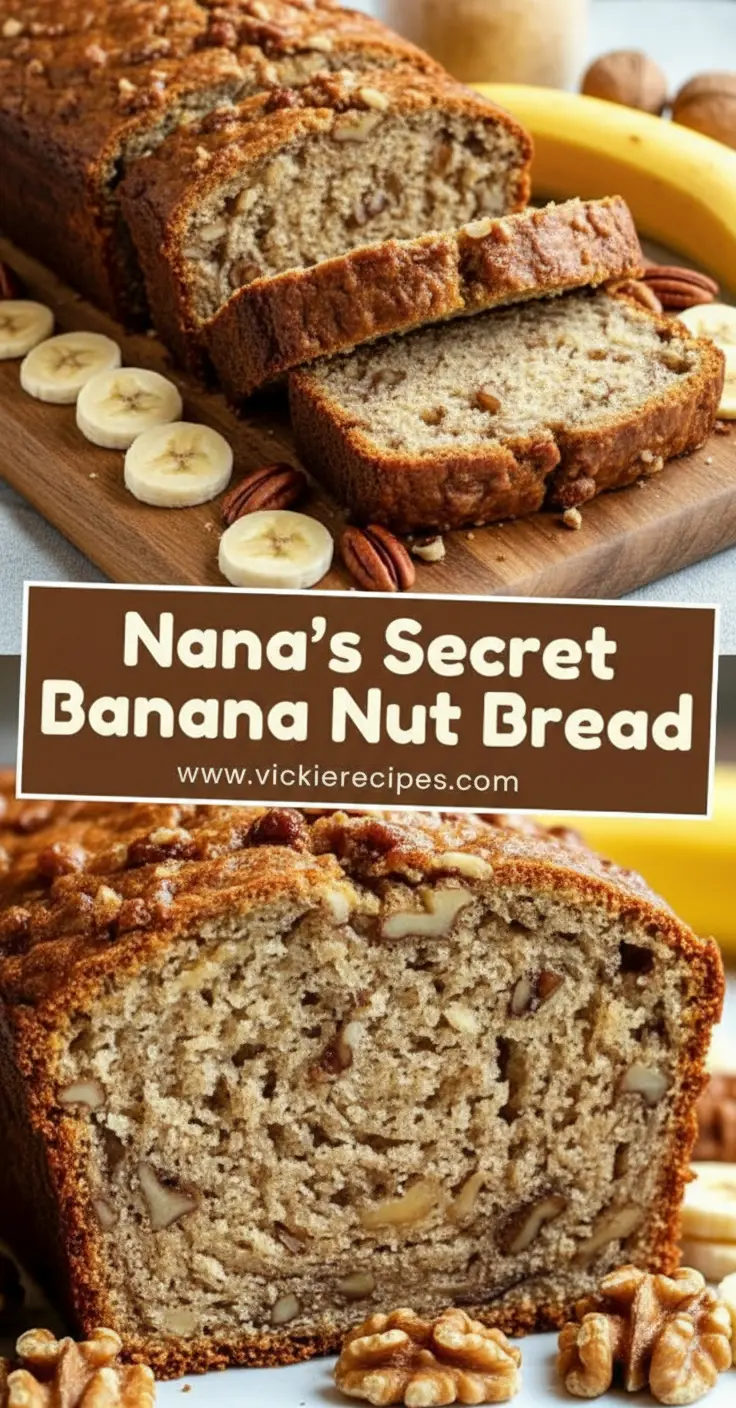
The Scent of Sunday Mornings and Nana’s Secret Banana Nut Bread
The air in our Bend home always feels a little crisper in the mornings, the kind of chill that begs for the oven to be turned on. Last Tuesday, as I watched the steam rise from my coffee, I noticed three overripe bananas sitting on the counter, their skins mottled with those beautiful, sugary leopard spots. My mind drifted immediately to my husband, Ethan Wallace, and the way his face lights up when the house smells like toasted walnuts and caramelizing fruit. This isn’t just any loaf, it is Nana’s Secret Banana Nut Bread, a recipe that has been whispered through generations of our family like a cherished bedtime story. When you are looking for nana’s ultimate moist banana bread recipe, you aren’t just looking for breakfast, you are looking for a slice of comfort that stays with you long after the last crumb is gone.
I remember standing on a yellow step stool in Nana’s kitchen, my small hands sticky with batter. She never used a timer, she cooked by the sound of the silence that falls when a cake is perfectly set. Today, I make this for our two children, teaching them that the best things in life often come from the ingredients we almost threw away. This banana nut bread is the bridge between her kitchen and mine, a testament to the power of a simple, shared meal. Whether you are a seasoned baker or a novice, this grandma’s banana nut bread will become your household’s most requested treat.
Table of Contents
- Why You’ll Love This Nana’s Secret Banana Nut Bread
- Ingredients for Nana’s Secret Banana Nut Bread
- How to Make Nana’s Secret Banana Nut Bread
- Pro Tips & Variations
- Nana’s Secret Banana Nut Bread Serving Suggestions
- Nana’s Secret Banana Nut Bread Storage & Reheating
- FAQ about Nana’s Secret Banana Nut Bread
- Final Thoughts
Why You’ll Love This Nana’s Secret Banana Nut Bread
There is a specific kind of magic in a recipe that requires no fancy equipment and yet delivers 5 star results every single time. You will adore this ultimate moist banana bread because it prioritizes texture and depth of flavor over fussy techniques. First and foremost, it is incredibly kid friendly. My children love helping mash the bananas, a task that feels more like play than kitchen chores. It is the perfect entry point for little ones to learn the rhythm of baking. If you are in a rush, you might also enjoy my 10 Minute Prep Simple Banana Bread, but there is something about Nana’s version that demands a slower pace.
- Sustainable Kitchen Rituals: This recipe is the ultimate way to use ripe bananas that might otherwise end up in the compost. It embraces a minimal waste philosophy that I hold dear in my work at MisterRecipes.
- Texture Excellence: Unlike some heavier loaves, this best banana nut bread features a tight, plush crumb and a distinct crunch from the walnut banana bread topping.
- Emotional Connection: This is family secret banana bread. It carries the weight of history and the lightness of a Sunday morning.
- Versatility: It works as a quick breakfast, a mid afternoon snack with tea, or a decadent dessert when warmed and topped with a scoop of vanilla bean ice cream.
For those who prefer a slightly tangier profile, I often suggest looking at this why sour cream makes the best banana bread guide, but Nana’s secret lies in the specific ratio of fat to fruit, ensuring it never dries out without needing extra dairy.
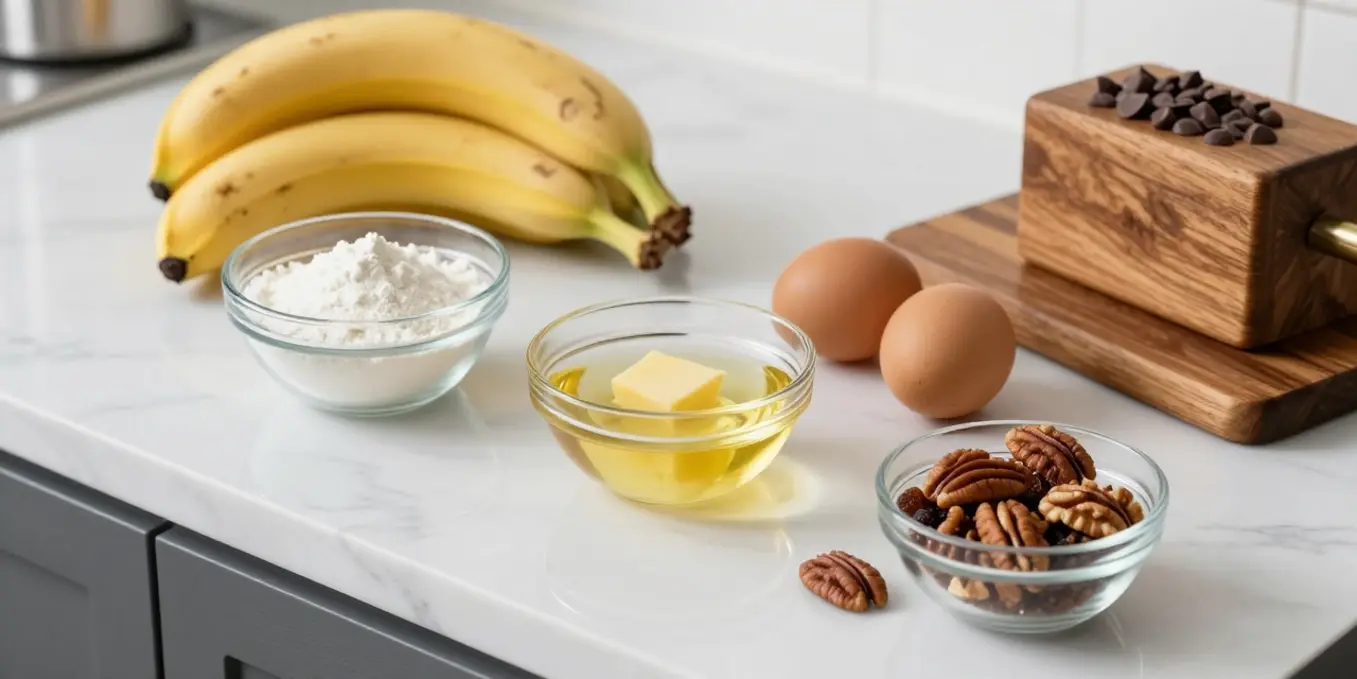
Ingredients for Nana’s Secret Banana Nut Bread
Gathering your ingredients is the first step in the mindfulness of baking. Ensure your ripe bananas are very soft, with plenty of brown speckles. This is where the concentrated sugar lives. This easy banana nut bread with ripe bananas relies on staples you likely already have in your pantry.
- 3 to 4 Extra Ripe Bananas: The darker the skin, the deeper the flavor. Mash them until they are mostly liquid with just a few small chunks for texture.
- 1/2 Cup Melted Butter: Nana always insisted on high quality unsalted butter to control the seasoning. This provides the richness characteristic of a moist banana bread.
- 3/4 Cup Toasted Walnuts or Pecans: I prefer walnuts for their earthy bitterness which balances the sweetness, but pecans are a wonderful, buttery substitute.
- 1 Cup Granulated Sugar: For that classic sweetness. You can substitute half with brown sugar for a deeper, molasses like note.
- 1 Large Egg: Beaten well to provide structure.
- 1 Teaspoon Vanilla Extract: Use the real stuff, it makes an incredible difference in the aromatic profile.
- 1 Teaspoon Baking Soda: The leavening agent that reacts with the bananas to create a lift.
- 1.5 Cups All Purpose Flour: The foundation of the loaf. For a different texture, some of my readers love using pecan streusel topping to add even more height.
- A Pinch of Salt: To brighten all the other flavors.
How to Make Nana’s Secret Banana Nut Bread
Step-by-Step Instructions
Baking should never feel like a race. Take a breath, preheat your oven to 350 degrees Fahrenheit, and grease a 4×8 inch loaf pan with a little butter. There is a specific quietness to the kitchen during this process that I find so therapeutic. This nana’s banana bread is all about the order of operations.
- The Mash: In a large mixing bowl, peel your bananas and mash them with a fork. I like to leave a few small lumps because they turn into little pockets of jammy sweetness during the bake. According to experts at Browneyed Baker, the consistency of the fruit is key to moisture content.
- The Integration: Pour your melted butter directly into the mashed bananas. Stir them together until the mixture is uniform and shimmering. The smell of the warm butter hitting the cold fruit is one of my favorite kitchen moments.
- The Sweetness: Stir in the sugar, the beaten egg, and your vanilla extract. Use a wooden spoon for this. There is something grounding about the weight of a wooden spoon against a ceramic bowl. At this stage, you are building the liquid foundation of your best banana nut bread.
- The Lift: Sprinkle the baking soda and the salt over the wet mixture and stir well. You might see a few tiny bubbles forming, that is the science of the bake beginning its work.
- The Flour: Gently fold in the all purpose flour. This is the most critical part, do not overmix. Overmixing develops gluten which can make the bread tough. Stop just when the last streak of white flour disappears. If you want a more dessert like feel, you could follow the folding technique used in this moist chocolate chip banana bread.
- The Crunch: Fold in your toasted walnuts. I like to save a small handful to sprinkle on the very top of the batter once it is in the pan. It creates a beautiful, rustic crown.
- The Bake: Pour the batter into your prepared loaf pan. Smooth the top with a spatula. Slide it into the center rack of the oven and bake for 50 to 60 minutes. Your kitchen will begin to smell like a warm embrace around the 40 minute mark.
- The Test: Insert a toothpick into the center of the loaf. If it comes out clean or with just a couple of dry crumbs, it is ready. Let it cool in the pan for at least 10 minutes before transferring it to a wire rack. This patience ensures the internal steam settles, keeping it a moist banana bread.
Pro Tips & Variations
Every kitchen is unique, and while Nana’s recipe is perfection to me, I encourage you to make it your own. Finding connection, not perfection, is the goal. Here are a few ways to pivot based on what you have in your cupboards.
- The Ripeness Hack: If your bananas are yellow and you can’t wait, bake them in their skins at 300 degrees for 15 minutes until they turn black and soft. This mimics the natural ripening process.
- The Nut Swap: While this is a banana nut bread, I recognize that allergies or preferences vary. You can easily omit the nuts or substitute them with sunflower seeds or even dried cranberries for a tart pop of flavor.
- Add a Spice Profile: Nana kept it simple, but Ethan loves it when I add half a teaspoon of ground cinnamon and a pinch of nutmeg. It gives it a seasonal, autumnal warmth that feels very Bend, Oregon.
- Dietary Adjustments: For a gluten free version, a high quality measure for measure gluten free flour blend works remarkably well here. If you are looking for a dairy free option, substitute the butter with melted coconut oil. The ripe bananas provide enough moisture to carry these changes seamlessly.
- Mini Loaves: Sometimes I use this batter to make smaller portions for the kids’ school lunches. Just reduce the bake time to about 20 to 25 minutes. You can also see my adorable mini banana bread loaves recipe for more inspiration.
Nana’s Secret Banana Nut Bread Serving Suggestions
Eating a slice of nana’s recipe is an event in itself, but how you serve it can elevate the experience. For a quiet breakfast, I love a thick slice toasted until the edges are golden and crisp, topped with a generous smear of salted butter. The way the butter pools in the nooks of the walnuts is pure sensory bliss.
If we are hosting friends, I might serve this alongside a platter of fresh seasonal berries and a dollop of honey sweetened Greek yogurt. It balances the richness of the walnut banana bread with a bright acidity. For a truly indulgent weekend treat, try using thick slices of this bread to make French toast. Dip them in a spiced egg wash and fry them until caramelized. It is a revelation. For more serving ideas, check out the recommendations at Kelly Stilwell’s blog regarding traditional pairings.
Nana’s Secret Banana Nut Bread Storage & Reheating
This bread actually tastes better the second day as the flavors have time to marry and the moisture redistributes. To store, wrap the cooled loaf tightly in plastic wrap or parchment paper. It will stay moist on the counter for up to 3 days or in the refrigerator for up to a week.
Freezing: This is a wonderful recipe for meal prep. I often bake two loaves at once, freezing one for a busy morning. Wrap the loaf in plastic wrap and then a layer of aluminum foil. It will keep beautifully for up to 3 months. To reheat, thaw at room temperature or warm individual slices in a toaster oven for that freshly baked texture.
FAQ about Nana’s Secret Banana Nut Bread
How do I ensure my banana bread is always moist?
The secret to nana’s ultimate moist banana bread recipe is the ratio of fruit to flour. Using exactly 3 to 4 large bananas ensures enough hydration. Also, be careful not to overbake, use the toothpick test at 50 minutes to be safe.
Can I use frozen bananas for this recipe?
Absolutely. Many of my ripe bananas banana bread batches start with frozen fruit. Just thaw them completely in a bowl and include all the liquid that releases, it contains concentrated sugars and flavor.
What makes this Nana’s “Secret” recipe?
The secret isn’t a complex ingredient, it is the method of mixing the butter with the bananas first. Most recipes cream butter and sugar, but Nana’s way coats the fruit in fat, creating a silkier, more consistent family secret banana bread.
Final Thoughts
As I sit here finished with another loaf, the house still holding onto the scent of vanilla and toasted nuts, I am reminded that cooking is our most basic form of care. This Nana’s Secret Banana Nut Bread isn’t just a recipe, it is a piece of my history that I am honored to share with you. In the busy rush of our modern lives, taking an hour to turn bruised fruit into something beautiful is a small, necessary act of gratitude. I hope this bread brings as much warmth to your table as it does to mine with Ethan and the kids. Please, stay a while, leave a comment below about your own family baking traditions, and save this recipe to your Pinterest boards so you can find it whenever you need a little slice of home.
Nana’s Secret Banana Nut Bread
Ingredients
Equipment
Method
- In a large mixing bowl, peel your bananas and mash them with a fork. Leave a few small lumps for texture.
- Pour your melted butter directly into the mashed bananas. Stir them together until the mixture is uniform and shimmering.
- Stir in the sugar, the beaten egg, and your vanilla extract. Use a wooden spoon for this.
- Sprinkle the baking soda and the salt over the wet mixture and stir well.
- Gently fold in the all-purpose flour. Do not overmix.
- Fold in your toasted walnuts. Save a small handful to sprinkle on the very top of the batter once it is in the pan.
- Pour the batter into your prepared loaf pan. Smooth the top with a spatula. Slide it into the center rack of the oven and bake for 50 to 60 minutes.
- Let it cool in the pan for at least 10 minutes before transferring it to a wire rack.