Spooky, Spectacular, and Surprisingly Simple: Your Ultimate Cobweb Cheesecake Recipe
Have you ever wondered what the most sought after type of recipe is when the leaves start to turn and a chill fills the air? Data shows that as Halloween approaches, searches for festive desserts skyrocket, with millions of home cooks looking for that perfect centerpiece that is both spooky and delicious. The challenge, however, is finding a recipe that looks like it took hours of professional skill but is actually simple enough for a beginner to master. That’s where this incredible no bake Cobweb Cheesecake comes in. It’s the answer to every Halloween host’s dream: a rich, creamy, and decadent dessert that delivers a major “wow” factor without any of the stress of a traditional baked cheesecake. No water baths, no worrying about cracks, just pure, simple, and spooky perfection.
This isn’t just another dessert; it’s a statement piece for your Halloween table. Imagine the looks on your guests’ faces when you bring out this stunning creation. The deep, dark chocolate crust provides the perfect base for a velvety smooth, tangy cream cheese filling. But the real magic lies in the simple yet dramatic chocolate cobweb design drizzled on top. It transforms a classic dessert into a work of edible art. Whether you are hosting a huge costume bash, looking for impressive halloween food ideas, or just want to make a special treat for your family, this recipe is your golden ticket. It’s family friendly, endlessly customizable, and guaranteed to be the star of any ghoulish gathering. Forget complicated pastries and finicky cakes; this year, let’s make Halloween deliciously easy.
Why You’ll Love This Cobweb Cheesecake
When you’re planning a menu for a holiday, especially one as fun and chaotic as Halloween, you need recipes that are reliable, impressive, and above all, delicious. This Cobweb Cheesecake checks every single box and then some. It’s one of those rare recipes that looks incredibly intricate and professionally made, yet is secretly one of the easiest desserts you will ever put together. If you’re tired of the same old store bought cookies and basic cupcakes, this cheesecake will elevate your celebration and make you feel like a pastry chef, even if you’ve never made a cheesecake in your life. It’s the perfect blend of spooky aesthetics and gourmet flavor, making it a must try for your annual festivities. Here’s exactly why this will become your go to Halloween dessert.
Effortless Elegance: The biggest advantage of this recipe is that it is entirely no bake. This means you can completely forget about the anxieties that come with traditional cheesecakes. There’s no need to fuss with a water bath, no preheating the oven for an hour, and absolutely no worrying about the top cracking as it cools. The process is straightforward: you mix the crust, press it into a pan, whip up the creamy filling, pour it in, and let the refrigerator do all the hard work. This makes it a fantastic easy halloween food for party, as you can prepare it a day or two in advance, freeing you up to focus on costumes, decorations, and other dishes on the day of your event. It’s a completely stress free way to create a showstopping dessert.
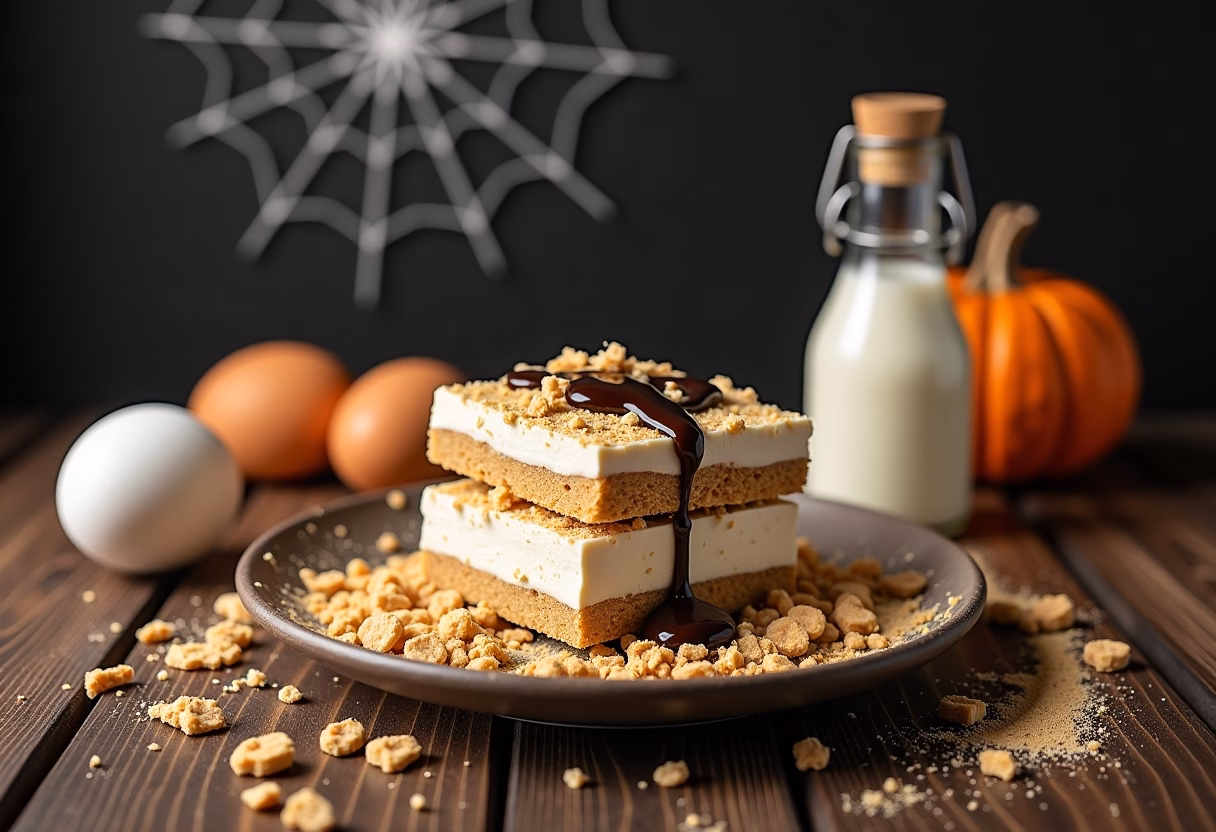
A Spooky Showstopper: Let’s be honest, the visual appeal is a huge part of Halloween food. This cheesecake is designed to be the centerpiece of your dessert table. The contrast between the bright, creamy filling and the dark, intricate chocolate web is visually stunning. It’s spooky, it’s chic, and it’s irresistibly photogenic. Your friends and family will be snapping pictures for their social media before they even take a bite. It’s the kind of dessert that gets people talking and asking, “How did you make that?” Little will they know your secret is just a bit of melted chocolate and a toothpick. This recipe is proof that you don’t need complex techniques to create something truly impressive and memorable.
Incredibly Rich and Delicious: While it looks amazing, this cheesecake is not just for show. The flavor and texture are absolutely divine. The base is a buttery, crunchy crust made from chocolate sandwich cookies (like Oreos), which provides the perfect dark and flavorful foundation. The filling is the star: a luscious, dense, and velvety mixture of cream cheese and sour cream, balanced with just the right amount of sugar and a hint of vanilla. It’s tangy, sweet, and melts in your mouth. The chocolate web on top isn’t just for decoration; it adds a lovely touch of rich chocolate in every bite, complementing the tangy filling beautifully. It’s a sophisticated flavor profile that adults will appreciate, but it’s also simple and yummy enough for kids to devour.
Fun and Customizable: This is one of the most fun halloween food recipes because the decorating part is where you can truly let your creativity shine. The cobweb design is classic, but you can easily put your own spin on it. Want a spookier look? Add a few drops of black or purple food coloring to a portion of the cheesecake filling and swirl it in before adding the web. You can also add a plastic spider toy on top for a classic creepy touch (just remember to remove it before serving!). For a different flavor, consider adding a teaspoon of espresso powder to the crust for a mocha vibe or a bit of orange zest to the filling for a citrusy kick. You could even use different cookies for the crust, like Biscoff or chocolate graham crackers, to completely change the flavor profile.
Ingredients for Cobweb Cheesecake
The beauty of this recipe lies in its simple, accessible ingredients. You can find everything you need at your local grocery store. For the best results, always use full fat cream cheese and sour cream for the richest, creamiest texture.
For the Chocolate Cookie Crust:
- 24 chocolate sandwich cookies (like Oreos), about 250g
- 6 tablespoons unsalted butter, melted
For the Cheesecake Filling:
- 24 ounces (three 8 ounce blocks) full fat block cream cheese, softened to room temperature
- 1 cup granulated sugar
- 1 cup full fat sour cream, at room temperature
- 1 teaspoon vanilla extract
- 1/4 cup heavy cream
For the Chocolate Cobweb Topping:
- 2 ounces semi sweet or bittersweet chocolate, finely chopped
- 1 teaspoon coconut oil or vegetable oil (optional, for a smoother consistency)
Substitutions:
- Gluten Free: Use your favorite gluten free chocolate sandwich cookies for the crust.
- Lighter Version: While full fat is recommended for texture, you can substitute Neufchâtel cheese for the cream cheese and light sour cream. Be aware the texture will be less dense and rich.
How to Make Cobweb Cheesecake
Step by Step Instructions
This no bake cheesecake comes together with just a few simple mixing and chilling steps. The key to a perfectly smooth filling is ensuring your cream cheese and sour cream are truly at room temperature before you begin. This prevents lumps and ensures a velvety texture.
Prepare the Pan and Crust: Lightly grease the bottom and sides of a 9 inch springform pan. To make the crust, place the chocolate sandwich cookies (the entire cookie, filling and all) into the bowl of a food processor. Pulse until they are fine crumbs. If you do not have a food processor, you can place them in a large zip top bag and crush them with a rolling pin. Transfer the crumbs to a medium bowl. Pour the melted butter over the crumbs and mix with a fork until all the crumbs are evenly moistened, resembling wet sand.
Form the Crust: Press the buttery crumb mixture firmly and evenly into the bottom and slightly up the sides of your prepared springform pan. Use the bottom of a measuring cup or a glass to pack it down tightly. This tight packing is crucial for a crust that holds together when you slice the cheesecake. Place the pan in the freezer to chill and set while you prepare the filling.
Make the Cheesecake Filling: In a large bowl using a handheld electric mixer or in the bowl of a stand mixer fitted with the paddle attachment, beat the room temperature cream cheese on medium speed until it is completely smooth and free of lumps, about 2 to 3 minutes. Scrape down the sides and bottom of the bowl. Add the granulated sugar and beat again for another 2 minutes until the mixture is light and fluffy.
Combine the Wet Ingredients: Add the room temperature sour cream and vanilla extract to the cream cheese mixture. Beat on low speed until just combined. Be careful not to overmix at this stage. In a separate small bowl, whip the heavy cream until soft peaks form. Gently fold the whipped cream into the cheesecake mixture with a spatula until it’s fully incorporated. The filling should be thick, smooth, and airy.
Assemble the Cheesecake: Retrieve the chilled crust from the freezer. Pour the cheesecake filling over the crust and use an offset spatula or the back of a spoon to spread it into an even, smooth layer.
Create the Cobweb Design: Prepare the chocolate topping immediately while the filling is still wet. Place the chopped chocolate and optional coconut oil in a small, microwave safe bowl. Microwave in 15 second intervals, stirring in between, until the chocolate is fully melted and smooth. Transfer the melted chocolate to a small piping bag or a zip top bag with a tiny corner snipped off.
Pipe the Web: Starting from the center of the cheesecake, pipe a small dot of chocolate. Then, pipe concentric circles of chocolate moving outwards toward the edge of the pan. You should have about 4 to 5 circles in total.
Form the Web: Working quickly before the chocolate sets, take a toothpick, skewer, or sharp knife. Gently drag the tip from the center dot of chocolate straight out to the edge of the cheesecake. Wipe the toothpick clean. Turn the cake slightly and repeat, dragging the toothpick from the center to the edge again. Continue this process all the way around the cake, creating about 8 to 10 lines, to form the signature cobweb pattern.
Chill to Set: Carefully cover the cheesecake with plastic wrap (be sure it doesn’t touch the top) or a cake dome. Refrigerate for at least 6 to 8 hours, but preferably overnight, until the cheesecake is firm and fully set. Do not freeze it to speed up the process, as this can affect the creamy texture.
Serve: Once fully chilled, run a thin knife around the edge of the cheesecake before releasing the springform pan’s side. Slice with a large, sharp knife, wiping the blade clean between each cut for perfect slices.
Pro Tips & Variations
Taking just a few extra moments to follow these professional tips can elevate your Cobweb Cheesecake from great to absolutely unforgettable. These little tricks ensure a perfect texture and a flawless presentation every time. Plus, once you master the basic recipe, you can start experimenting with exciting flavor variations that will keep your guests coming back year after year. This dessert is a fantastic canvas for your culinary creativity, making it one of the most versatile halloween recipes in your collection.
Pro Tips:
Room Temperature is Non Negotiable: Repeating this because it is the single most important tip for a lump free cheesecake. Set your cream cheese and sour cream on the counter for at least 2 to 3 hours before you begin. If you are short on time, you can unwrap the cream cheese blocks and cut them into smaller cubes to speed up the softening process. Cold ingredients will not combine smoothly, resulting in a lumpy filling no matter how much you beat them.
Don’t Overmix the Filling: Once you add the sour cream and folded in whipped cream, mix only until the ingredients are just combined. Overmixing at this stage can incorporate too much air or break down the fats, leading to a cheesecake that is runny or has a grainy texture after it sets. Gentle folding is key to maintaining that dense, luxurious, and creamy consistency.
Master the Web: The key to a clean cobweb design is speed and a steady hand. Have your melted chocolate ready to go the moment you finish smoothing the filling. The filling needs to be wet for the toothpick to drag the chocolate cleanly. Also, be sure to wipe your toothpick or skewer clean after each and every drag from the center to the edge. If you don’t, you’ll end up smearing the previous line and blurring the web effect.
For Picture Perfect Slices: To get those clean, sharp slices you see in bakeries, use a large, thin knife. Dip the knife in a tall glass of hot water, wipe it dry with a paper towel, and then make your cut. Repeat this process for every single slice. The warm blade will glide through the cheesecake and crust without smearing the filling or dragging crumbs.
Variations:
Pumpkin Spice Cobweb Cheesecake: Embrace the flavors of the season by transforming this into a pumpkin cheesecake. Reduce the sour cream to 1/2 cup and add 1 cup of pumpkin puree (blotted with paper towels to remove excess moisture) along with 1 teaspoon of pumpkin pie spice to the filling. The orange hue also looks incredible for Halloween.
Bloody Berry Cheesecake: For a gorier, more creepy halloween food vibe, create a “blood” drizzle. After the cheesecake has fully set, mix a cup of raspberries (fresh or thawed from frozen) with a few tablespoons of sugar and a squeeze of lemon juice. Simmer for a few minutes until thickened into a sauce. Let it cool completely, then drizzle it over the finished cobweb design or serve it alongside for guests to add themselves.
Mocha Madness Cheesecake: Coffee and chocolate are a match made in heaven. Dissolve 2 teaspoons of instant espresso powder in the 1 teaspoon of vanilla extract before adding it to your cheesecake filling. You can also use a chocolate crust and a chocolate ganache topping for an even more decadent treat. This variation is perfect for an adult Halloween party.
** Peanut Butter Spiderweb:** For a nutty twist, substitute the chocolate crust with a crust made from Nutter Butter cookies. In the filling, reduce the sugar to 3/4 cup and add 3/4 cup of creamy peanut butter. The resulting cheesecake tastes like a giant, creamy peanut butter cup.
Serving Suggestions
This Cobweb Cheesecake is a rich and decadent dessert that truly stands on its own. However, building a complementary menu around it can turn a simple treat into a full fledged Halloween feast. The key is to balance its creamy sweetness with other textures and flavors. Whether you are planning a spooky dinner or a buffet of **halloween food for party**, these serving suggestions will help you create a cohesive and memorable spread.
Start by thinking about what your guests will be eating before dessert. A savory and slightly spooky main course is a fantastic lead in. Consider making a batch of our fun and easy Jack O’Lantern Quesadillas. They are simple to prepare, visually on theme, and their savory, cheesy flavor provides a wonderful contrast to the sweet and tangy cheesecake that will follow. Another fantastic option is a hearty main like Tombstone Shepherd’s Pie, which is filling, comforting, and plays into the ghoulish graveyard theme. Serving a substantial, savory meal ensures that the rich cheesecake feels like a special, indulgent finale rather than an overwhelming sugar bomb.
When it comes to drinks, you have plenty of festive options. For an adult crowd, pairing the cheesecake with a dark, robust coffee or a creamy espresso martini is a sophisticated choice. The bitterness of the coffee beautifully cuts through the richness of the cream cheese. For a themed cocktail, a glass of deep red wine or a specially crafted spooky drink like our Witch’s Brew punch would be perfect. For the kids and non drinkers, a mug of warm spiced apple cider is a cozy and classic pairing. The warm spices of the cider complement both the chocolate and vanilla notes in the cheesecake.
If you’re creating a larger dessert table, place the Cobweb Cheesecake as the grand centerpiece and surround it with smaller, complementary treats. Think about different textures and flavors. A platter of our Witch Finger Cookies would add a crunchy element, while some gooey Ghost Cheesecake Brownies offer a different kind of chocolatey goodness. By offering a variety of treats, you create a dynamic dessert experience that caters to everyone’s tastes and makes your Halloween spread look abundant and exciting. The cheesecake will undoubtedly be the star, but these supporting characters will make the entire experience even more delicious.
Storage & Reheating
Proper storage is key to keeping your Cobweb Cheesecake fresh and delicious. Since this is a no bake, dairy based dessert, it must be kept refrigerated.
Fridge Storage: Leftover cheesecake can be stored in the refrigerator for up to 5 days. You can either cover the springform pan tightly with plastic wrap or transfer the slices to an airtight container. If using a container, placing a small piece of parchment paper between slices can prevent them from sticking together.
Freezer Storage: This cheesecake freezes beautifully! It’s a great option if you want to make your Halloween dessert well in advance. To freeze, first let the cheesecake set completely in the refrigerator overnight. Then, you can either freeze the whole cheesecake or individual slices.
- Whole Cheesecake: Place the entire cheesecake, still on the springform base, into the freezer uncovered for about 1 to 2 hours, or until it’s firm to the touch. Once firm, remove it and wrap it tightly in two layers of plastic wrap, followed by a layer of aluminum foil. This prevents freezer burn.
- Individual Slices: Cut the cheesecake into slices, then place them on a baking sheet lined with parchment paper. Freeze until solid, about an hour. Once solid, wrap each slice individually in plastic wrap and then place them all in a large freezer safe bag or container.
Thawing: To enjoy your frozen cheesecake, transfer it from the freezer to the refrigerator and let it thaw overnight. Thawing it slowly in the fridge is essential to maintain its creamy texture. Do not thaw it on the counter, as this can cause it to become watery. This dessert is served chilled, so no reheating is necessary.
FAQ about Cobweb Cheesecake
Can I use a regular pie dish instead of a springform pan?
Yes, you absolutely can use a 9 inch deep dish pie plate. The main advantage of a springform pan is the easy removal and beautiful presentation with straight sides. If you use a pie dish, you won’t be able to remove the cheesecake whole. You’ll simply have to slice and serve it directly from the dish, which works just as well and tastes just as delicious!
My chocolate was too thick to pipe the web. What went wrong?
This is a common issue! The most likely culprit is that the chocolate was either slightly overheated, which can cause it to seize, or a drop of water got into it. To fix this, you can try stirring in about a teaspoon of neutral oil (like coconut or vegetable oil) into the melted chocolate. This will often smooth it out and make it the perfect consistency for piping. Always melt chocolate slowly and in short intervals to prevent scorching.
Is this recipe good for halloween food for kids?
Absolutely! This is one of the best recipes for halloween food for kids. Kids love the spooky look, and the flavor is a total crowd pleaser. The best part is that they can help make it! They can crush the cookies for the crust, help mix the filling (with supervision), and watch you create the magical cobweb design. Just be sure to use a plastic toy spider for decoration instead of a real one!
How far in advance can I make this Cobweb Cheesecake?
This is the perfect make ahead dessert. For best results, you can make it up to 2 days in advance. Prepare the cheesecake completely, including the cobweb topping, and keep it covered in the refrigerator. The flavors will actually meld and deepen overnight, so making it a day ahead is a fantastic idea. If you need to make it further in advance, follow the freezer instructions.
Final Thoughts on Cobweb Cheesecake
There you have it a spooky, sophisticated, and incredibly simple dessert that is guaranteed to be the highlight of your Halloween celebration. This Cobweb Cheesecake is more than just a recipe; it’s an opportunity to create a little bit of Halloween magic right in your own kitchen. Its rich, creamy flavor and dramatic look will have everyone thinking you’re a professional pastry chef, and only you will know how easy it was to whip up. From the crunchy chocolate crust to the velvety smooth filling and eye catching design, every element comes together to create the perfect festive treat.
Don’t be intimidated by its impressive appearance. This recipe is designed for success, regardless of your baking skill level. It’s the perfect project for a quiet afternoon and an even better dessert to share with the people you love.
If you make this spooky masterpiece, I would absolutely love to see it! Snap a photo and share it on social media, or leave a comment below and let me know how it turned out.
Don’t forget to Pin this recipe to your Halloween board on Pinterest so you can find it again next year! And while you’re here, be sure to subscribe to our newsletter for more easy, festive, and delicious recipes delivered straight to your inbox. Happy Halloween and happy dessert making

Cobweb Cheesecake
Ingredients
Equipment
Method
- Lightly grease the bottom and sides of a 9 inch springform pan. Pulse chocolate sandwich cookies in a food processor until fine crumbs or crush in a zip-top bag with a rolling pin. Transfer crumbs to a bowl and mix with melted butter until evenly moistened.
- Press crumb mixture firmly into the bottom and slightly up the sides of the prepared springform pan. Chill in freezer while preparing filling.
- Beat softened cream cheese on medium speed until smooth, about 2-3 minutes. Scrape down bowl. Add sugar and beat for 2 minutes until light and fluffy.
- Add sour cream and vanilla extract, beat on low speed until just combined. Whip heavy cream until soft peaks form. Fold whipped cream gently into cheesecake mixture until smooth and airy.
- Pour cheesecake filling over chilled crust and smooth into an even layer.
- Melt chocolate and optional coconut oil in a microwave-safe bowl in 15 second intervals, stirring until smooth. Transfer melted chocolate to a piping bag or zip-top bag with a tiny corner snipped off.
- Pipe a small dot of chocolate in the center of the cheesecake, then pipe 4 to 5 concentric circles moving outward toward the edge.
- Using a toothpick or skewer, drag lines from the center dot out to the edge to create a spiderweb pattern. Clean the toothpick between drags.
- Cover cheesecake without touching the top and refrigerate for at least 6 to 8 hours, preferably overnight, until fully set.
- Before serving, run a thin knife around the edge to loosen and remove springform side. Slice with a sharp knife, wiping blade clean between cuts for perfect slices.