Are Your Halloween Treats Missing a Spooky, Yet Wholesome, Twist?
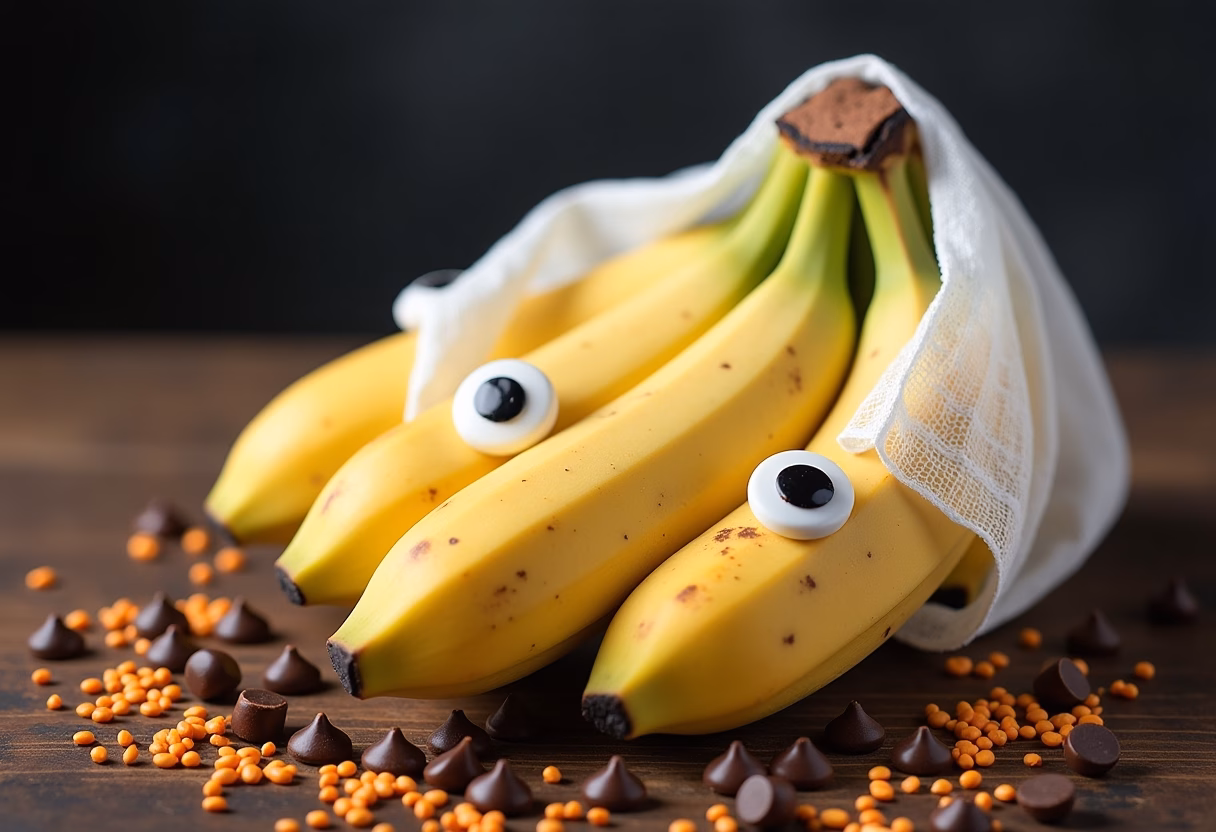
Ever wonder if your halloween food lineup is truly hitting the mark, captivating both the eyes and the taste buds of your little goblins and ghouls? In a world saturated with sugary, artificial concoctions, finding a treat that’s both magically festive and surprisingly nutritious can feel like searching for a ghost in broad daylight. But what if there was a simple, enchanting recipe that defied expectations, proving that healthy and hauntingly delicious aren’t mutually exclusive? Prepare to have your Halloween treat paradigm shifted, because we’re about to unveil a recipe that’s guaranteed to be the star of your spooky season spread: **Spooky Banana Mummies**!
Forget the laborious baking and complicated ingredients; these charmingly wrapped fruit treats are not only incredibly easy to assemble but also wickedly fun for the whole family to make together. We all know the struggle of trying to find halloween food ideas that appeal to both picky eaters and health-conscious parents. This recipe bridges that gap effortlessly, offering a delightful combination of natural sweetness from ripe bananas and the satisfying crunch (or melt, depending on your chocolate choice!) of a mummy’s bandage. It’s the kind of creative kitchen project that transforms an ordinary snack into an extraordinary Halloween memory.
Imagine the delight on every face as they unwrap their very own Spooky Banana Mummies, each one a unique, edible masterpiece. This isn’t just another dessert; it’s an experience, a playful nod to the spirit of Halloween without the usual sugar rush aftermath. We’ve meticulously crafted this recipe to be approachable for even the most novice cooks, ensuring that your time in the kitchen is filled with laughter, not frustration. So, if you’re ready to add a touch of charming fright and wholesome goodness to your Halloween festivities, stick with us. You’re about to discover your new favorite halloween recipe, guaranteed to leave everyone screaming for more (in the best way possible, of course!).
Why You’ll Love These Spooky Banana Mummies
You’re on the hunt for the perfect **halloween food for party** that stands out from the crowd, right? Something that’s both adorable and delicious, without demanding hours of your precious time? Look no further! These **Spooky Banana Mummies** are an absolute game-changer for your spooky celebrations, and here’s exactly why they’ll become your go-to Halloween treat:
- Effortlessly Quick & Simple: Seriously, you won’t believe how fast these come together! With minimal ingredients and straightforward steps, you can whip up a whole army of these cute mummies in under 30 minutes. This makes them perfect for last-minute party prep or when you need a fun activity with the kids without a huge time commitment.
- Kid-Friendly & Engaging: This isn’t just a recipe; it’s an edible craft project! Kids absolutely adore unwrapping and decorating these banana mummies. It’s a fantastic way to get them involved in the kitchen, fostering creativity and a love for healthy treats. Plus, it encourages them to eat fruit in a fun, disguise-worthy way!
- Wholesome & Delicious: While other halloween foods might lean heavily into candy and artificial flavors, our Spooky Banana Mummies offer a refreshing, naturally sweet alternative. The creamy banana base pairs perfectly with the chocolate “bandages,” making them a treat you can feel good about serving. It’s a delightful balance of indulgence and nutrition.
- Customizable & Versatile: Want to switch it up? These mummies are super flexible! Use white chocolate for classic bandages, dark chocolate for a richer taste, or even a mix of both. Add sprinkles, edible glitter, or different candy eyes to give each mummy its own personality. They’re a blank canvas for your spooky imagination!
- Dietary-Friendly Options: With simple tweaks, these mummies can cater to various dietary needs. Easily make them dairy-free or vegan by using dairy-free chocolate chips. They’re naturally gluten-free, making them an inclusive option for your Halloween guests. Check out our Pro Tips section for more variations!
- Visually Striking & Insta-Worthy: Let’s be real, part of the fun of Halloween is the aesthetic! These Spooky Banana Mummies are incredibly photogenic and sure to get compliments. Their quirky, adorable appearance makes them perfect for showcasing on your social media, proving that easy halloween food can also be incredibly impressive.
- Perfect for Any Halloween Event: Whether you’re hosting a full-blown costume party, having a cozy Halloween movie night, or just looking for a fun after-school snack, these mummies fit the bill. They’re easy to transport, portion, and serve, making them a stress-free addition to any celebration. For more fantastic ideas, explore our collection of halloween food ideas for parties!
Ingredients for Spooky Banana Mummies
Get ready to gather your simple supplies for these adorable and delicious mummies!
- 4 ripe, medium-sized bananas
- 1 cup white chocolate chips (good quality melting chocolate works best)
- 2 tablespoons coconut oil (optional, but helps with smooth melting and dipping)
- 1/4 cup semi-sweet chocolate chips (for the mummy eyes)
- Edible candy eyes (small, round ones are perfect for a spooky gaze)
- Popsicle sticks or bamboo skewers (optional, for easier handling)
Substitutions:
* **Bananas:** While ripe bananas offer the best sweetness and texture, slightly less ripe ones work too, just ensure they are firm enough to hold their shape when sliced.
* **White Chocolate Chips:** You can use white melting wafers, white candy melts, or even white chocolate bars, finely chopped. If you prefer a darker mummy look, milk or dark chocolate can be used for the bandages – it creates a different aesthetic but is equally delicious!
* **Coconut Oil:** If you don’t have coconut oil, you can omit it. The chocolate might be a little thicker, but still workable. A tiny amount of vegetable shortening (like Crisco) can also be used if needed for consistency.
* **Semi-Sweet Chocolate Chips:** For the eyes, you can use dark chocolate chips, milk chocolate chips, or even an edible food marker if you have one.
* **Edible Candy Eyes:** No candy eyes? No problem! You can use mini chocolate chips, tiny dots of frosting, or even draw them on with an edible food marker after the chocolate has set.
How to Make Spooky Banana Mummies
Get ready for a super fun and simple recipe that will transform ordinary bananas into extraordinary Halloween delights!
Step-by-Step Instructions
Here’s your detailed guide to creating the cutest, creepy halloween food that everyone will adore:
Prepare Your Bananas:
- Start by peeling all four ripe bananas.
- Slice each banana into three equal pieces, creating chunky, bite-sized “mummy bodies.”
- Pro Tip: For easier handling, especially if you’re making these for a party, gently insert a popsicle stick or bamboo skewer into the cut end of each banana piece. This creates a convenient handle.
- Line a baking sheet with parchment paper or a silicone mat. This will prevent your mummies from sticking and make cleanup a breeze.
- Arrange the banana pieces (with or without sticks) on the prepared baking sheet.
- Pop the baking sheet into the freezer for at least 15-20 minutes. This brief chill helps the bananas firm up, making them easier to dip and ensuring the chocolate sets quickly. Don’t freeze them solid, just a good chill will do!
Melt the White Chocolate:
- While the bananas are chilling, place the white chocolate chips into a microwave-safe bowl.
- If using, add the 2 tablespoons of coconut oil to the bowl.
- Microwave on high in 30-second intervals, stirring thoroughly after each interval. White chocolate can seize easily, so go slow and stir well.
- Continue microwaving and stirring until the chocolate is completely melted and smooth, with a pourable consistency. Be careful not to overheat it.
- Alternatively (Double Boiler Method): If you prefer not to microwave, set a heatproof bowl over a saucepan of simmering water (ensure the bowl doesn’t touch the water). Add white chocolate chips and coconut oil, stirring until smooth and melted.
Dip and Drizzle the Mummies:
- Remove the chilled banana pieces from the freezer.
- One by one, dip each banana piece into the melted white chocolate, ensuring it’s fully coated. You can gently swirl it around or use a spoon to coat.
- Lift the banana from the chocolate, allowing any excess to drip back into the bowl. This helps create a cleaner mummy shape.
- Place the coated banana back onto the parchment-lined baking sheet. Repeat with all banana pieces.
- Once all bananas are coated, allow the chocolate to set slightly for about 5-10 minutes. It doesn’t need to be completely hardened yet.
Create the Mummy Bandages:
- Once the first layer of white chocolate has just begun to set (it should still be a little tacky), it’s time to create the mummy effect!
- Using a spoon or a piping bag with a very small snip in the corner (or even a Ziploc bag with the corner snipped), drizzle the remaining melted white chocolate back and forth over each banana, creating crisscross “bandage” patterns.
- Leave a small gap open near the top for where the “eyes” will go. Resist the urge to make the bandages too neat – slightly messy adds to the authentic mummy look!
Add the Spooky Eyes:
- Immediately after drizzling the bandages, while the chocolate is still wet, carefully press two edible candy eyes into the small gap you left open on each mummy. The melted chocolate will act as “glue.”
- If your candy eyes aren’t sticking well, you can dab a tiny bit of melted chocolate on the back of each eye before placing it.
- If you don’t have candy eyes, melt the 1/4 cup semi-sweet chocolate chips (microwave in 15-second intervals, stirring). Dip a toothpick into the melted dark chocolate and gently dot two “eyes” onto each mummy.
Final Chill and Serve:
- Once all your Spooky Banana Mummies are decorated with eyes and bandages, return the baking sheet to the refrigerator for at least 15-20 minutes, or until the white chocolate is completely firm and set.
- For the best texture and taste, serve these chilled. The slight chill makes them refreshing and helps the chocolate maintain its crispness.
- Arrange them on a spooky platter and watch them disappear! These are the perfect fun halloween food that people will rave about.
Pro Tips & Variations
Elevate your **Spooky Banana Mummies** from just cute to utterly unforgettable with these pro tips and creative variations! These ideas will help you customize your mummies, address specific dietary needs, and ensure they’re the hit of your Halloween celebration.
Pro Tips:
* **The Freezer is Your Friend:** Don’t skip the initial chill step for the banana pieces. It makes them much easier to handle, dip, and ensures the chocolate sets faster, preventing a messy, melted situation. A very brief chill after coating also helps the bandage drizzle adhere better.
* **Work Smart, Not Hard with Chocolate:** When melting white chocolate, low and slow is the way to go. White chocolate can seize or burn easily. If it seems too thick after melting, add a tiny bit more coconut oil (1/2 teaspoon at a time) to thin it out. If it becomes too thin, let it cool slightly – sometimes it thickens as it cools.
* **The Art of the Drizzle:** For the mummy “bandages,” less is more. You don’t need to completely cover the banana; the uneven, slightly messy crisscross lines are what give it that authentic, charming mummy look. A piping bag with a small tip, or even a ziploc bag with a tiny corner snipped off, gives you the most control for drizzling.
* **Eye Placement Matters:** Place the candy eyes immediately after drizzling the bandages, while the chocolate is still wet. This ensures they stick securely. If they pop off, use a tiny dab of melted chocolate to re-affix them.
* **Chill Before Serving:** These mummies are best served chilled. Not only does it keep the chocolate firm and crisp, but the cold banana is a refreshing contrast, especially if you’re serving them at a warmer party.
Variations:
* **Vegan/Dairy-Free Delight:** Absolutely! Use dairy-free white chocolate chips (many brands are available, often almond-based or oat-based). For the eyes, dairy-free chocolate chips or edible gel pens work perfectly. This makes them a fantastic **easy halloween food for party** option for everyone.
* **Dark Chocolate Mummies:** For a richer, more dramatic mummy, use melted dark chocolate chips for the main coating and white chocolate for the bandages. This creates a fantastic contrast and a more sophisticated flavor profile that adults will love.
* **Sprinkle Specter:** Before the white chocolate bandages set, sprinkle a little Halloween-themed sprinkles over your mummies. Orange and black sprinkles, ghost-shaped sprinkles, or even edible glitter can add an extra festive touch.
* **Nutty Mummies:** If there are no nut allergies, consider finely chopping some toasted almonds or pistachios and sprinkling them over the wet chocolate coating before chilling. This adds a delightful crunch and nutty flavor.
* **Fruity Frights:** While bananas are classic, you can adapt this concept! Try coating strawberries, apple slices, or even clementine segments in white chocolate and drizzling them for different “fruit mummies.” Just ensure the fruit is dry before dipping for best adhesion.
* **Vampire Mummies:** For a gruesomely fun twist, after applying the white chocolate bandages and eyes, use a tiny drop of red food coloring mixed with a little corn syrup or a red edible gel pen to create a “blood drizzle” coming from the mummy’s mouth (or just near the eyes). This amps up the **gross halloween foods** factor in a playful way!
* **Monster Mummies:** Use food coloring to tint your white chocolate green, purple, or even orange before dipping. Then proceed with white bandages and candy eyes for colorful monster mummies!
Serving Suggestions
These **Spooky Banana Mummies** are fantastic on their own, but pairing them with other Halloween goodies can really complete your festive spread. Here are some ghoulishly good serving suggestions to make your Halloween party truly memorable:
- Halloween Dessert Platter: Arrange your Spooky Banana Mummies alongside other themed treats. Think Monster Rice Krispie Treats, Witch Finger Cookies, or even some brownie “graves” for a variety of textures and flavors.
- Frightening Fruit Skewers: Alternate your Spooky Banana Mummies on longer skewers with grapes, melon balls, and strawberries. This creates a colorful and refreshing fruit arrangement that balances out the sweetness.
- Creepy Candy Buffet: Set up a dedicated “candy zone” with bowls of your banana mummies, alongside traditional Halloween candy, popcorn, and other small treats. This allows guests to pick and choose their favorites.
- Dipping Station Fun: While these mummies are pre-coated, you could offer small bowls of extra melted chocolate (dark, milk, or even colored white chocolate) for an optional second dip or extra drizzling fun, especially for kids who love to get creative.
- Monster Milkshakes: Serve your Spooky Banana Mummies as a side to vibrant green “slime” milkshakes or purple “potion” smoothies. The cool, creamy drink pairs wonderfully with the chilled, chocolate-covered banana.
- Coffee or Hot Chocolate Bar: For an adult Halloween gathering, these mummies are a delightful, light dessert alongside a warm pumpkin spice latte or a rich dark hot chocolate. A perfect treat to complement warm beverages on a chilly autumn evening.
- Complementary Sweet and Salty: Pair your sweet mummies with some savory, spooky snacks. Consider some Mummy Hot Dogs or a festive Halloween-themed snack mix to offer a balanced spread.
Storage & Reheating
Proper storage is key to keeping your **Spooky Banana Mummies** fresh, firm, and frightfully delicious for as long as possible. Good news – they’re incredibly easy to store!
Storage:
* **Refrigerator:**
* Once the chocolate has completely set, arrange the **Spooky Banana Mummies** in a single layer in an airtight container. If you need to stack them, place a piece of parchment paper between the layers to prevent them from sticking together and smudging the chocolate.
* Store them in the refrigerator for up to 3-4 days. The bananas will naturally soften over time, but they remain delicious.
* *Important:* While they taste great chilled, prolonged refrigeration can sometimes cause the banana to weep a little liquid, especially if the chocolate coating isn’t completely sealed. This is normal and doesn’t affect taste.
* **Freezer (for longer storage):**
* For extended storage, flash freeze the mummies first. Place the fully set mummies in a single layer on a parchment-lined baking sheet and freeze for about 1-2 hours, or until completely solid.
* Once frozen solid, transfer them to a freezer-safe, airtight container or a heavy-duty freezer bag. Squeeze out as much air as possible if using a bag.
* They can be stored in the freezer for up to 1 month.
Reheating (or rather, “Thawing”):
* **From Refrigerator:** No reheating needed! These mummies are designed to be enjoyed chilled straight from the fridge. In fact, they are often at their best when cold.
* **From Freezer:**
* If you’ve frozen your **Spooky Banana Mummies**, transfer them from the freezer to the refrigerator a few hours (2-3 hours) before you plan to serve them. This allows them to thaw gently and come to a pleasant, chilled temperature while keeping the chocolate firm.
* Avoid thawing at room temperature for too long, as this can make the chocolate coating soft and potentially messy.
* Do not microwave or heat them. The chocolate will melt, and the banana will become mushy.
FAQ about Spooky Banana Mummies
Here are some common questions you might have about making and enjoying these adorable **Spooky Banana Mummies**, ensuring your Halloween treat experience is perfectly eerie!
- Q: Can I make Spooky Banana Mummies ahead of a party? How far in advance?
- A: Absolutely! These are fantastic for making ahead. You can prepare them up to 2-3 days in advance and store them in an airtight container in the refrigerator. For longer storage, freeze them as described in the Storage section, and they’ll last for up to a month. Just remember to thaw them in the fridge before serving.
- Q: My white chocolate is clumpy or seized. What went wrong?
- A: White chocolate is notoriously finicky! It’s likely that it got too hot too quickly, or a tiny bit of water got into the chocolate. When melting, always go slow, use short bursts in the microwave with frequent stirring, or a very gentle double boiler method. If it seizes, sometimes adding a teaspoon of vegetable shortening or coconut oil and stirring vigorously can help, but often it’s best to start fresh.
- Q: Can I use other fruit besides bananas for this recipe?
- A: You certainly can! While bananas are ideal for their mummified shape and creamy texture, you can experiment with other fruits. Strawberries, apple slices, or even clementine segments can be similarly coated. Just ensure the fruit is very dry before dipping, as any moisture will cause the chocolate to seize or not adhere properly. For other festive fruit options, check out our Pumpkin Patch Dirt Cups!
- Q: I don’t have popsicle sticks. Are they necessary?
- A: Popsicle sticks are completely optional! They simply make the mummies easier to dip and handle, especially for kids, and turn them into more of a “pop” treat. If you’re serving them on a platter with forks, or if you don’t mind a little mess, you can definitely make them without the sticks.
- Q: How can I make these even more spooky or gross halloween foods friendly?
- A: To amp up the spook factor, you could use green food coloring in a portion of your white chocolate for an “oozing” effect, or add some “blood” using red gel food coloring mixed with a tiny bit of corn syrup, dribbled near the eyes. You could also tint some of the white chocolate grey or light green for a more “decayed” mummy look! For another truly chilling appetizer, try our Bloody Eyeball Meatballs.
Final Thoughts on Spooky Banana Mummies.
There you have it – a recipe that effortlessly blends wholesome goodness with Halloween charm! These **Spooky Banana Mummies** aren’t just a treat; they’re an experience, a playful way to celebrate the spooky season without succumbing entirely to the candy overload. We’ve walked you through every step, from selecting the perfect ripe bananas to crafting their eerie bandages and piercing eyes, ensuring even the most novice kitchen ghoul can master this delightful creation.
What makes these mummies truly special is their universal appeal. They’re a fantastic way to engage kids in the kitchen, fostering creativity and healthy eating habits in a fun, disguise-worthy package. For adults, they offer a light, refreshing, and guilt-free indulgence that perfectly complements any Halloween gathering. Whether you’re hosting a grand party filled with halloween food ideas for dinner, or simply enjoying a quiet night of trick-or-treating at home, these banana mummies are guaranteed to bring smiles and maybe a few joyful shrieks!
We hope you’ll make these Spooky Banana Mummies a cherished part of your annual Halloween traditions. Don’t forget to share your ghoulishly good creations with us! We absolutely love seeing your culinary adventures come to life. Snap a photo of your mummified masterpieces and tag us on social media! And guess what? This is just one of many amazing halloween recipes we have up our sleeves.
If you loved this fun and easy recipe, please do us a huge favor: Save this recipe on Pinterest by clicking the share button and pinning it to your favorite Halloween board! Your pins help others discover these wickedly delicious treats. We’d also be thrilled if you leave a comment below and let us know how your Spooky Banana Mummies turned out. What variations did you try? Did your kids have a blast making them? Your feedback is invaluable to us. Finally, be sure to subscribe to our newsletter for more enchanting recipes, seasonal tips, and exclusive content delivered straight to your inbox. Get ready to haunt your kitchen with joy, one spooky banana mummy at a time!

Spooky Banana Mummies
Ingredients
Equipment
Method
- Peel and slice each banana into three equal pieces. Insert popsicle sticks or bamboo skewers into the cut end if desired for easy handling. Arrange on a parchment-lined baking sheet and freeze for 15-20 minutes until firm but not solid.
- Melt white chocolate chips with coconut oil in a microwave-safe bowl using 30-second intervals, stirring frequently until smooth and pourable. Alternatively, melt using a double boiler.
- Dip each banana piece fully into the melted white chocolate, letting excess drip off, then place back onto the parchment paper. Allow coating to set slightly for 5-10 minutes.
- Drizzle remaining white chocolate back and forth over each banana to create crisscross ‘bandage’ patterns, leaving a small gap near the top for eyes. Slightly messy lines add to the mummy effect.
- Press two edible candy eyes into the gap while the chocolate is still wet to adhere. If no candy eyes are available, use melted semi-sweet chocolate and a toothpick to dot the eyes.
- Return the bananas to the refrigerator for 15-20 minutes to fully set the chocolate. Serve chilled for the best texture and flavor.