Introduction
Have you ever wondered why some home cooks struggle with dry, dense biscuits while others pull golden, flaky masterpieces from their ovens? The secret often lies in one simple shift: understanding that savory cheddar and chive biscuits aren’t just a side dish, they’re an experience waiting to happen in your kitchen.
I remember the first time my mother-in-law shared her biscuit technique with me. I stood in her kitchen, watching her work the cold butter into the flour with such intention that I realized biscuits weren’t about rushing. They were about patience, precision, and the kind of comfort that comes from feeding people you love. That moment changed how I approached baking, especially when it came to crafting the perfect cheddar chive biscuits.
What makes savory biscuit recipes so magical is their versatility. They sit perfectly alongside a steaming bowl of soup, nestle into a brunch spread, or stand alone as the unexpected star of a casual dinner table. But here’s what most recipes won’t tell you: the real magic happens when you understand the why behind each step, not just the what.
This guide isn’t another quick-fix recipe you’ll forget by next week. Instead, I’m inviting you into my kitchen to explore homemade cheddar chive biscuits that are crispy on the outside, tender within, and infused with the sharp bite of aged cheddar and the delicate whisper of fresh chives. Whether you’re a seasoned baker or someone who’s intimidated by yeast and lamination, these flaky cheddar biscuits will prove that mastering the art of biscuit-making is entirely within your reach.
The beauty of this recipe lies in its honest simplicity. With just a handful of pantry staples and a few minutes of active work, you’ll create something that tastes like it came from a Southern grandmother’s kitchen or a cozy British tea room. And the best part? Once you understand this foundational technique, you’ll unlock the ability to create variations that feel entirely your own.
Why You’ll Love This Savory Cheddar & Chive Biscuits
There’s something profoundly satisfying about pulling a tray of warm cheese and chive biscuits from the oven. The aroma alone is worth the effort. But let me tell you exactly why this recipe deserves a permanent place in your cooking rotation.
Unbeatable Flavor with Minimal Ingredients
These biscuits prove that you don’t need a complicated ingredient list to create something spectacular. Sharp cheddar cheese provides bold, unmistakable flavor, while fresh chives add a gentle allium brightness that lifts the entire bite. There’s no pretension here, just clean, honest taste that speaks for itself.
Perfect for Every Occasion
Breakfast with scrambled eggs and bacon? Yes. A elegant dinner alongside roasted vegetables? Absolutely. Tucked into a lunch box or served at a casual gathering? These savory cheese biscuits adapt to any situation. I’ve served them at holiday tables where they disappeared faster than I could transfer them to a basket, and I’ve made them on quiet Tuesday nights just because my family asked for them.
Quick and Reliable, Even for Beginners
One of my favorite things about biscuit baking is the timeline. From concept to table is roughly thirty minutes. There’s no long fermentation, no mysterious rising times, no watching and waiting. You mix, you shape, you bake. The predictability is comforting, especially when you’re cooking for people who are counting on you to deliver.
Impressive Without Being Pretentious
There’s an elegance to homemade biscuits that store-bought versions can never replicate. When guests see that you’ve made them from scratch, there’s an immediate sense of “Oh, she really made an effort.” But between you and me, this recipe is far easier than the admiration you’ll receive.
Naturally Gluten-Friendly Adaptations Available
This recipe also opens doors if you need to accommodate different diets. Gluten-free savory biscuits can be made with a 1:1 gluten-free flour blend, and I’ve had tremendous success with that substitution. Similarly, exploring keto cheddar chive biscuits variations allows you to serve these to friends with different dietary needs without feeling like you’re making “diet food.”
A Gateway to Confidence
Mastering biscuits builds kitchen confidence in a way few other baking projects can. Once you understand the mechanics of how cold butter creates layers, how buttermilk provides tender crumb, and how gentle handling preserves flakiness, you’ll approach other baking with renewed assurance. These buttermilk cheddar chive biscuits become your foundation for so much more.
Ingredients for Savory Cheddar & Chive Biscuits
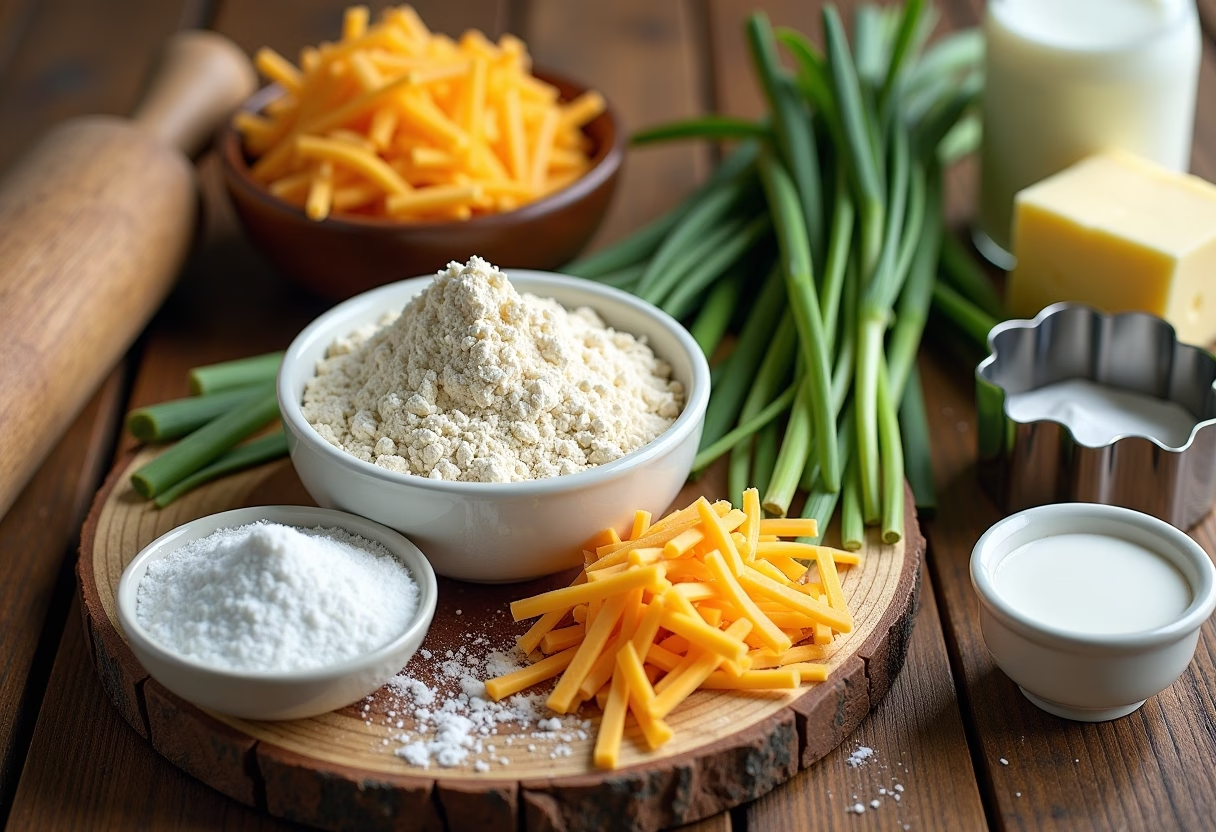
Dry Ingredients:
- 2 cups all-purpose flour (or for gluten-free savory biscuits, use a 1:1 GF blend)
- 1 tablespoon baking powder
- 1 teaspoon kosher salt
- 1/4 teaspoon black pepper
Wet Ingredients & Mix-Ins:
- 6 tablespoons cold unsalted butter, cubed
- 1 cup sharp cheddar cheese, shredded and lightly packed
- 3 tablespoons fresh chives, finely chopped
- 3/4 cup cold buttermilk
- 2 tablespoons heavy cream or milk (for brushing tops)
Optional Additions:
- 1/2 teaspoon smoked paprika (adds depth)
- 1/4 teaspoon garlic powder (for subtle savory notes)
- Fleur de sel for finishing
Helpful Substitutions:
If buttermilk isn’t available, mix regular milk with a tablespoon of lemon juice or vinegar and let sit five minutes. For a richer biscuit, use half-and-half instead of regular buttermilk. If you prefer easy cheddar chive drop biscuits, you can increase the buttermilk to 1 cup and skip the shaping step entirely. These variations let you adapt to what you have on hand, which is the true mark of a confident cook.
How to Make Savory Cheddar & Chive Biscuits
Step-by-Step Instructions
Step 1: Prepare Your Station and Ingredients
Before you begin mixing, gather everything and set it on your counter within arm’s reach. This isn’t just about convenience, it’s about respect for the biscuit-making process. Cold ingredients are essential here, so if your kitchen is warm, place your mixing bowl in the freezer for five minutes before starting. I know this sounds fussy, but those few degrees make a measurable difference in how your biscuits rise and flake. Remove your butter from the fridge and cube it while it’s still cold. The cubes should be about the size of peas when you begin mixing. Measure your buttermilk and set it aside. These moments of preparation transform what could feel rushed into something intentional.
Step 2: Combine Dry Ingredients
In a large mixing bowl, whisk together your flour, baking powder, salt, and black pepper. Take your time with this step. Whisking isn’t just mixing, it’s aerating. You’re incorporating air into the flour, which contributes to lift and flakiness. Some people use a food processor for this step, and that’s perfectly fine, but I prefer the meditative rhythm of whisking by hand. It connects me to the process. As you whisk, think about how these dry ingredients form the foundation for everything that follows.
Step 3: Work in the Cold Butter
This is where many home bakers falter, so pay close attention. Add your cold, cubed butter to the flour mixture. Using a pastry cutter, two knives, or your fingertips (if your hands are naturally cool), work the butter into the flour. You’re aiming for a texture that resembles coarse breadcrumbs or small peas. This is crucial. The pieces of butter should still be visible and distinct. As these butter pieces melt in the oven, they create steam, which in turn creates those beautiful flaky layers you’re after. If you overwork this stage and the butter becomes too incorporated, you’ll end up with dense biscuits instead of flaky ones. Work quickly and gently. If your butter starts to soften, place the bowl back in the freezer for a few minutes before continuing.
Step 4: Fold in the Cheese and Chives
Once your butter is worked into the flour to that perfect breadcrumb texture, gently fold in your shredded cheddar cheese and chopped fresh chives. Use a spatula or wooden spoon and fold rather than stir. This motion is gentler and preserves those precious butter pockets. The cheese should be evenly distributed but not worked into a paste. Fresh chives add their subtle onion-like brightness here. If you’re using dried chives instead of fresh, use only one tablespoon, as they’re more concentrated in flavor.
Step 5: Add the Buttermilk
Pour your cold buttermilk over the mixture. Using a fork, gently combine until just comes together into a shaggy dough. This is another critical moment. Mix just until the dough forms, no more. Overworking develops gluten, which makes biscuits tough. You want the dough to look slightly rough and somewhat wet. If it seems too dry and won’t hold together, add buttmilk one tablespoon at a time until you reach that sweet spot. The dough should be soft and slightly tacky, but not sticky like cake batter.
Step 6: Shape and Cut
Turn your dough onto a lightly floured surface. Handle it as little as possible. Gently pat it into a rectangle about three-quarter inch thick. For the most dramatic flakiness, fold the dough in half and gently pat again. You can repeat this fold one more time if you’d like. This technique, borrowed from laminated pastry, creates distinct layers. Using a sharp biscuit cutter or the rim of a drinking glass (about 2 inches in diameter), cut straight down without twisting. Twisting seals the edges and prevents proper rising. If you prefer easy cheddar chive drop biscuits, skip this shaping and simply drop spoonfuls onto your baking sheet.
Step 7: Place on Baking Sheet and Prepare to Bake
Arrange your biscuits on a parchment-lined baking sheet, leaving about an inch between each one. They need room to rise and shouldn’t touch during baking. Brush the tops gently with heavy cream or milk. This isn’t just for aesthetics, it creates that beautiful golden-brown finish we’re after. At this point, you can refrigerate the biscuits for up to an hour if you’re not ready to bake immediately. Cold biscuits actually bake even better, so this is a helpful make-ahead step.
Step 8: Bake Until Golden
Preheat your oven to 400 degrees Fahrenheit. Bake for 14 to 16 minutes, until the tops are deep golden brown. Your kitchen should smell absolutely incredible at this point. The exact baking time depends on your oven’s personality, so start checking around the 12-minute mark. The biscuits are done when they’re golden and firm to a gentle touch.
Step 9: Cool and Serve
Remove from the oven and let cool on the baking sheet for five minutes before transferring to a wire rack. This brief resting period allows them to set. Serve warm, ideally within an hour of baking. There’s truly nothing quite like a warm biscuit with a sliver of butter melting into its flaky layers.
Pro Tips & Variations
The Cold Ingredient Philosophy
I cannot stress enough how much cold ingredients matter in biscuit making. This isn’t a suggestion, it’s a fundamental truth. Cold butter creates steam pockets. Cold buttermilk means less mixing is required to bring the dough together. If you’re baking in summer or in a warm kitchen, work quickly and don’t hesitate to chill your bowl and ingredients between steps. I sometimes even place my mixing bowl over ice while I prep everything. Some bakers keep their flour in the freezer. It sounds extreme, but these measures guarantee results.
The Lamination Technique
I mentioned folding the dough earlier, but let me elaborate. After you’ve combined the dough, you can gently fold it in half one or two times before cutting. This creates distinct layers that will dramatically increase your flakiness. It’s the same technique used for puff pastry and croissants, just gentler and simpler. Don’t over-fold, though. One or two folds are ideal.
Cheese Selection Matters
Not all cheddar is created equal. A sharp, aged cheddar provides bold flavor that holds its own through baking. A mild cheddar will disappear into the background. I prefer Vermont white cheddar or a good English farmhouse cheddar, but any quality sharp cheddar will work beautifully. If you want to experiment, try a combination like half sharp cheddar and half gruyere, or add a sprinkle of aged gouda. Just make sure you shred your cheese fresh rather than using pre-shredded, which contains anti-caking agents that can affect texture.
Fresh Herbs Beyond Chives
While chives are classic, you have wonderful options here. Try fresh thyme or rosemary (use half the amount, as they’re more pungent). Smoked paprika adds depth. A tiny pinch of cayenne pepper adds subtle heat without being obvious. Some bakers add crispy bacon bits or caramelized onions. The beauty of understanding the base recipe is you can make it uniquely yours.
Gluten-Free and Dietary Variations
For gluten-free savory biscuits, use a quality 1:1 gluten-free flour blend. The ratio stays the same, but you might need slightly less buttermilk initially, as gluten-free flours absorb liquid differently. For vegan cheese and chive biscuits, use vegan butter and a plant-based milk mixed with a tablespoon of vinegar instead of buttermilk. The results won’t be identical to traditional biscuits, but they’ll still be delicious. For keto cheddar chive biscuits, substitute almond flour for half the all-purpose flour and use a keto-friendly sweetener if desired, though these savory biscuits don’t actually need any sweetness.
Make-Ahead Mastery
You can prepare your biscuits up to the point of baking and freeze them on a baking sheet, then transfer to a freezer bag. Bake directly from frozen, adding a few extra minutes to the baking time. This makes weeknight dinners easier. You can also freeze baked biscuits and reheat them gently in the oven.
Serving Suggestions
One of my favorite things about these biscuits is their graceful ability to complement nearly any meal. I’ve served them at elegant dinner parties, casual family dinners, and quiet Sunday mornings, and they’ve never disappointed.
Alongside Soup
This is perhaps the most classic pairing, and for good reason. A warm bowl of butternut squash soup, chicken and rice soup, or tomato bisque becomes elevated when you can tear into a warm, flaky biscuit. The richness of the cheese plays beautifully against creamy soups, while the chives add a counterpoint of freshness. I often make these biscuits specifically to serve with homemade soup on cool autumn evenings.
As a Brunch Centerpiece
Arrange these biscuits on a wooden board alongside soft scrambled eggs, crispy bacon, and fresh fruit. Add a small bowl of honey butter or herb-infused butter. This transforms a simple breakfast into something that feels intentional and special. You might even explore our easy fluffy classic dinner rolls as another bread option for your brunch spread if you’re looking to round out your offerings.
With Roasted Vegetables
Serve alongside roasted Brussels sprouts, caramelized carrots, or roasted root vegetables. The sharpness of the cheddar complements earthy vegetables beautifully. Try pairing with our guide to crispy roasted Brussels sprouts with bacon for a complete side dish experience that impresses without requiring hours in the kitchen.
For a Casual Charcuterie
Place these biscuits on a board with cured meats, cheeses, pickled vegetables, and preserves. The savory biscuits provide structural support for creating little flavor combinations. Guests enjoy the interactive nature of building their own bites.
At a Dinner Party
Place one warm biscuit on each bread plate as guests arrive at the table. Serve with herbed butter or aged balsamic vinegar for dipping. This small gesture speaks volumes about your attention to hospitality. It says, “I made this for you,” which is ultimately what home cooking is about.
With Chili or Stew
These biscuits are perfect companions to hearty, warming dishes. The richness of beef chili is beautifully cut by the biscuits’ flakiness and the brightness of the chives. Serve alongside your favorite cider braised short ribs for a winter dinner that feels substantial and nourishing.
Storage & Reheating
Room Temperature Storage
Biscuits are best enjoyed the day they’re made, but they’ll keep in an airtight container at room temperature for up to two days. The texture changes slightly over time as they naturally lose moisture, but they’re still quite pleasant.
Refrigerator Storage
Store cooled biscuits in an airtight container in the refrigerator for up to four days. Before serving, warm them gently in a 300-degree oven for about five minutes.
Freezer Storage
Baked biscuits freeze beautifully for up to three months. Arrange them on a baking sheet, freeze until solid, then transfer to a freezer-safe bag. You can reheat from frozen in a 350-degree oven for about ten minutes, or thaw at room temperature and warm for five minutes. Unbaked biscuits also freeze well. Freeze them on a baking sheet, then transfer to a freezer bag. Bake directly from frozen, adding two to three minutes to the baking time.
Best Reheating Methods
The oven is your friend here. A gentle reheating at 300 degrees for five minutes restores much of the original texture and flavor. Avoid the microwave, which can make biscuits rubbery. If you’re in a real hurry, wrap individual biscuits loosely in foil and warm for about ten minutes, though the oven method genuinely produces superior results.
FAQ About Savory Cheddar & Chive Biscuits
Why are my biscuits not flaky?
Flakiness comes from distinct butter pockets and minimal mixing. Most commonly, biscuits become dense when the butter is overworked into the flour at the beginning or when the dough is mixed too much when the buttermilk is added. Remember: work butter into flour gently until you still see small pea-sized pieces. Mix the dough only until it just comes together. Another culprit is warm butter. Always use cold butter straight from the refrigerator.
Can I make these ahead of time?
Absolutely. You can prepare the dough, cut your biscuits, and refrigerate them on a baking sheet for up to eight hours before baking. You can also freeze them at this stage for several weeks. Bake as directed, adding just a minute or two if baking from frozen. This is particularly helpful when you’re entertaining and want to minimize last-minute stress. The cold resting time actually improves the final result by allowing the gluten to relax.
What’s the difference between these biscuits and scones?
The main differences are subtle. Biscuits typically contain baking powder as the leavening agent and are more savory, while scones often include baking soda and sugar and are slightly sweeter. Biscuits are also usually smaller and cooked at a higher temperature. These cheese scones or savory scone recipes would follow a similar method but with slight adjustments to ingredient ratios. Both are delicious in their own right.
Can I use dried chives instead of fresh?
You can, but use only one tablespoon of dried chives, as they’re more concentrated in flavor. Reconstitute them in a tablespoon of warm water for a few minutes before adding. Fresh chives are ideal, but dried work in a pinch. Fresh herbs always provide superior flavor and color, which is why I recommend seeking them out when possible.
How do I know when they’re done baking?
Look for a deep golden brown color on top. The biscuits should feel firm but still slightly yielding when you gently press them. If you have a thermometer, the internal temperature should reach about 200 degrees Fahrenheit. Don’t underbake, as the interiors need time to set properly. Conversely, don’t overbake, or they’ll become dry. Around 14 to 16 minutes is typically perfect, though every oven is different.
Can I make easy cheddar chive drop biscuits?
Yes! Increase the buttermilk to 1 cup to create a wetter dough. Skip the shaping and cutting step, and instead drop spoonfuls of dough onto your baking sheet using a cookie scoop or large spoon. These bake at the same temperature and time as traditional biscuits. They’re slightly less refined looking but equally delicious and require less hands-on work.
Final Thoughts on Savory Cheddar & Chive Biscuits
There’s something deeply human about baking. It’s one of the oldest kitchen skills, passed down through generations, refined through repetition, shared among friends. Every time you bake a batch of homemade cheddar chive biscuits, you’re participating in a tradition that spans centuries and continents.
When I first began making these biscuits regularly, I was nervous. I’d had failures before. I’d made dense biscuits that disappointed, gummy centers that frustrated, biscuits that looked nothing like what I’d imagined. But I kept trying, kept learning, and eventually, something clicked. The understanding moved from my head to my hands. Now, when I walk into my kitchen to make a batch, my body knows what to do. The cold butter, the gentle mixing, the careful cutting, the moment I pull the tray from the oven, still warm and golden.
These buttermilk cheddar chive biscuits have become part of my family’s story. My daughter asks for them on school mornings. My husband pairs them with his photography projects as he shoots food for the blog. My son sneaks them warm from the cooling rack when he thinks I’m not looking. They’re no longer just a recipe to me, they’re a vehicle for care and connection.
I hope this recipe becomes part of your story too. I hope you’ll make these biscuits for people you love, that you’ll experience that quiet confidence that comes from knowing you can create something truly delicious from simple ingredients. I hope you’ll discover your own variations, your own moments of joy in the kitchen.
Please save this recipe to your Pinterest board so you can find it easily when you’re ready to bake. Leave a comment below and tell me your thoughts, your experiments, your stories. Subscribe to MisterRecipes so you don’t miss future recipes and stories. And most importantly, go bake something today. Your kitchen, and everyone who loves you, will thank you for it.

Savory Cheddar and Chive Biscuits
Ingredients
Equipment
Method
- Prepare your station and ingredients. Gather everything within arm’s reach. Place your mixing bowl in the freezer for five minutes before starting.
- In a large mixing bowl, whisk together flour, baking powder, salt, and black pepper.
- Add cold, cubed butter to the flour mixture. Using a pastry cutter, two knives, or fingertips, work the butter into the flour until you resemble coarse breadcrumbs or small peas.
- Gently fold in shredded cheddar cheese and chopped fresh chives. Use a spatula or wooden spoon and fold rather than stir.
- Pour cold buttermilk over the mixture. Using a fork, gently combine until just comes together into a shaggy dough.
- Turn your dough onto a lightly floured surface. Handle it as little as possible. Gently pat it into a rectangle about three-quarters inch thick. Fold the dough in half and gently pat again.
- Using a sharp biscuit cutter or the rim of a drinking glass (about 2 inches in diameter), cut straight down without twisting.
- Arrange biscuits on a parchment-lined baking sheet, leaving about an inch between each one. Brush the tops gently with heavy cream or milk.
- Preheat your oven to 400 degrees Fahrenheit. Bake for 14 to 16 minutes, until the tops are deep golden brown.
- Remove from the oven and let cool on the baking sheet for five minutes before transferring to a wire rack.