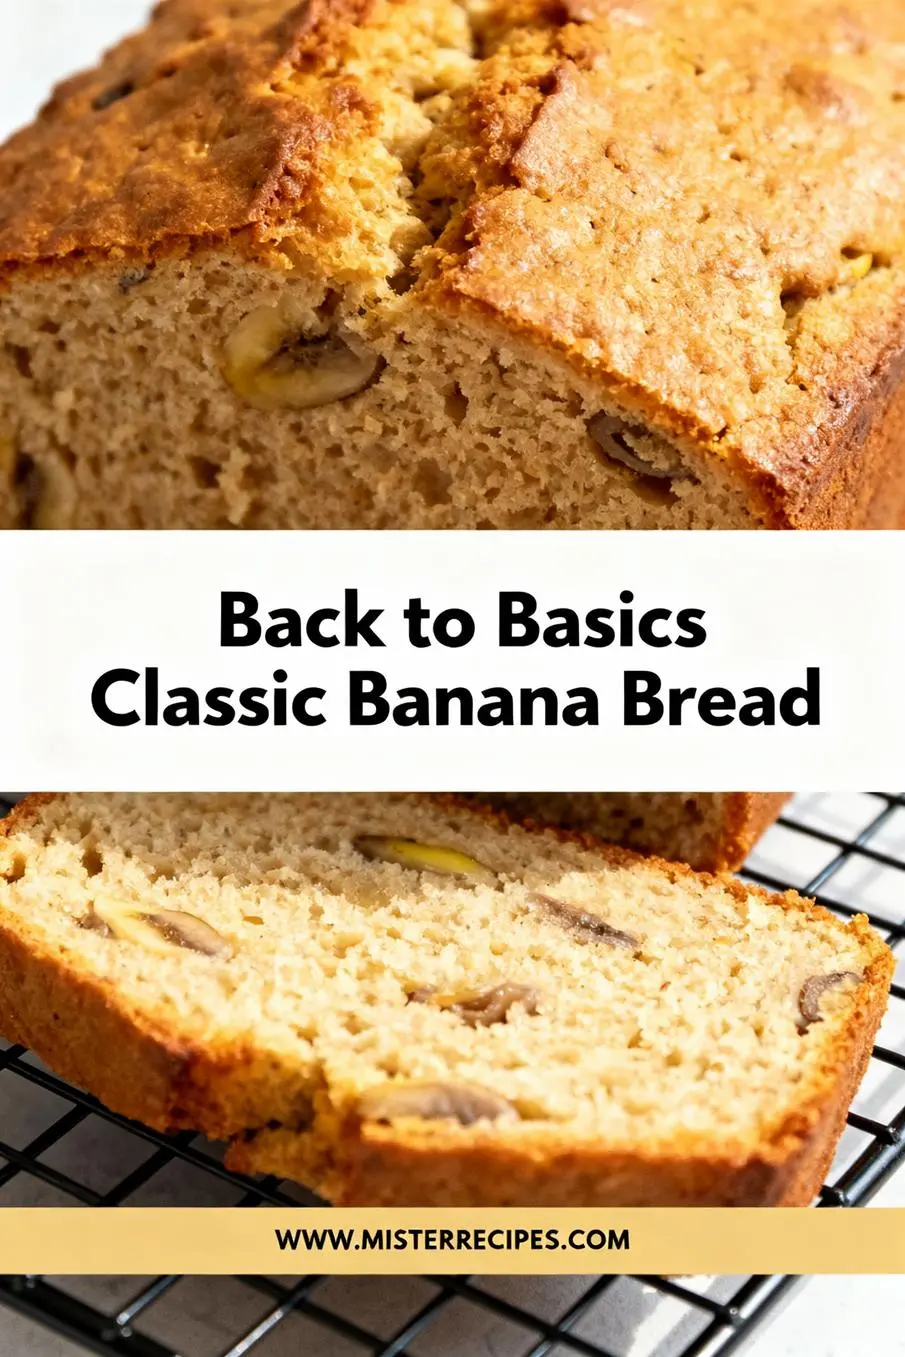
Stories from the Skillet: Finding Home in Back to Basics Classic Banana Bread
It was Tuesday, and the rain in Bend had settled into that soft, persistent drumming against the office skylight. Ethan was downstairs wrestling with a tough Lightroom edit. Olivia (ever the scientist) was attempting to engineer a miniature dam system in the sink, and James was demanding the immediate consumption of approximately seventeen slightly shriveled bananas resting stubbornly in the fruit bowl. Sometimes, the most complicated days call for the simplest comfort. I looked at those speckled brown reminders, and realized it was time for the recipe that anchors our kitchen, the Back to Basics Classic Banana Bread. It’s the kind of recipe that doesn’t ask for fussy techniques or exotic ingredients, just a commitment to warm, familiar flavor, producing the best classic banana bread recipe you’ll ever encounter.
I get asked all the time about the secret to perfectly moist banana bread. Is it the sour cream? Is it the precise temperature? Is it a secret ingredient I borrowed from a Michelin-star pastry chef? Here’s the truth, dear friends. The secret, especially when making a profoundly satisfying, simple, homemade banana bread, isn’t complexity, it’s care. It’s about not overmixing, embracing those truly overripe bananas right when they develop that sweet funk, and letting the scent of vanilla and spice fill the house until the gray Oregon afternoon feels a little brighter. This recipe is an intentional return to the fundamentals. It’s what my grandmother made, what I perfected over years of Friday night baking sessions, and what finally convinced Ethan (a notorious non-baker) to keep our flour bin consistently stocked.
We’ve experimented with everything from sour cream banana bread variations to those unbelievably sweet sugar cookie hybrids, but nothing truly replaces the simple, restorative power of this easy moist banana bread with ripe bananas. This loaf is rich, deeply flavored, and utterly dependable, an essential foundation for any home baker. If you’ve been searching for the definitive, no-fail classic banana bread recipe, look no further. This recipe bypasses the need for high-maintenance techniques, proving that sometimes, the simple way is truly the best way.
Table of Contents
- Why You’ll Love This Back to Basics Classic Banana Bread
- Ingredients for Back to Basics Classic Banana Bread
- How to Make Back to Basics Classic Banana Bread
- Pro Tips & Variations of Back to Basics Classic Banana Bread
- Back to Basics Classic Banana Bread Serving Suggestions
- Back to Basics Classic Banana Bread Storage & Reheating
- FAQ about Back to Basics Classic Banana Bread
- Final Thoughts
Why You’ll Love This Back to Basics Classic Banana Bread
We need recipes that perform, especially on a long week. This isn’t just another average easy banana bread recipe, it’s a foundational staple designed for repeated success. Here’s why this version earns its spot as the best banana bread on your rotation:
- Unbeatable Moisture: We use a strategic blend of sugar and fat to ensure this loaf remains incredibly moist banana bread for days, resisting the dry crumbliness that plagues many inferior recipes.
- Simple Pantry Ingredients: You likely have every single ingredient needed already sitting on your shelf, making this truly the simple homemade banana bread no mixer recipe you can whip up anytime.
- Flavor Depth: We rely on the natural sweetness of black-spotted, overripe bananas blended perfectly with a hint of cinnamon and quality vanilla extract for a deep, comforting flavor profile.
- Freezer-Friendly: Bake a double batch and wrap one for later, making this the perfect freezer-friendly banana bread option for unexpected company or quick breakfast needs.
- Family Approved: Olivia and James give this loaf two thumbs up, especially when I sneak in a few chocolate chips (don’t tell Ethan!).
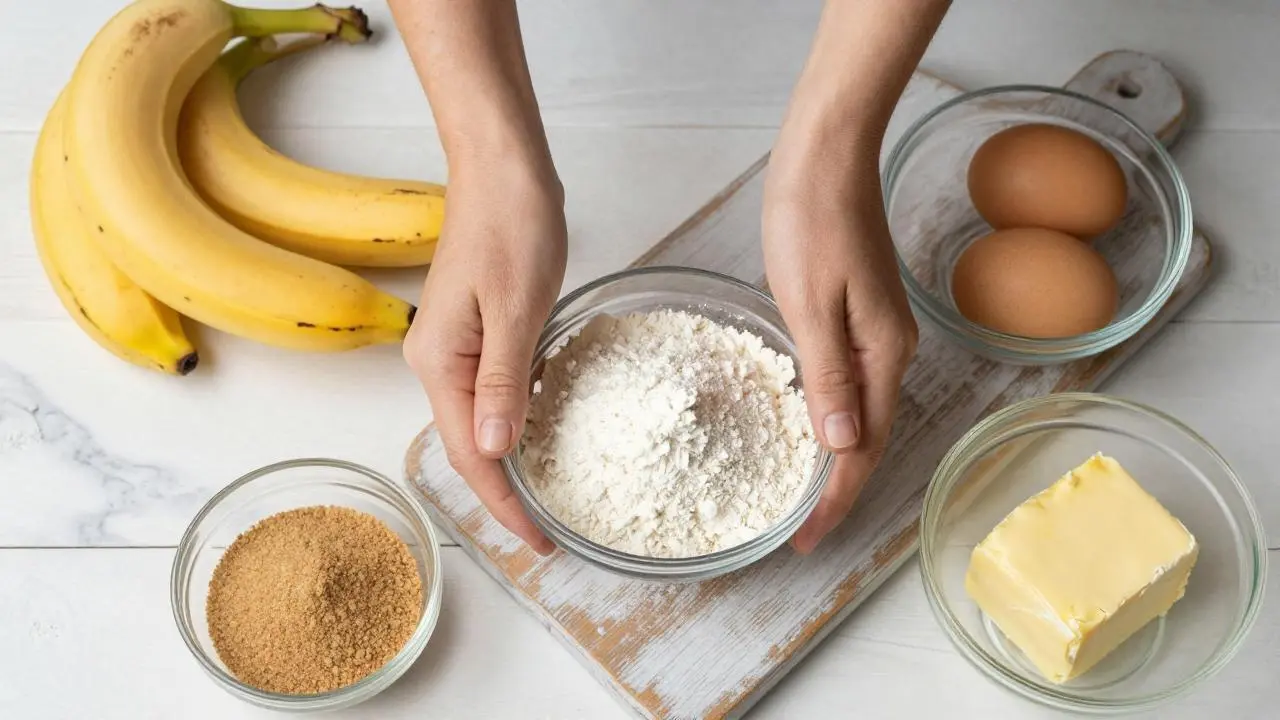
Ingredients for Back to Basics Classic Banana Bread
The beauty of this recipe lies in its simplicity. Use quality ingredients, and you’ll be rewarded with quality flavor. Always measure your flour correctly (spooned into the cup, then leveled!) to avoid a tough or dry crumb.
- Ripe Bananas: 3 medium to large, very ripe (black-spotted) bananas. The riper, the sweeter, the better the flavor.
- All-Purpose Flour: 1 ½ cups. I prefer unbleached flour here.
- Granulated Sugar: ½ cup. For a richer, deeper molasses note, you can substitute half of this with brown sugar.
- Unsalted Butter: ½ cup (1 stick), melted and slightly cooled. Using melted butter contributes significantly to the final texture and moistness.
- Egg: 1 large, room temperature.
- Vanilla Extract: 1 teaspoon. Use the good stuff, it makes a difference!
- Baking Soda: 1 teaspoon. Make sure it’s fresh!
- Salt: ½ teaspoon. Essential for balancing the sweetness.
- Optional Mix-ins: ½ cup chopped walnuts or pecans for a traditional banana nut bread experience.
How to Make Back to Basics Classic Banana Bread
This is truly a one-bowl basic banana bread concept, designed for minimal fuss—perfect for those days when you just need the oven timer distraction.
Step-by-Step Instructions for Back to Basics Classic Banana Bread
- Preheat and Prep: Preheat your oven to 350°F (175°C). Lightly grease a standard 9×5 inch loaf pan. For easy removal, I line mine with parchment paper, leaving an overhang like little handles.
- Mash the Bananas: In a large mixing bowl, thoroughly mash the overripe bananas until they are mostly smooth with only a few small lumps remaining. I use a fork for this; a mixer is entirely unnecessary for this easy banana bread recipe.
- Combine Wet Ingredients: Add the melted and slightly cooled butter, granulated sugar (or the mixture of brown and granulated sugar), egg, and vanilla extract to the mashed bananas. Whisk everything together briefly until just combined. The mixture will look slightly lumpy, but that’s fine.
- Add Dry Ingredients (The Crucial Step): In a separate small bowl, whisk together the flour, baking soda, and salt. Gently sprinkle the dry ingredients over the wet ingredients.
- Mix Gently: Using a rubber spatula, mix the batter just until the flour streaks disappear. Do not overmix! Overmixing develops gluten and that is the enemy of moist banana bread. If you are adding nuts or chocolate chips, fold them in now.
- Bake: Pour the batter into the prepared loaf pan and smooth the top with the spatula. Optional: sprinkle a small amount of extra sugar on top for a delightful crunchy crust. Bake for 55 to 65 minutes.
- Check for Doneness: The loaf is done when a toothpick inserted near the center comes out clean, or with just a few moist crumbs attached. The top should be a beautiful golden brown, smelling warmly of cinnamon and sweet fruit. If the top starts to brown too quickly, lightly tent it with aluminum foil after about 40 minutes.
- Cool: Let the loaf cool in the pan for 10 minutes before carefully lifting it out onto a wire rack. Allow it to cool almost completely before slicing for the cleanest cuts and best flavor, though I often succumb to slicing a warm end piece for a quality control check!
Pro Tips & Variations of Back to Basics Classic Banana Bread
Even a basic recipe can benefit from a few expert tweaks. Think of these as little secrets passed down through a very long line of enthusiastic home bakers.
- Use Brown Sugar: While the basic recipe uses granulated sugar, substituting up to half of the sugar with brown sugar adds depth of flavor and contributes significantly to the final moist banana bread texture, akin to the best banana bread recipe championed by many of my colleagues.
- The Yogurt/Sour Cream Hack: If you find yourself wanting an even more plush, velvety moist one-bowl banana bread texture, replace half the melted butter (¼ cup) with ¼ cup of full-fat plain yogurt or sour cream. This is a common and very effective trick for extra richness, similar to the technique used in my better than bakery sour cream banana loaf.
- Flour Variation: For a slight texture variance, replace 2 tablespoons of all-purpose flour with 2 tablespoons of cornstarch. This helps tenderize the crumb.
- Make it Gluten-Free: This recipe converts beautifully using a 1-to-1 gluten-free flour blend (ensure it contains xanthan gum).
- DIY Starbucks Copycat Hack: To mimic the richness of the famous coffee shop loaf, fold in ½ cup of toasted walnuts and add an extra ¼ teaspoon of fine cinnamon. It brings you closer to that taste-alike better than Starbucks banana bread copycat without compromising the classic foundation. For further inspiration on perfecting the texture, check out this great resource from Live Well Bake Often on the classic banana bread recipe.
Back to Basics Classic Banana Bread Serving Suggestions
This easy moist banana bread with ripe bananas is perfect naked, but sometimes a little dressing up is required for a weekend brunch. Here are our favorite ways to serve it in the Motter household:
- Warm with Butter: The classic, perfect way. Slice it thick, toast it slightly, and slather with good quality salted butter.
- The Nutella Swirl: James’s favorite. Warm a slice and drizzle with slightly melted Nutella or a simple dark chocolate ganache.
- Fruity Crunch: Serve alongside fresh berries (blueberries or raspberries work perfectly) and a dollop of crème fraîche or Greek yogurt for a lighter feel.
- The Fall Favorite: A warm slice topped with a scoop of vanilla ice cream, toasted pecans, and a light caramel sauce.
Back to Basics Classic Banana Bread Storage & Reheating
One of the best things about making homemade banana bread is how well it keeps. Whether it’s breakfast throughout the week or a future craving, storage is simple.
Countertop (Short Term): Once completely cooled, wrap the bread tightly in plastic wrap or store it in an airtight container at room temperature for up to 3 to 4 days. Do not skip the cooling step, as wrapping warm bread causes condensation and soggy spots.
Freezing (Long Term): This is an excellent freezer-friendly banana bread. Ensure the bread is absolutely cold. Wrap the entire loaf or individual slices first in plastic wrap, then again in aluminum foil or place it in a freezer-safe zip-top bag. It keeps beautifully for up to 3 months. Thaw overnight at room temperature or reheat individual slices slightly in the microwave or toaster oven.
FAQ about Back to Basics Classic Banana Bread
Q: Can I use less sugar in this classic banana bread recipe?
A: Yes, you can usually reduce the sugar by about ¼ cup without seriously impacting the structure, as the sweetness from the overripe bananas provides a lot of flavor. However, remember that sugar also contributes significantly to the moisture and tenderness of baked goods, so extreme reductions might result in a drier loaf.
Q: Why did my easy moist banana bread sink in the middle?
A: The most common causes are using too much leavening (baking soda), insufficient baking time, or too much moisture. Make sure your oven temperature is accurate and let the bread bake until the toothpick test is passed. If you added extra fruit or liquid, it could be tipping the balance. Always use just the number of bananas specified, as too much mashed banana can make the center collapse.
Q: Is this simple homemade banana bread no mixer recipe really achievable without any electric tools?
A: Absolutely! This simple homemade banana bread no mixer recipe is designed to be fully mixed by hand using just a fork and a spatula. The gentle mixing is key to a tender texture, something that a powerful stand mixer often works against when making quick breads.
Q: How ripe do the bananas really need to be for the best flavor?
A: The riper the better! Look for bananas that are at least 50% dark brown or black on the peel. As bananas ripen, the starches convert to sugar, intensifying the flavor and natural sweetness, making your final loaf far superior to one made with yellow or slightly spotted fruit. This ensures you get that true grandma’s classic banana bread flavor depth.
Final Thoughts
The afternoon progressed, the rain turned into sleet, and by 3:30 p.m., the scent of warm, sweet banana bread was the only thing standing between us and total Tuesday mutiny. There’s something deeply humbling about a recipe that is so profoundly simple, yet delivers so perfectly. We often chase newness, complexity, and viral trends, but sometimes, the best lessons are found when we return to the basics. The quiet satisfaction of slicing that first piece, seeing the steam rise, and watching James reach for an end crust while Olivia dips hers in a glass of milk, is everything. This is more than baking, it’s home. It’s a story told from the skillet.
Pin this Back to Basics Classic Banana Bread recipe for later, and let me know your favorite way to enjoy it!
Back to Basics Classic Banana Bread
Ingredients
Equipment
Method
- Lightly grease the inside of your slow cooker. Line the bottom and sides with parchment paper for easy removal.
- In a large mixing bowl, mash the ripe bananas until mostly smooth with a few small lumps, using a fork or potato masher. Add the melted butter, sugar, egg, and vanilla extract. Whisk until just combined. The mixture may look lumpy, which is fine.
- In a separate small bowl, whisk together the flour, baking soda, and salt. Sprinkle the dry ingredients over the wet mixture. Gently fold in with a spatula until just combined, avoiding overmixing to keep it moist. If using nuts, fold them in now.
- Pour the batter into the prepared slow cooker and smooth the top with a spatula. Sprinkle a small amount of extra sugar on top for a crunchy crust if desired. Cover and cook on LOW for 2.5 to 3 hours, until a toothpick inserted in the center comes out clean or with moist crumbs.
- Turn off the crockpot and let the bread cool in the pot for 10-15 minutes. Carefully lift out using the parchment paper and place on a wire rack to cool completely before slicing for best texture.