
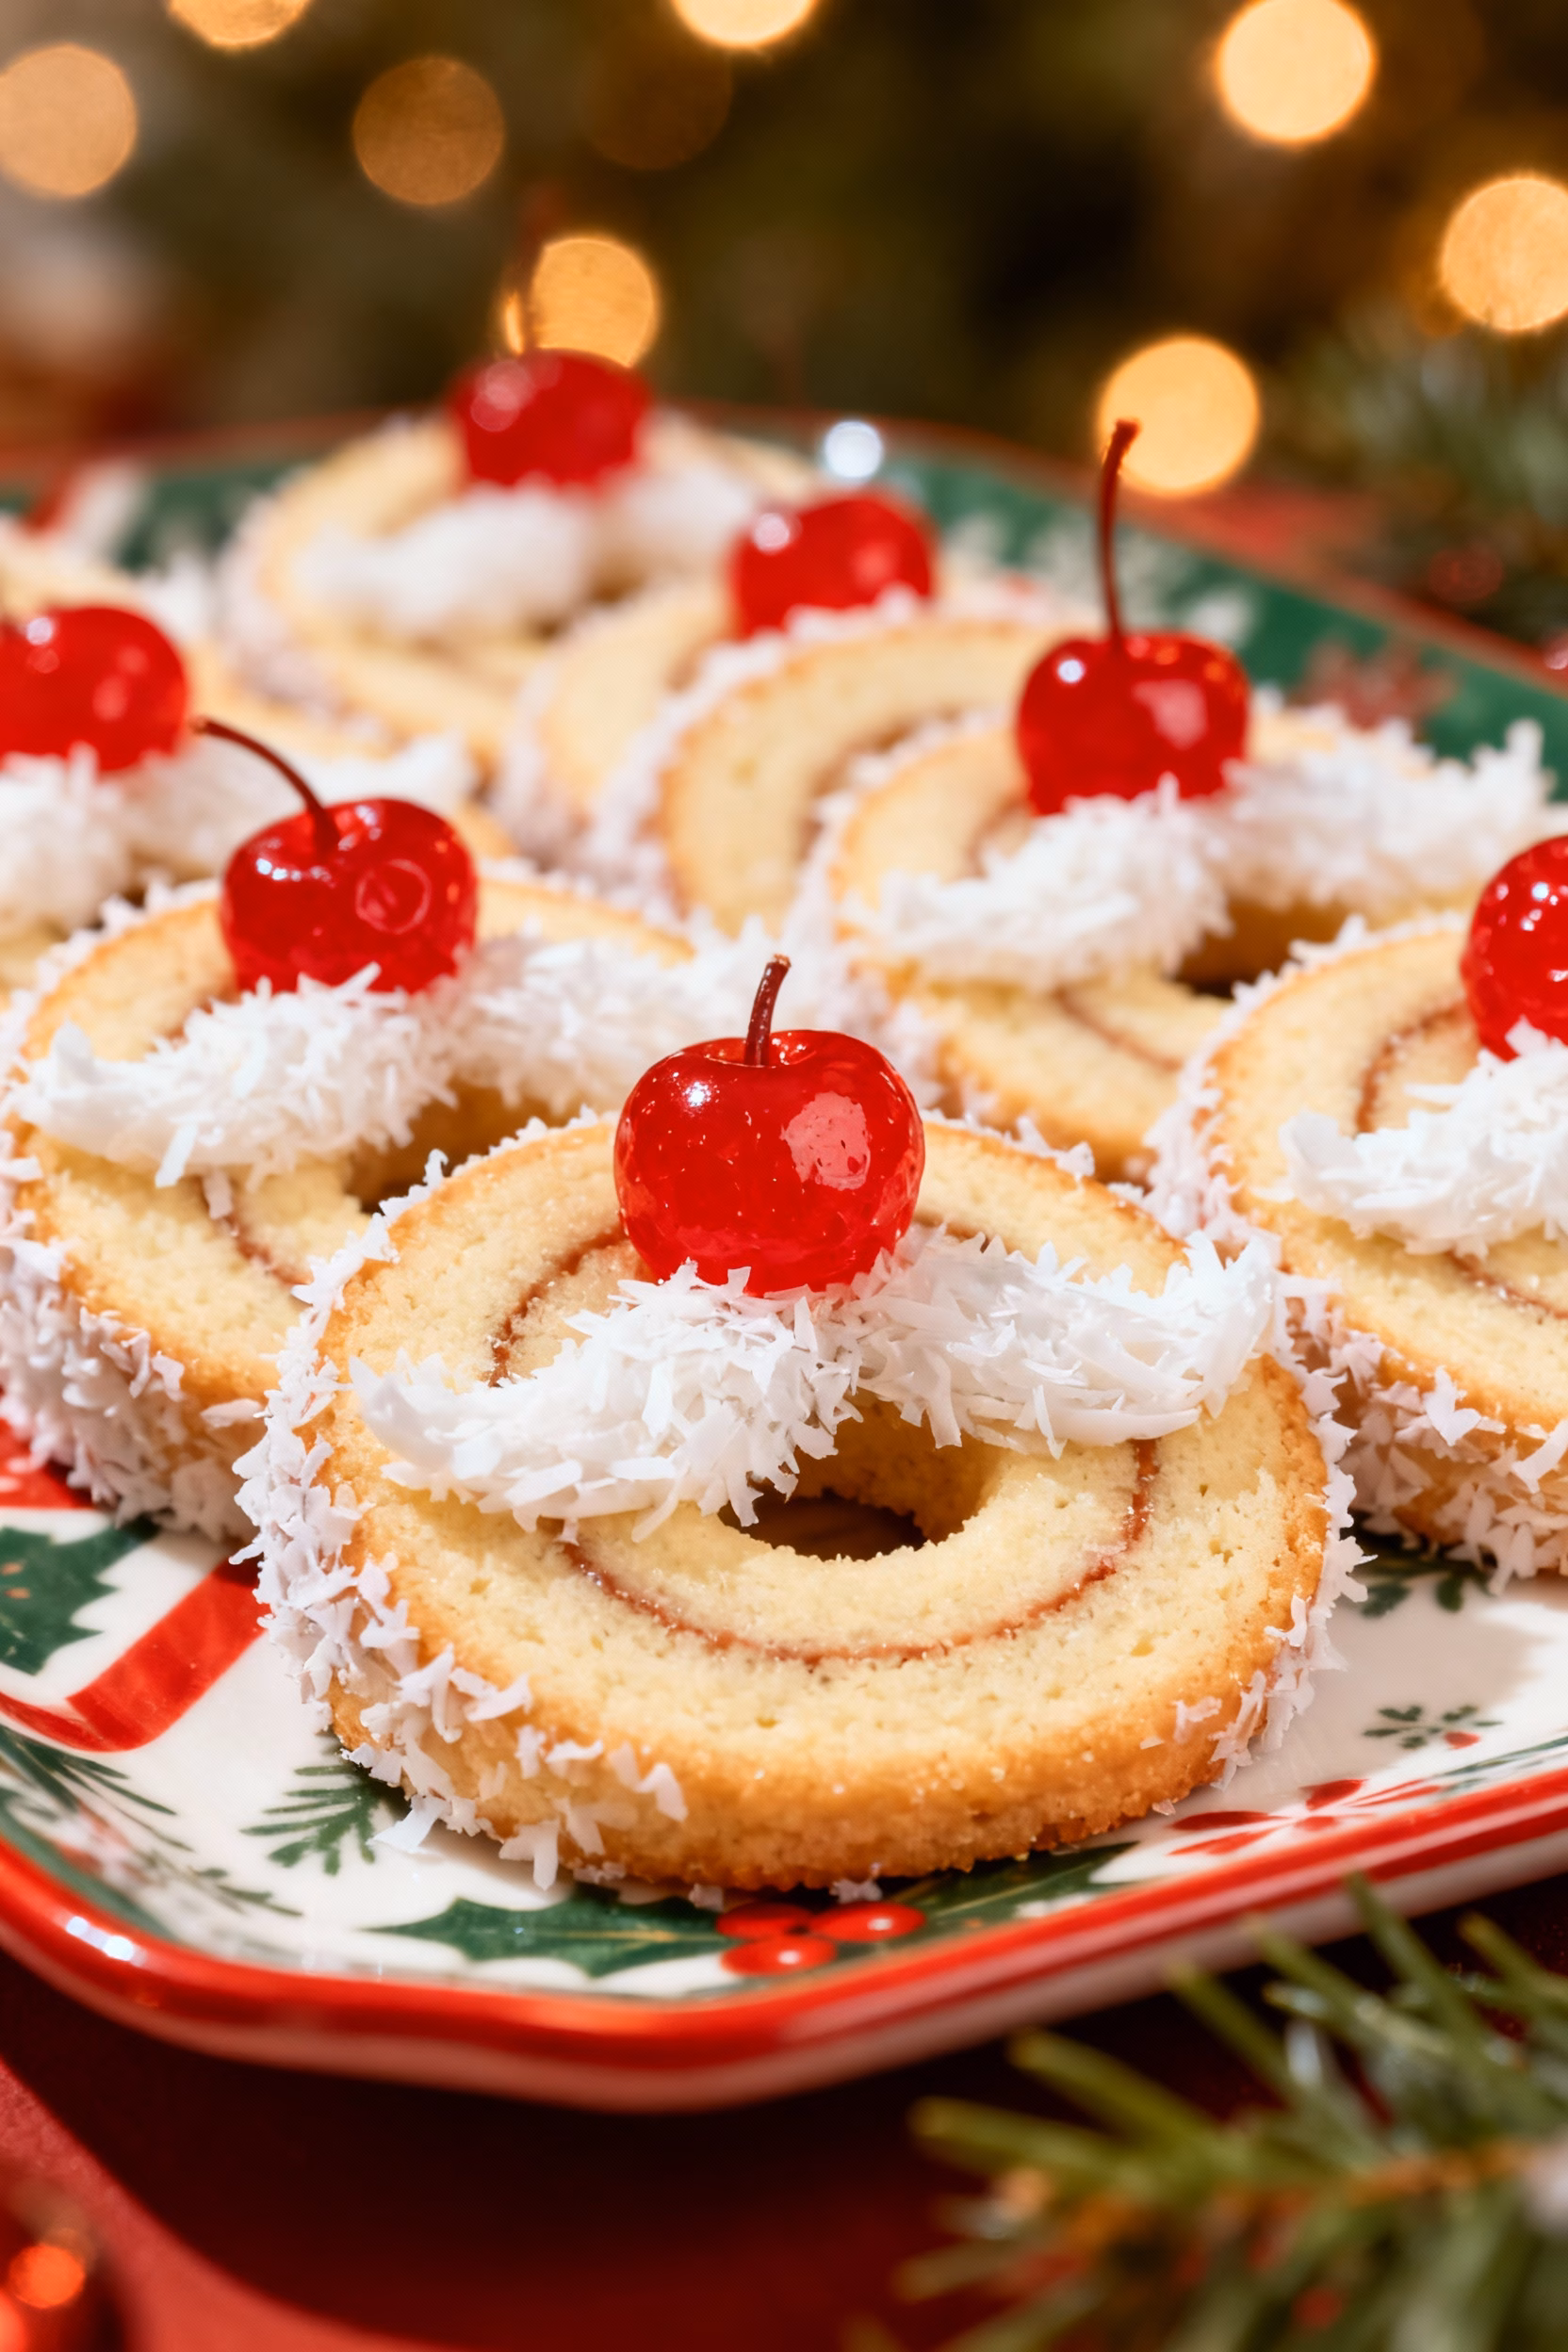
Tell me, does anything smell more like Christmas than butter and almond extract hitting a hot oven? For me, the holiday season always tastes like something sweet and a little bit buttery. Growing up, Christmas Eve was less about the gifts under the tree and more about the enormous, slightly chaotic cookie assembly line my Grandmother ran in the kitchen. She specialized in retro Christmas cookies, those wonderful mid-century cookie recipes that taste of pure nostalgia, and the Santa’s Whiskers Cookies were the undisputed star of the show. If you’re looking for an amazing make ahead cookie dough that captures that classic holiday flavor, this is it. These are those festive, slice-and-bake refrigerator cookies rolled in coconut, bursting with sweet, jewel-bright bits of candied red cherries.
Today, Adams (12) and Jana (9) love making these almost as much as I did. They call them ‘Santa’s secret beard cookies’ because of the fluffy, slightly messy coconut ‘whiskers’ on the outside. This recipe is the best Santa’s Whiskers Cookie recipe because it delivers on both flavor and ease. We’re using the classic slice-and-bake cookie dough method, which means you can mix the dough tonight, chill it, and have fresh-baked cookies in minutes tomorrow. It’s perfect for busy parents, especially when you need a fantastic addition to your Christmas cookie tray ideas or a simple batch of easy Christmas cookies for a last-minute gathering. Grab your apron, let’s bring some of that old-fashioned warmth back to the kitchen, and see about making these delicious holiday slice and bake treats!
Why You’ll Love This Santa’s Whiskers Cookies: The Best Slice-and-Bake Holiday Cookie Recipe
If you’re already prepping your repertoire for holiday baking, allow me to convince you why these festive cherry cookies need a prime spot. The beauty of this recipe isn’t just in the gorgeous, celebratory look, but in the sheer efficiency of the creation process. This is truly the ultimate make ahead Christmas cookie.
- Effortless Slice and Bake Method: Forget messy cookie cutters and rolling pins. Our recipe focuses on creating easy-to-handle Santa’s Whiskers Cookies dough logs. This means the heavy lifting is done days in advance. When the kids are ready for a quick treat, or guests show up unexpectedly, you just grab the log from the fridge, slice, and bake. This makes them ideal batch cookie recipes for the busy season.
- Packed with Nostalgia and Flavor: These aren’t your average sugar cookies. They are rich, tender, and buttery, heightened by the delicate combination of vanilla and a hint of almond extract cookies. The texture is sublime: tender shortbread-style cookie contrasted by the chewiness of the coconut and the delightful pop of candied cherry cookies recipe.
- Perfect for Freezing (The Ultimate Prep Secret): Are you planning a huge cookie swap? You can learn exactly how to make Santa’s Whiskers Cookies and then tuck them away. The dough logs freeze beautifully, meaning you are instantly ready weeks before the rush. This is pure Christmas cookie preservation and a secret weapon for any seasonal baker.
- Kid-Friendly and Fun: The assembly line process, especially rolling the logs in the shredded coconut, is a total blast for kids. Emily loves setting up the station, and even Adams, who usually prefers playing video games, gets involved in creating the perfect ‘whiskers’. Jana calls the halved cherries the ‘holiday polka dots’. The visual appeal alone makes them fantastic for Cookie Gift Ideas.
- High-Value Ingredients: Unlike some thinner, less flavorful slice-and-bake recipes, this one uses quality butter and a secret addition, which we will get to, that keeps the interior tender and perfect, complementing the cherry pecan cookies combination beautifully.
- Semantic Search Win: By mastering this simple recipe, you gain control over a traditional slice-and-bake variant that is highly sought after every Christmas. It answers the user intent looking for Santa’s Whiskers Cookies with almond extract and delightful textural contrast.
They are sweet, festive, and taste exactly like the kind of love and hard work you want to package up and share with the people you care about. If you haven’t decided on your Holiday Cookie Recipes yet, start here.
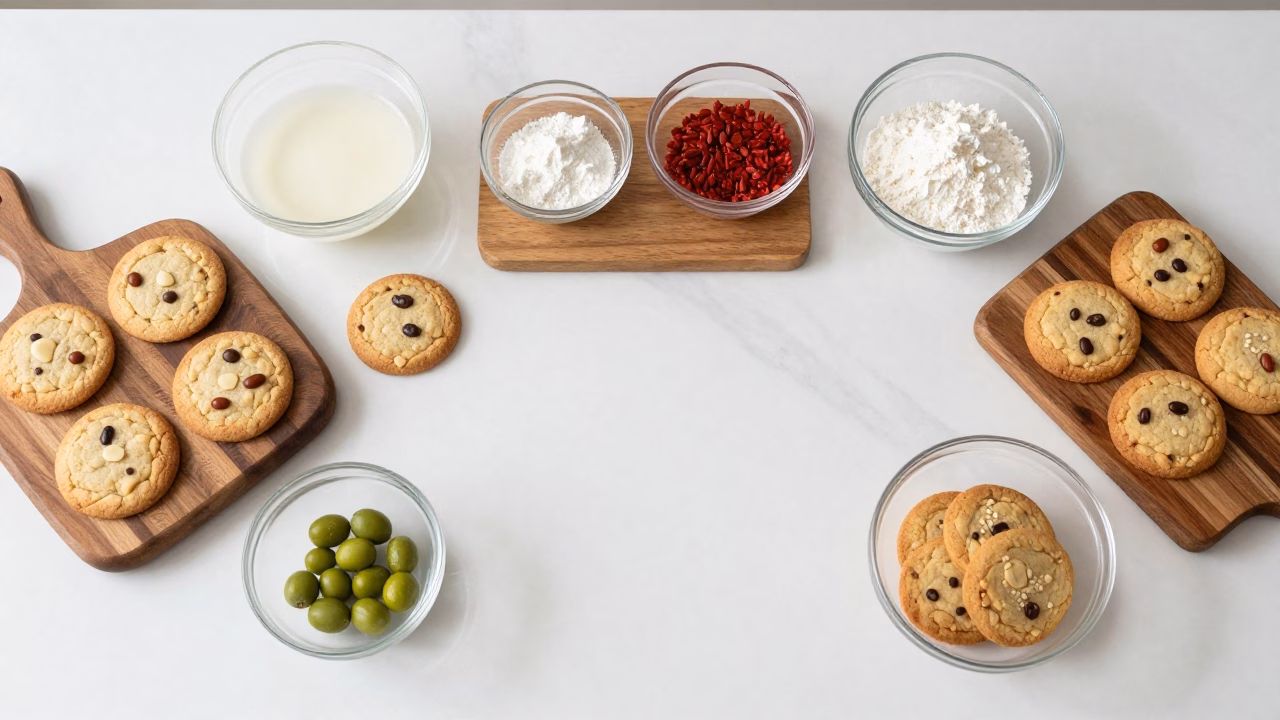
Ingredients for Santa’s Whiskers Cookies
This is a classic shortbread-style base, so quality ingredients really shine through. Make sure your butter is truly softened, not melted!
- Dry Ingredients:
- 3 cups All-Purpose Flour
- 1 teaspoon Baking Powder
- 1/2 teaspoon Kosher Salt
- Wet Ingredients:
- 1 cup (2 sticks) Unsalted Butter, softened
- 1/2 cup Granulated Sugar
- 1/2 cup packed Light Brown Sugar
- 2 large Eggs, room temperature
- 1 teaspoon Pure Vanilla Extract
- 1/2 teaspoon Almond Extract (non-negotiable for that classic flavor!)
- Mix-Ins & Coating:
- 2/3 cup Candied Red Cherries, roughly chopped (or maraschino cherries, patted completely dry)
- 1/2 cup Finely Chopped Pecans (optional, for extra crunch)
- 1 large Egg White, lightly beaten (for the ‘glue’)
- 1 1/2 cups Sweetened Shredded Coconut (for rolling)
- Extra Candied Red Cherries, halved (for decoration)
How to Make Santa’s Whiskers Cookies Dough Logs
The secret to perfect holiday icebox cookies is precise dough log preparation. Following this simple method ensures perfectly round, easy-to-slice cookies every time. This section answers the intent behind Santa’s Whiskers Cookies step by step instructions.
Step-by-Step Instructions
- Combine Dry Ingredients: In a medium bowl, whisk together the all-purpose flour, baking powder, and kosher salt. Set this aside.
- Cream Butter and Sugars: In a large mixing bowl, using an electric mixer (or stand mixer fitted with the paddle attachment), beat the softened butter, granulated sugar, and light brown sugar together on medium speed until the mixture is light, fluffy, and pale, about 3-4 minutes. Scrape down the sides of the bowl as needed.
- Add Liquids and Flavor: Beat in the two large eggs, one at a time, ensuring each is fully incorporated before adding the next. Stir in the vanilla extract and the critical almond extract. The mixture will look rich and creamy.
- Mix in Dry Ingredients: Gradually add the flour mixture to the wet ingredients, mixing on low speed until just combined. Stop as soon as you see no raw flour streaks remaining. Do not overmix the dough.
- Fold in the Festive Bits: Gently fold in the chopped candied red cherries and the chopped pecans (if using) using a rubber spatula. Ensure they are evenly distributed, creating the perfect mix for your cherry almond baking combinations.
- Shape the Dough Logs: Divide the dough in half. Lay a large piece of plastic wrap or parchment paper on your counter. Place one half of the dough in the center. Carefully shape the dough into a tight cylinder, approximately 1 1/2 to 2 inches in diameter. This takes a little gentle coaxing, but wrap the cylinder tightly in the plastic wrap, pressing it firmly to eliminate any air pockets and maintain a perfect circular shape. Repeat with the second half of the dough. These are your essential Santa’s Whiskers Cookies dough logs.
- Chill Time (The Crucial Step): Place the tightly wrapped dough logs in the refrigerator for a minimum of 4 hours, or preferably overnight. Chilling is what gives these cookies their incredible, sliceable structure. This is how you achieve perfectly uniform Santa’s Whiskers Cookies slice and bake results.
- Preheat and Prep: When ready to bake, preheat your oven to 350°F (175°C). Line two large baking sheets with parchment paper or silicone baking mats.
- The Coconut Whiskers Roll: Set up your rolling station. Place the shredded coconut in a shallow dish (this is the key to the ‘whiskers’). Lightly beat the egg white in another small dish. Unwrap one chilled dough log. Brush the entire exterior of the dough log lightly with the egg white. Immediately roll the log vigorously in the coconut until it is completely coated. This gives you the signature ‘whisker’ look and texture. This step ensures great adherence for that distinct coconut rolled cookies appearance.
- Slice and Decorate: Using a sharp, non-serrated knife, slice the dough into 1/4-inch thick rounds. Place the sliced rounds about 2 inches apart on the prepared baking sheets. Place a halved candied cherry in the center of each round for that beautiful, traditional appeal.
- Bake Time: Bake for 10-12 minutes, or until the edges are lightly golden brown and the centers are set but still look soft.
- Cool: Let the cookies cool on the baking sheet for 5 minutes before transferring them to a wire rack to cool completely. Enjoy these lovely yuletide coconut cherry cookies!
Pro Tips & Flavorful Variations for Santa’s Whiskers Cookies
Part of the joy of baking is customizing a classic to make it your own. Here are some tips and alternative flavors, including how to maximize your freezer cookie dough strategy.
Mastering the Dough and Freezing Tips
Temperature is Everything: Ensure your butter is truly at room temperature for maximum creaminess, and conversely, ensure your dough is rock-hard chilled before slicing. If the dough snaps when you try to slice it, let it sit on the counter for 5 minutes. If it squishes, it needs more time in the fridge.
The Perfect Chill for Slicing: If you plan on making the Santa’s Whiskers Cookies freeze ahead, be sure to double-wrap the logs—first in plastic wrap and then in aluminum foil or a freezer bag. Frozen logs will keep well for up to three months. When ready to bake, thaw them in the refrigerator overnight before rolling in coconut and slicing. This answers how to maximize your strategy for holiday entertaining cookies.
Slicing Uniformity: The best tool for making uniform slices is a good ruler and a large, sharp chef’s knife. Try a rocking motion rather than pressing straight down to prevent squishing the dough log.
Flavor and Ingredient Alternatives
- Nut Substitutions: If pecans aren’t your favorite, these cookies are delightful as cherry almond cookies using slivered almonds. Walnuts also work well. Alternatively, you can omit nuts entirely for a nut-free version.
- Cherry Swap: Don’t love candied cherries? You can substitute with dried cranberries or golden raisins for a different twist. Just make sure the maraschino cherries are completely dried if you use them, or they will bleed color into the dough.
- Extra Almond Flavor: For a deeper, more pronounced flavor experience, use almond flour to replace about 1/4 cup of the all-purpose flour. This gives a lovely, slight nuttiness that pairs beautifully with the almond extract.
- Coconut Extract: Feeling tropical? Consider adding a few drops of coconut extract alongside the vanilla and almond extracts for an even more intense buttery coconut cookies experience.
- White Christmas Cookies Variation: For an elegant, truly white cookie, omit the brown sugar and use only granulated sugar, slightly increasing the butter if the dough seems too dry. Drizzle the finished, cooled cookies with melted white chocolate for a beautiful finish. This creates stunning White Christmas Cookies.
- Make it Gluten-Free: These cookies adapt very well to a good quality 1:1 gluten-free flour blend. No other adjustments should be necessary.
Santa’s Whiskers Cookies Serving Suggestions
Part of the joy of making these old-fashioned Christmas cookies is sharing them! These slice-and-bake classics are perfect on their own, but they truly shine when presented as part of a curated holiday spread. Cooking isn’t just about food; it’s about making people happy, and pairing the right treats elevates the experience.
- Classic Cookie Tray Pairing: Serve these alongside other contrasting classics. The sweetness from the coconut and cherry goes perfectly with spicy or rich flavors. I love placing them next to soft, chewy molasses cookies or some classic Chocolate Crinkle Cookies. The red, white, and green theme is naturally festive.
- The Perfect Beverage Match: Serve these with a hot beverage. Their buttery texture dissolves beautifully with a cozy mug of Mexican hot chocolate or a thick, rich eggnog. For the adults, a dark roast coffee or a small glass of amaretto would complement the almond flavor perfectly.
- Holiday Gift Packaging: Because they hold their shape so well, these festive bake ahead cookies are excellent candidates for holiday gifting. Layer them in a festive tin lined with parchment paper. Pair them with a DIY cocoa mix jar. They are durable enough to travel, making them excellent choices for cookie gift packaging.
- Dessert Board Centerpiece: Use the vibrant red, green, and white colors of these cookies as the focal point of a holiday dessert charcuterie board. Surround them with savory items like cheese straws and spiced nuts to cut the sweetness, or other sweet treats like chocolate truffles or Chewy Coconut Macaroons.
- Ice Cream Accent: Crumble a cooled Santa’s Whiskers Cookie over a scoop of vanilla bean ice cream for an unexpected festive dessert. The contrasting temperatures and textures are sublime.
Emily especially loves placing these on a tiered platter for our annual Christmas open house. They look stunning, easy to grab, and everyone comments on the retro flair. If you want to see a different approach to slice-and-bake holiday cookies, take a look at this recipe from Scattered Thoughts of a Crafty Mom for inspiration!
Santa’s Whiskers Cookies Storage & Reheating
One of the best features of icebox cookies is their unparalleled shelf life, both in the dough state and once baked.
Storing Dough Logs (The Make-Ahead Winner)
- Refrigerator: Tightly wrapped Santa’s Whiskers Cookies dough logs can be stored in the refrigerator for up to one week. This is perfect for those busy days leading up to Christmas. Just slice and bake as needed.
- Freezer: For long-term storage, wrap the logs first in plastic wrap, then snugly in aluminum foil, or store in a freezer-safe bag. Label, date, and freeze for up to 3 months. Thaw in the refrigerator overnight before slicing and rolling in coconut.
Storing Baked Cookies
- Room Temperature: Once fully cooled, store the baked cookies in an airtight container at room temperature for 5 to 7 days. Stacking them with a small piece of parchment paper in between helps preserve the coconut coating.
- Freezer: Baked Santa’s Whiskers Cookies freeze very well. Place them in a single layer on a baking sheet to flash freeze for one hour, then transfer them to a freezer-safe container or bag. They will keep for up to 6 weeks. Thaw at room temperature for several hours before serving.
My goal, always, is to minimize kitchen stress around the holidays. Using the freezer cookie dough technique for these makes holiday entertaining exponentially easier, giving you more time for things like decorating or watching Christmas movies with the kids.
FAQ about Santa’s Whiskers Cookies
Q: Can I use maraschino cherries instead of candied cherries in Santa’s Whiskers Cookies?
A: Yes, absolutely! When making the Santa’s Whiskers Cookies with maraschino cherries, the key step is drying them properly. Drain the cherries, then pat them aggressively with paper towels until they are nearly dry. If they are too wet, the moisture will alter the dough’s consistency and can cause the color to bleed during baking, which we want to avoid for that neat look. Using a high-quality candied cherry substitute ensures success.
Q: Are these cookies supposed to be soft or crisp?
A: This vintage Christmas cookie recipe creates a cookie that is the perfect hybrid, leaning toward tender. Because of the butter and sugars, the edges become slightly crisp (especially when cooled), but the center remains tender and light, like a buttery shortbread. They are definitely not hard or overly crispy like a biscotti, but rather showcase a lovely, melt-in-your-mouth texture.
Q: What if my Santa’s Whiskers Cookies dough logs keep flattening while chilling?
A: If you find your dough logs are not holding their perfect circular shape, they might be too soft, or not wrapped tightly enough. When wrapping the log, ensure you press firmly on the plastic wrap and roll the dough tightly, almost like a sausage, to compress it. Once shaped, you can nestle the log into the corner of your refrigerator or place it inside a paper towel tube cut open on one side while chilling. This provides external support until the butter solidifies, ensuring great Santa’s Whiskers Cookies dough logs.
Q: How can I ensure the coconut sticks well to the outside of the cookie log?
A: The trick demonstrated in the Santa’s Whiskers Cookies step by step instructions is the egg white wash. A light coating of beaten egg white acts as a perfect ‘glue’ for the coconut. Ensure the dough is cold, apply the wash quickly, and immediately roll it in the sweetened shredded coconut. If you wait too long, the egg white will dry, or the dough will warm up.
Q: Are these a good choice for a Christmas Cookie Tray?
A: They are phenomenal! These cookies are visually striking due to the white coconut coconut whisker cookies and the vibrant red cherry. They look beautiful next to brown cookies (like gingersnaps or chocolate crinkles) and green cookies. They offer a unique flavor profile that distinguishes them from classic chocolate chip or peanut butter cookies, making them ideal for an impressive Christmas cookie tray ideas spread.
Final Thoughts on Nostalgia and Santa’s Whiskers
This particular vintage Christmas cookie, the Santa’s Whiskers, represents everything I love about the holidays: simplicity, tradition, and flavor that transports you back in time. It doesn’t take expensive gadgets or complicated techniques to make memorable food; sometimes, all it takes is a chilled log of butter-rich dough and a sprinkle of bright red cherries. It’s a moment of connection, whether you’re making the dough on a quiet Tuesday evening or slicing and baking with the kids on Christmas Eve. Adams is in charge of lining up the perfect cherry halves this year, and Jana is the official coconut roller. Watching my kids carry on these simple traditions, like making my Grandmother’s festive holiday cookies, is a reminder that cooking isn’t just about food; it’s about building those happy memories.
I encourage you to try this simple, rewarding recipe. Chill your dough, grab those candied cherries, and make some food that truly makes people happy. Happy Baking!
The Best Old-Fashioned Santa’s Whiskers Cookies
Ingredients
Equipment
Method
- In a medium bowl, whisk together the all-purpose flour, baking powder, and kosher salt. Set aside.
- In a large mixing bowl, beat the softened butter, granulated sugar, and light brown sugar together until light, fluffy, and pale, about 3-4 minutes.
- Beat in the eggs, one at a time, then stir in the vanilla and almond extract.
- Gradually add the flour mixture, mixing until just combined. Fold in the chopped candied cherries and pecans.
- Divide the dough in half. Shape each half into a tight cylinder, about 1½–2 inches in diameter. Wrap tightly in plastic wrap and chill for at least 4 hours or overnight.
- Preheat oven to 350°F (175°C). Line baking sheets with parchment paper.
- Lightly beat the egg white. Unwrap one dough log, brush with egg white, then roll in shredded coconut until fully coated.
- Slice the log into ¼-inch thick rounds and place 2 inches apart on baking sheets. Top each with a halved candied cherry.
- Bake for 10–12 minutes, until edges are lightly golden. Cool on the sheet for 5 minutes, then transfer to a wire rack.


