
Introduction
Have you ever wondered what transforms a simple cookie into a cherished memory? For me, it’s not just about the ingredients; it’s about the moment. I still remember the first time I baked with my kids, Adams and Jana, during the holidays. We wanted to create something special, a treat that felt both festive and comforting. That’s when we landed on the idea of making these incredible Mint Chocolate Chip Cookies. The kitchen filled with the scent of fresh mint and melting chocolate, and their excited faces as they peeked into the oven became a core memory. This recipe is more than just a list of instructions; it’s a gateway to creating your own moments of joy. It’s about that perfect balance of refreshing mint and rich, decadent chocolate, a flavor combination that feels both nostalgic, like a scoop of your favorite ice cream, and wonderfully new. These cookies are designed for home cooks, for busy parents, for anyone who believes that the best meals are the ones we share. They are chewy, packed with flavor, and so easy to whip up. Whether you are baking for a holiday get together, a fun St. Patrick’s Day celebration, or just a cozy Tuesday night, these cookies are guaranteed to bring a smile to everyone’s face. It’s a simple recipe, but one that I hope becomes a part of your family’s story, just as it has become a part of mine.
Why You’ll Love This Mint Chocolate Chip Cookies
These aren’t just any cookies; they’re an experience waiting to happen. From the moment you start mixing the dough to that first warm, gooey bite, you’ll understand why this recipe is a permanent fixture in my baking rotation. I’ve spent a lot of time perfecting the balance of flavors and textures, ensuring they are not only delicious but also foolproof for home cooks of any skill level. These cookies embody everything I love about baking: they bring people together, create instant happiness, and make your kitchen smell absolutely divine. If you’re looking for a recipe that’s a little bit special yet completely approachable, you’ve found it. Here’s exactly why you’ll fall in love with them:
- Perfectly Soft and Chewy Texture: The ultimate goal for any cookie, right? This recipe is meticulously crafted to produce a cookie with a soft, chewy center and beautifully crisp edges. The secret lies in the precise combination of butter, sugars, and a chilling step that prevents the cookies from spreading too thin. Each bite gives you that satisfying density you want from a homemade cookie, making them incredibly moreish. They hold their shape wonderfully, creating a thick cookie that is oh so satisfying to sink your teeth into.
- An Irresistible Flavor Combination: The marriage of cool, refreshing mint and rich, indulgent chocolate is iconic for a reason. Unlike some recipes where the mint can be overpowering, this one strikes the perfect chord. We use just enough peppermint extract to create a bright, clean flavor that beautifully complements the sweetness of the chocolate chips. It is reminiscent of classic mint chocolate chip ice cream, but with the added comfort of a warm, freshly baked cookie. It’s a sophisticated yet fun flavor profile that delights both kids and adults.
- Incredibly Simple and Fun to Make: I’m a firm believer that anyone can bake, and this recipe is a testament to that philosophy. The steps are straightforward and written for beginners. There are no complicated techniques or fancy equipment required. It’s the perfect recipe to make with your kids, letting them help with mixing the ingredients and dropping the dough onto the baking sheets. It’s a wonderfully rewarding process that proves you don’t need to be a pastry chef to create bakery quality treats at home. For another fun baking project, you should try these maraschino cherry chocolate chip cookies!
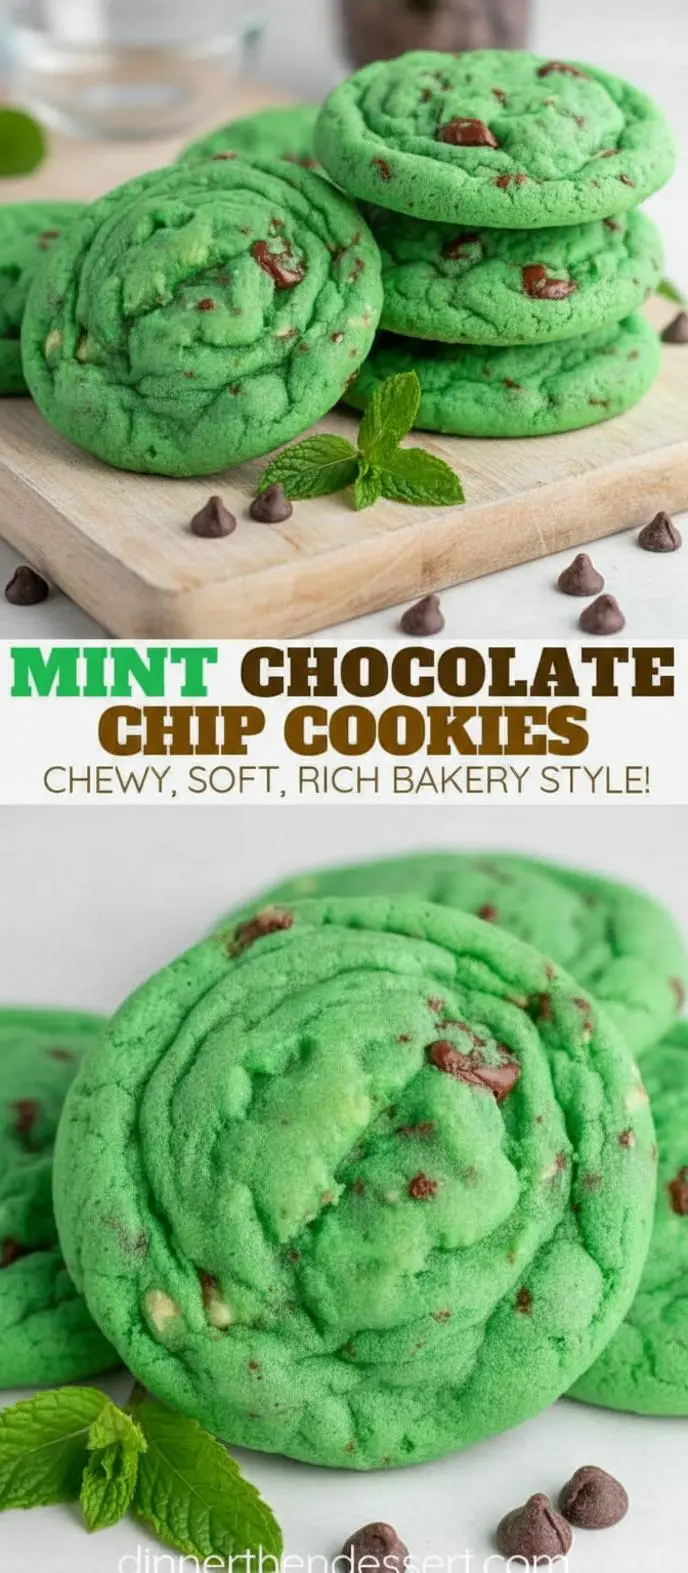
- Visually Stunning for Any Occasion: With their beautiful green hue and specks of dark chocolate, these cookies are showstoppers. The optional touch of green food coloring makes them pop, turning them into the perfect treat for Christmas platters, St. Patrick’s Day parties, or simply to brighten up your cookie jar. They look as good as they taste and are guaranteed to be the first thing to disappear at any bake sale or family gathering. They have that homemade charm with a professional look. If you love mint desserts, you have to see these Triple Layer Fudgy Mint Oreo Brownies.
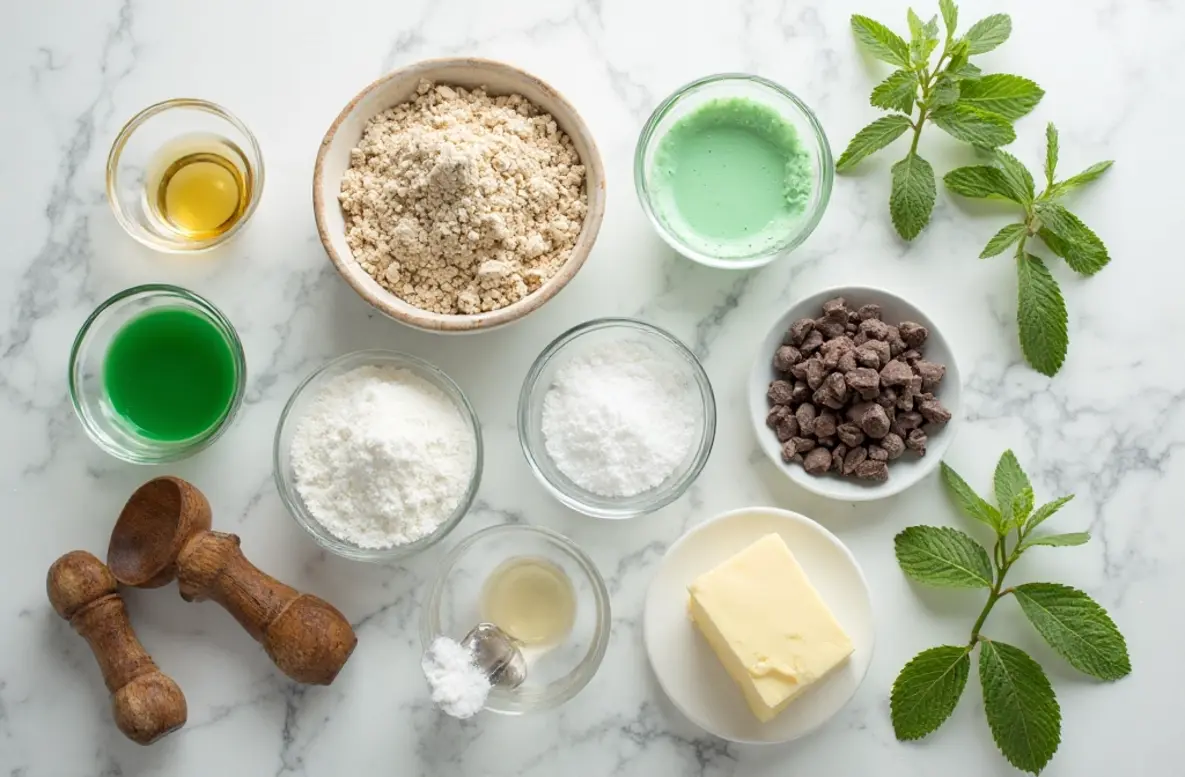
Ingredients for Mint Chocolate Chip Cookies
- 1 cup (226g) unsalted butter, softened to room temperature
- 3/4 cup (150g) granulated sugar
- 1/2 cup (110g) packed light brown sugar
- 2 large eggs, at room temperature
- 1 1/2 teaspoons peppermint extract
- 1/2 teaspoon pure vanilla extract
- 2 1/2 cups (300g) all purpose flour
- 1 teaspoon baking soda
- 1/2 teaspoon salt
- 4-6 drops green food coloring, optional
- 1 1/2 cups (255g) semi sweet chocolate chips or mint chocolate chips
Substitutions:
- Chocolate Chips: Feel free to use dark chocolate chunks, mini chocolate chips, or even Andes mint pieces instead of regular chocolate chips.
- Butter: If you only have salted butter, you can use it and reduce the added salt to 1/4 teaspoon.
- Extract: While peppermint extract provides the classic flavor, you could use spearmint extract for a slightly different, garden mint taste.
How to Make Mint Chocolate Chip Cookies
Step-by-Step Instructions
Creating these delightful Mint Chocolate Chip Cookies is a simple and rewarding process. I’ve broken it down into easy to follow steps to ensure you get perfect results every single time, even if you’re a total beginner in the kitchen. The most important part of this whole process is to have fun with it! Put on some music, get the family involved, and enjoy the simple pleasure of creating something delicious from scratch. The smell that will fill your kitchen is an added bonus. Remember, cooking is all about making people happy, and that includes yourself. We start by creaming the butter and sugars together, a crucial step for a light and chewy texture. Then we’ll build our flavor base with the eggs and extracts before combining the wet and dry ingredients. The magic really happens when you fold in those glorious chocolate chips. The key to a thick cookie that doesn’t spread too much is to chill the dough, so don’t be tempted to skip that step! It might require a bit of patience, but the reward of a perfectly shaped, chewy cookie is absolutely worth the wait. Let’s get that apron on and begin!
- Cream Butter and Sugars: In a large mixing bowl, using a stand mixer or a hand mixer, beat the softened butter, granulated sugar, and brown sugar together on medium high speed for about 2-3 minutes until the mixture is light, fluffy, and pale in color. This step incorporates air into the dough, which is key for a great texture.
- Add Wet Ingredients: Add the eggs one at a time, beating well after each addition. Scrape down the sides of the bowl as needed to ensure everything is well combined. Beat in the peppermint extract and vanilla extract. If you’re using food coloring, add it now and mix until the color is uniform.
- Combine Dry Ingredients: In a separate medium bowl, whisk together the all purpose flour, baking soda, and salt. This ensures the leavening and salt are evenly distributed, so you don’t get a salty or soapy bite.
- Mix Dough: With the mixer on low speed, gradually add the dry ingredient mixture to the wet ingredients. Mix until just combined. Be careful not to overmix at this stage; overmixing develops the gluten in the flour too much and can lead to tough cookies.
- Add Chocolate Chips: Gently fold in the chocolate chips using a rubber spatula or wooden spoon. I like to save a few to press into the tops of the cookies just before baking for that perfect bakery style look.
- Chill the Dough: This is a crucial step! Cover the bowl with plastic wrap and chill the cookie dough in the refrigerator for at least 1 hour, or up to 24 hours. Chilling solidifies the fat in the butter. When the cookies bake, the chilled fat takes longer to melt, which means the cookies spread less and stay thicker and chewier.
- Preheat and Prepare: When you’re ready to bake, preheat your oven to 350°F (175°C). Line two large baking sheets with parchment paper to prevent sticking and for easy cleanup.
- Scoop and Bake: Scoop the chilled dough into rounded tablespoons (about 1.5 tablespoons each) and place them about 2 inches apart on the prepared baking sheets. If desired, press a few extra chocolate chips onto the tops of the dough balls.
- Bake to Perfection: Bake for 10-12 minutes, or until the edges are lightly golden brown and the centers look soft and slightly underdone. They will continue to bake on the hot pan after you remove them from the oven. For another great cookie recipe, check out this one from Food Network.
- Cool and Enjoy: Let the cookies cool on the baking sheet for 5 minutes before transferring them to a wire rack to cool completely. This helps them set up properly. Enjoy the warm, gooey, minty chocolate goodness!
Pro Tips & Variations
Once you’ve mastered the basic recipe, you can start having fun and experimenting. A great recipe is a starting point, and I always encourage home cooks to make it their own. These pro tips will help you troubleshoot common cookie problems and elevate your baking game. Whether you want a deeper flavor, a different texture, or need to accommodate dietary restrictions, there’s always room to play. For instance, did you know that the type of chocolate you use can completely change the cookie’s personality? Or that a tiny sprinkle of sea salt on top can make the flavors pop in an unexpected way? Think of these suggestions as a way to continue your cooking journey. It’s how you go from following a recipe to truly understanding it. If you enjoy creating unique flavor combinations, you might also love making a batch of my Brown Sugar Pop Tart Cookies, which are always a hit. The possibilities in the kitchen are endless, and these tips are just the beginning of making this mint chocolate chip cookie recipe uniquely yours.
- Don’t Skip Chilling the Dough: I know I mentioned it before, but it’s the single most important tip for thick, chewy cookies. Chilling the dough solidifies the butter. When the cold dough hits the hot oven, the butter melts more slowly, which prevents the cookies from spreading into thin, crispy discs. A minimum of one hour is good, but for the best results and an even deeper flavor, I recommend chilling for up to 24 hours.
- Room Temperature Ingredients are Key: For the initial creaming step, having softened butter and room temperature eggs makes a huge difference. They emulsify better, trapping air in the mixture. This trapped air expands when heated in the oven, leading to a lighter, softer cookie texture. Cold ingredients don’t combine as smoothly. A quick tip to get eggs to room temperature fast is to place them in a bowl of warm water for a few minutes.
- Measure Flour Correctly: How you measure your flour can dramatically affect your cookies. Instead of scooping the flour directly out of the bag with your measuring cup (which compacts it), use a spoon to fluff up the flour in the bag, then scoop it into your measuring cup and level it off with a straight edge. This prevents you from adding too much flour, which can result in dry, cakey cookies.
Variations:
- Gluten Free Mint Chocolate Chip Cookies: To make this recipe gluten free, simply substitute the all purpose flour with a high quality, 1 to 1 gluten free baking flour blend that contains xanthan gum. The results are just as chewy and delicious.
- Double Chocolate Mint Cookies: For the ultimate chocolate lover, reduce the all purpose flour to 2 1/4 cups and add 1/4 cup of unsweetened cocoa powder to the dry ingredients. This will give you a rich, chocolatey dough as the base.
- Andes Mint Chocolate Chip Cookies: For that classic, creamy mint flavor, replace the semi sweet chocolate chips with 1 1/2 cups of chopped Andes mints. The melty texture and iconic flavor are absolutely heavenly.
Serving Suggestions
One of the great joys of baking is deciding how you’ll present and enjoy your creations. These Mint Chocolate Chip Cookies are absolutely fantastic on their own, warm from the oven, but they also serve as a wonderful foundation for more elaborate desserts. Thinking about pairings is part of the fun and can transform a simple cookie into a memorable dessert experience. Whether you’re hosting a party, packing a lunchbox, or settling in for a cozy night, there are so many ways to serve these treats. The cool mint and rich chocolate pair beautifully with a variety of flavors and textures. I love thinking about how the cookies can interact with other elements, like the creaminess of ice cream or the warmth of a good cup of coffee. It’s all about creating moments of connection and enjoyment around food. Below are a few of my family’s favorite ways to serve these cookies, which I hope will inspire you to get creative and find your own perfect pairings. Try them out and see which one becomes your new go to way to enjoy this delightful treat.
- The Classic: With a Glass of Milk: You can’t go wrong with the timeless combination of cookies and milk. The cold, creamy milk is the perfect counterpoint to the rich chocolate and chewy texture of the cookie. It’s simple, nostalgic, and utterly perfect.
- Mint Chocolate Chip Ice Cream Sandwiches: Take two completely cooled cookies and sandwich a generous scoop of vanilla bean or even more mint chocolate chip ice cream between them. You can roll the edges in mini chocolate chips for an extra special touch. Wrap them individually in plastic wrap and freeze for a perfect make ahead dessert.
- A Festive Dessert Platter: Build a beautiful holiday or party platter featuring these green cookies as the star. Surround them with other complementary treats like dark chocolate truffles, white chocolate pretzels, or even some of my easy homemade peppermint patties. The variety of colors and flavors makes for a stunning and delicious presentation.
- Warm Cookie A La Mode: Gently warm a cookie in the microwave for 10 to 15 seconds until it’s soft and the chocolate is melty. Place it in a bowl and top with a small scoop of vanilla ice cream and a drizzle of hot fudge sauce. It’s an incredibly indulgent and comforting dessert that takes just minutes to assemble.
Storage & Reheating for Mint Chocolate Chip Cookies
Storing Baked Cookies:
To keep your cookies soft and chewy, store them in an airtight container at room temperature. They will stay fresh for up to 5 days. For extra softness, you can place a slice of bread in the container; the cookies will absorb moisture from the bread, keeping them perfectly moist.
Storing Cookie Dough:
You can refrigerate the cookie dough in an airtight container for up to 3 days before baking. For longer storage, freeze it! Scoop the dough into balls and place them on a baking sheet. Freeze until solid, then transfer the frozen dough balls to a zip top freezer bag. They can be stored in the freezer for up to 3 months. When you’re ready for a fresh cookie, you can bake the dough directly from frozen; just add 1-2 minutes to the baking time.
Reheating:
For that fresh out of the oven experience, you can reheat a cookie by placing it in the microwave for about 10-15 seconds. This will soften the cookie and melt the chocolate chips, making it warm and gooey again.
FAQ about Mint Chocolate Chip Cookies
- Why did my cookies spread out so much?
- This is a common cookie conundrum! The most likely culprit is that the dough wasn’t chilled long enough. Chilling the dough solidifies the butter, which helps the cookies bake up thick and chewy instead of spreading thin. Another reason could be that your butter was too soft, almost melted, when you creamed it with the sugar. It should be softened to room temperature, but not greasy or liquid.
- Can I use fresh mint instead of peppermint extract?
- While I love using fresh ingredients, fresh mint doesn’t provide the same potent, classic flavor as peppermint extract in baked goods. The flavor of fresh mint is much more subtle and herbaceous and doesn’t hold up well to the heat of the oven. For that iconic “mint chip” taste, peppermint extract is definitely the way to go.
- How do I get a vibrant green color without using too much food coloring?
- A little goes a long way! I recommend using gel food coloring instead of liquid food coloring. Gel colors are much more concentrated, so you only need a few drops to achieve a beautiful, vibrant green without thinning out your cookie dough or adding any extra flavor. Start with just 3-4 drops and mix, adding one more drop at a time until you reach your desired shade.
- Can I make these cookies vegan?
- Yes, you can adapt this recipe to be vegan. Use a high quality plant based butter substitute in place of the dairy butter, and use a vegan egg replacer (such as a flax egg or a commercial egg substitute) for the eggs. Also, ensure your chocolate chips are dairy free. The texture will be slightly different, but still delicious! For another perspective on this cookie, you can see a variation on Allrecipes.
Final Thoughts on Mint Chocolate Chip Cookies
And there you have it! A simple, heartfelt recipe for what I truly believe are the perfect Mint Chocolate Chip Cookies. I hope you feel inspired to head into your kitchen and create a batch of your own. Remember, every time you bake, you’re not just making food; you’re creating an opportunity for connection and making memories that will last long after the last cookie is gone.
If you try this recipe, I would absolutely love to hear from you! Please leave a comment below and let me know how they turned out. And if you’re on Pinterest, don’t forget to save this recipe for later so you can easily find it. For more family friendly recipes and kitchen stories, be sure to subscribe to the Mister Recipes newsletter. Happy baking!
Mint Chocolate Chip Cookies
Ingredients
Equipment
Method
- In a large mixing bowl, using a stand mixer or a hand mixer, beat the softened butter, granulated sugar, and brown sugar together on medium high speed for about 2-3 minutes until the mixture is light, fluffy, and pale in color.
- Add the eggs one at a time, beating well after each addition. Scrape down the sides of the bowl as needed. Beat in the peppermint extract and vanilla extract. If using food coloring, add it now and mix until the color is uniform.
- In a separate medium bowl, whisk together the all purpose flour, baking soda, and salt.
- With the mixer on low speed, gradually add the dry ingredient mixture to the wet ingredients. Mix until just combined.
- Gently fold in the chocolate chips using a rubber spatula or wooden spoon. Save a few to press into the tops of the cookies just before baking.
- Cover the bowl with plastic wrap and chill the cookie dough in the refrigerator for at least 1 hour, or up to 24 hours.
- Preheat your oven to 350°F (175°C). Line two large baking sheets with parchment paper.
- Scoop the chilled dough into rounded tablespoons (about 1.5 tablespoons each) and place them about 2 inches apart on the prepared baking sheets. If desired, press a few extra chocolate chips onto the tops of the dough balls.
- Bake for 10-12 minutes, or until the edges are lightly golden brown and the centers look soft and slightly underdone.
- Let the cookies cool on the baking sheet for 5 minutes before transferring them to a wire rack to cool completely.


