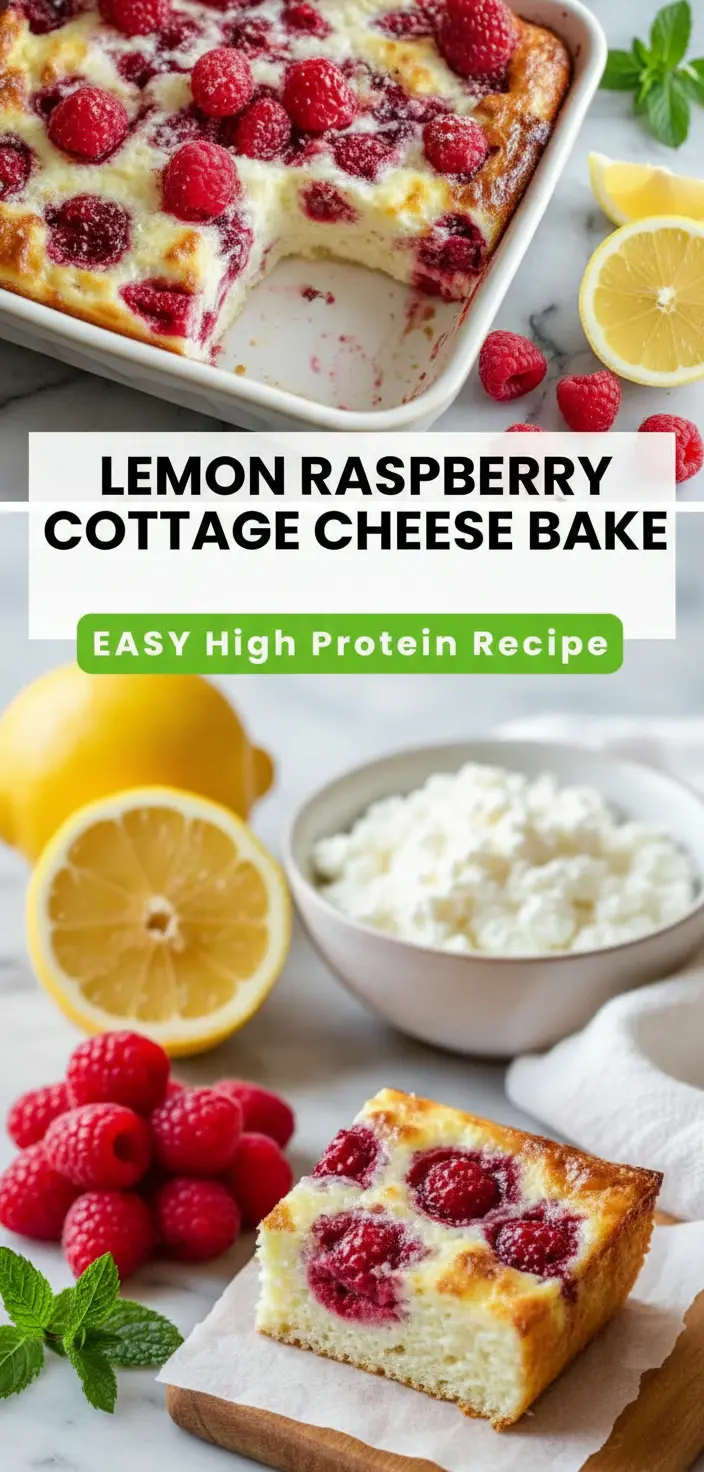
The Easiest Crispy Baked Chicken Tenders (That Actually Stay Crispy!)
Have you ever wondered if it’s truly possible to get that deep fried, shatteringly crisp crunch on a chicken tender without a single drop of oil from a deep fryer? We’re often told that baking is the ‘healthy’ option, a compromise that trades that satisfying crispiness for a less greasy meal. But what if I told you that wasn’t a trade you had to make? What if the secret to the most incredible Crispy Baked Chicken Tenders you’ve ever had was hiding right in your oven, waiting to be unlocked with just a few simple kitchen staples?
Here in our pine scented corner of Oregon, the request for Homemade Chicken Tenders is a weekly chorus from my kids, Olivia and James. For years, I chased that perfect texture, the one that mimics their favorite drive thru treat but feels a little more nourishing, a little more like home. I tried different breadings, various temperatures, and every trick in the book. The result was often… fine. But never spectacular. They were either a bit soft, or the breading would slide right off. It wasn’t until I went back to basics, remembering the way my grandmother taught me to respect simple ingredients, that I finally cracked the code. It’s a method so simple and so foolproof, it will completely change the way you think about Oven-Baked Chicken Tenders. This isn’t just a recipe; it’s the answer to that weeknight dinner dilemma, a guaranteed crowd pleaser that brings everyone to the table. It is that perfect balance of wholesome and ridiculously delicious, proving that you can absolutely have it all. These tenders are golden, crunchy, and packed with flavor, all while being wonderfully easy to prepare.
Why You’ll Love This Crispy Baked Chicken Tenders Recipe
There’s a quiet magic to a recipe that pleases every single person at the table. On a busy Tuesday, when my husband Ethan is finishing up a design project and the kids are buzzing with energy from school, these Crispy Baked Chicken Tenders are my secret weapon. They transform a regular evening into something a little more special, filling our home with the warm, savory scent of baked garlic, paprika, and perfectly seasoned chicken. The sound of that first bite, that audible crunch, followed by a chorus of “Mmm, this is the best!”, is pure joy. It’s more than just a quick meal; it’s a moment of connection. You will love making these because they are not only delicious but also incredibly rewarding. Here’s why this recipe will become a staple in your kitchen too.
Incredibly Crunchy, No Fryer Needed: This is the ultimate promise of this recipe. We use a specific three step breading process and a high baking temperature to create a crust that is unbelievably crispy and golden brown. The secret lies in using Panko breadcrumbs, which are lighter and flakier than regular breadcrumbs, allowing them to crisp up beautifully in the oven’s dry heat. You get all the satisfying texture of fried chicken without the mess or the extra grease, making these Healthy Baked Chicken Tenders a smarter choice.
Quick and Easy for Busy Weeknights: I know how precious time is, especially on a school night. This entire recipe for Easy Crispy Baked Chicken Tenders Recipe comes together in about 30 minutes. The prep is minimal, the cleanup is a breeze (especially if you use parchment paper), and the result is a meal that tastes like you spent hours on it. It’s the kind of reliable, stress free recipe every home cook needs in their back pocket, just like a simple One Pot Chicken Alfredo.
Kid Approved and Family Friendly: Let’s be honest, Crispy Chicken Fingers are a universal kid favorite. But these homemade ones are a game changer. They’re perfectly sized for little hands, endlessly dip friendly, and because you control the ingredients, you know exactly what your family is eating. Olivia and James devour these, and I feel good serving them. It’s a fantastic way to get a solid protein into their diets in a form they absolutely love.
Perfectly Seasoned and Flavorful: Forget bland, boring chicken. We season every single layer of these tenders, from the flour dredge to the egg wash and finally the panko coating itself. A simple but powerful blend of garlic powder, onion powder, paprika, and a hint of salt and pepper ensures that every bite is bursting with savory flavor. The addition of Parmesan cheese to the breading adds a nutty, salty depth that takes these from good to absolutely irresistible.
Endlessly Versatile and Customizable: This recipe is a fantastic starting point. You can easily customize it to fit your family’s tastes or dietary needs. Add a pinch of cayenne for a spicy kick, or use different herbs like dried oregano or thyme. For a gluten free version, simply swap the flour and panko for your favorite Gluten-Free Chicken Tenders alternatives. They can be a main course, a salad topper, or a party appetizer.
Great for Meal Prep: These tenders are also wonderful for meal prepping. You can bread them ahead of time and store them in the fridge for a day before baking, making dinner time even faster. They are a reliable component for a busy week, much like other simple chicken dishes such as Baked Chicken Parmesan, where the prep work pays off handsomely.
Ingredients for Crispy Baked Chicken Tenders
- 1.5 lbs Chicken Tenderloins (or boneless, skinless chicken breasts cut into 1 inch strips)
- 1 cup all purpose flour
- 2 large eggs
- 2 cups Panko breadcrumbs
- 1/2 cup grated Parmesan cheese
- 1 tsp garlic powder
- 1 tsp onion powder
- 1 tsp smoked paprika
- 1 tsp salt
- 1/2 tsp black pepper
- Olive oil or cooking spray
Substitutions:
- For Gluten Free Chicken Tenders: Use a 1 to 1 gluten free baking flour and gluten free panko breadcrumbs. Almond flour also works as a great coating for a Keto-Friendly Baked Chicken Tenders version.
- For Dairy Free: Simply omit the Parmesan cheese. The tenders will still be wonderfully crispy and delicious.
- Chicken: If you can’t find Chicken Tenderloins, you can easily make your own Chicken Breast Strips. Just slice boneless, skinless chicken breasts lengthwise into even strips.
How to Make Crispy Baked Chicken Tenders
Step-by-Step Instructions
Making these Homemade Chicken Tenders is all about setting up an efficient assembly line. Before I start, I like to take a deep breath and clear my counter. I find that a little bit of organization at the beginning makes the whole process feel calm and almost meditative. It’s a rhythm of dip, coat, and place, and soon you have a beautiful tray of tenders ready for the oven. This method is designed to be simple and foolproof, perfect for beginners or for when you have little helpers in the kitchen. James loves being in charge of the “breadcrumb station,” and his serious focus on getting every nook and cranny coated is the cutest thing. This Baked Panko-Crusted Chicken Tenders Recipe is as much about the making as it is the eating.
Prepare Your Oven and Baking Sheet: First things first, preheat your oven to 425°F (220°C). This high heat is crucial for getting that super crispy exterior quickly, sealing in the juices. Line a large baking sheet with parchment paper for easy cleanup. For extra crispiness all around, place a wire rack on top of the baking sheet. This allows hot air to circulate underneath the Baked Chicken Strips, preventing them from getting soggy on the bottom. Lightly spray the wire rack with cooking spray.
Set Up Your Breading Station: This is the key to a smooth process. You’ll need three shallow dishes or plates.
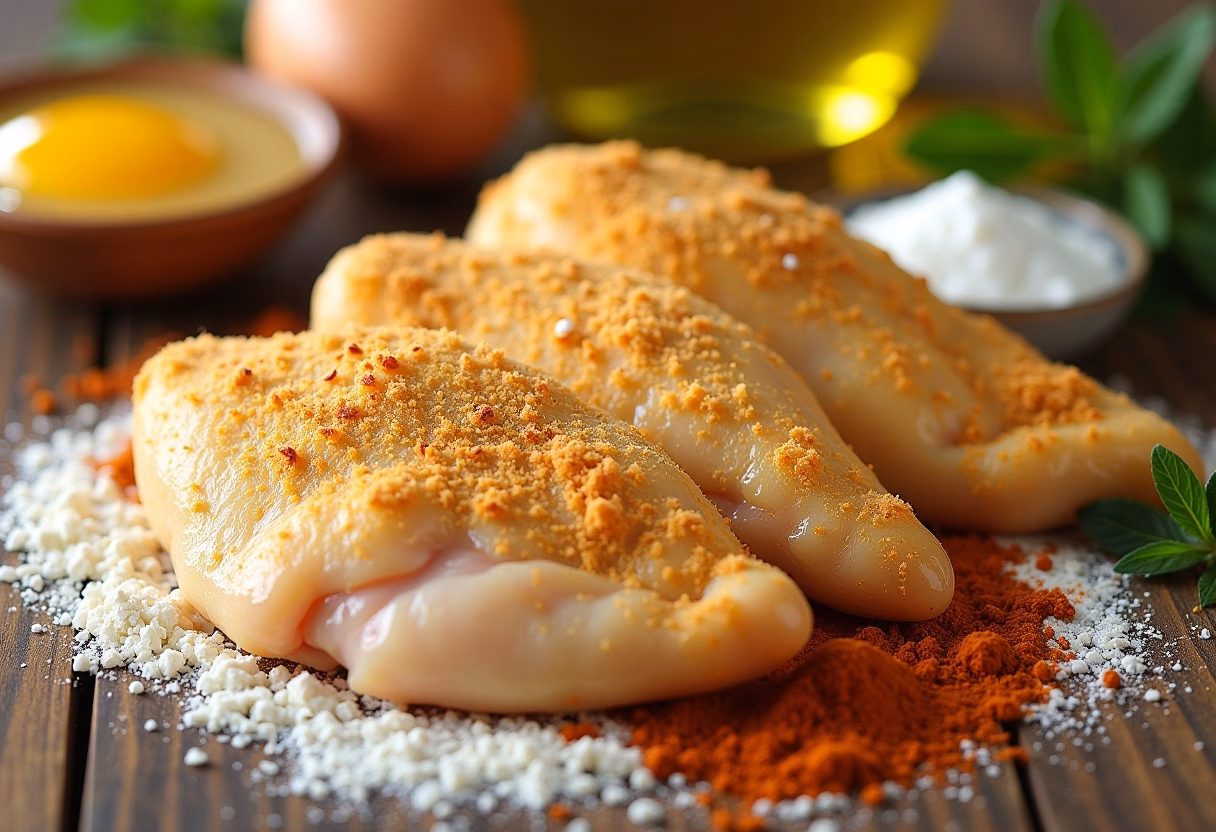
- Dish 1 (Flour Mixture): In the first dish, whisk together the all purpose flour, salt, pepper, half of the garlic powder (1/2 tsp), and half of the onion powder (1/2 tsp). Seasoning the flour is the first layer of flavor.
- Dish 2 (Egg Wash): In the second dish, crack the two eggs and whisk them with a fork until they are smooth and pale yellow.
- Dish 3 (Panko Mixture): In the third dish, combine the Panko breadcrumbs, grated Parmesan cheese, the remaining garlic powder (1/2 tsp), the remaining onion powder (1/2 tsp), and the smoked paprika. Mix it all together until it’s evenly combined. This seasoned panko coating is what makes these Parmesan-Crusted Chicken Tenders so special.
Prepare the Chicken: Pat the Chicken Tenderloins completely dry with paper towels. This is a small but vital step. A dry surface helps the flour, and subsequently the entire breading, adhere much better, so it won’t fall off during baking.
Bread the Chicken Tenders: Now for the fun part! Working with one chicken tender at a time, follow this three step process:
- First, dredge the chicken tender in the flour mixture, shaking off any excess. You want a light, even coating.
- Next, dip the floured tender into the egg wash, making sure it’s fully coated on all sides. Let any excess egg drip off.
- Finally, press the egg coated tender into the Panko mixture. Be generous here! Press down gently to help the breadcrumbs adhere, and make sure the entire tender is covered in that beautiful, crunchy coating.
Arrange and Bake: Place each breaded chicken tender onto the prepared wire rack on your baking sheet, leaving a little space between each one. This prevents them from steaming and helps them get crispy. Once all the tenders are breaded, lightly spray the tops with olive oil or cooking spray. This helps them get that gorgeous golden brown color. Bake for 15 to 20 minutes, flipping them halfway through, until the chicken is cooked through and the coating is golden and crispy. The internal temperature should read 165°F (74°C).
Pro Tips & Variations
Over the years, I’ve made this Easy Crispy Baked Chicken Tenders Recipe more times than I can count. Along the way, I’ve picked up a few little tricks that take them from great to truly exceptional. These are the small details that ensure maximum crispiness and flavor every single time. And because no two families are the same, I’ve also included some of our favorite variations. Cooking should be creative, and a good base recipe is like a blank canvas. Don’t be afraid to experiment and make it your own! Whether you like things fiery hot or are catering to a specific dietary need, there’s a version of these tenders for you.
Pro Tips for the Best Oven-Baked Chicken Tenders:
Don’t Crowd the Pan: This is my number one rule for anything you want to get crispy in the oven. If you place the Baked Chicken Strips too close together, they will steam instead of bake, resulting in a softer, soggier crust. Always leave a little breathing room between each tender. If your baking sheet isn’t big enough, it’s better to use two sheets than to overcrowd one.
Use a Wire Rack: I mentioned this in the instructions, but it’s worth repeating because it makes such a difference. Placing the tenders on a wire rack set inside the baking sheet allows hot air to circulate 360 degrees around the chicken. This crisps up the bottom just as much as the top, giving you a truly all over crunch.
Toast the Panko First (Optional Pro Move): If you have an extra five minutes and want to guarantee a deep, golden brown color and an even crispier texture, try toasting your Panko breadcrumbs before you use them. Simply spread them on a dry baking sheet and toast in the preheated oven for 3 to 5 minutes, watching carefully until they are lightly golden. Let them cool completely before mixing with the Parmesan and spices.
The “Wet Hand, Dry Hand” Method: To keep your fingers from becoming a clumpy, breaded mess, assign one hand for the dry ingredients (flour, panko) and the other hand for the wet ingredient (egg). For example, use your left hand to drop the chicken into the flour, then use it to move the floured chicken to the egg. Use your right hand to coat it in egg, then move it to the panko. Finally, use your left (dry) hand again to coat it in the breadcrumbs. It feels awkward at first, but it’s a total game changer for clean and efficient breading.
Fun Variations to Try:
- Spicy Crispy Chicken Tenders: Ethan loves a little heat. To make a spicy version, add 1/2 teaspoon of cayenne pepper to the flour mixture and another 1/2 teaspoon to the panko mixture. You could also add a few dashes of your favorite hot sauce to the egg wash. This makes for a great appetizer, similar in spirit to spicy chicken tacos with avocado salsa.
- Gluten-Free Chicken Tenders: This recipe is easily adaptable. Simply substitute the all purpose flour with a gluten free all purpose blend and use certified gluten free panko breadcrumbs. The results are just as crunchy and delicious.
- Keto-Friendly Baked Chicken Tenders: For a low carb, keto version, replace the all purpose flour with almond flour and the panko breadcrumbs with crushed pork rinds or a mix of almond flour and more Parmesan cheese. This creates a super savory, rich crust.
- Herby Chicken Tenders: Add 1 tablespoon of finely chopped fresh herbs like parsley, or 1 teaspoon of dried herbs like oregano or an Italian seasoning blend to your panko mixture for a fresh, aromatic twist. This is delicious when served with a marinara dipping sauce.
- Air Fryer Chicken Tenders: These are also fantastic in the air fryer! Prepare the tenders as directed. Preheat your air fryer to 400°F (200°C). Place the tenders in a single layer in the air fryer basket (work in batches if needed). Cook for 10 to 12 minutes, flipping halfway, until golden brown and cooked through.
Serving Suggestions
Once those golden, Crispy Baked Chicken Tenders come out of the oven, the possibilities are endless. In our house, what we serve them with often depends on the day of the week and how much energy I have left! On a relaxed Friday night, it might be a classic pairing with a side of oven baked sweet potato fries and a big bowl of ketchup for the kids. But these versatile tenders can be the star of a much more elevated meal too. I love thinking about balance, pairing their rich, savory crunch with something fresh, bright, or creamy. The key is to choose sides that complement the chicken without overwhelming it. For more classic chicken ideas, this Parmesan Chicken Tenders recipe from Allrecipes is a great source of inspiration.
Here are a few of our favorite ways to serve them:
- With a Trio of Dipping Sauces: A “sauce flight” instantly makes dinner feel more fun. We love classic honey mustard, smoky BBQ sauce, and a creamy homemade ranch. For the adults, a spicy aioli or a sweet chili sauce is also fantastic.
- On Top of a Fresh Salad: For a lighter, healthier meal, these tenders are incredible sliced and served over a bed of crisp greens. Try a classic Caesar salad or a simple garden salad with a lemon vinaigrette. The warm, crunchy chicken against the cool, crisp lettuce is a wonderful contrast in temperatures and textures. You can even build a whole meal around it, like in this Chicken Caesar Salad Bowl.
- With Creamy Mac and Cheese: This is the ultimate comfort food pairing. The creamy, cheesy pasta is the perfect soft counterpoint to the crunchy chicken. It’s a meal that kids and adults will both go wild for.
- With Roasted Vegetables: To keep things simple and healthy, I often toss a medley of vegetables like broccoli, bell peppers, and zucchini with a little olive oil, salt, and pepper, and roast them on a separate pan alongside the chicken. They usually finish cooking around the same time.
- Inside a Wrap or Sandwich: Slice up the leftover tenders (if you have any!) and stuff them into a soft tortilla with lettuce, tomato, and a drizzle of ranch for a quick and delicious lunch the next day. The Kitchn has a wonderful guide on making chicken tenders that also offers great serving ideas like this.
Storage & Reheating
While these Crispy Baked Chicken Tenders are definitely best when enjoyed fresh and hot from the oven, they are still delicious as leftovers. The key is to store and reheat them properly to maintain as much of that signature crunch as possible.
Storage:
Allow the chicken tenders to cool completely to room temperature. This is important to prevent condensation from forming in the container, which would make them soggy. Once cooled, store them in an airtight container in the refrigerator for up to 3 to 4 days.
Freezing:
You can also freeze the baked tenders. First, place the cooled tenders on a baking sheet in a single layer and freeze for about an hour, or until firm. This is called flash freezing and it prevents them from sticking together. Transfer the frozen tenders to a freezer safe bag or container. They will keep in the freezer for up to 3 months.
Reheating:
The best way to reheat these tenders and revive their crispiness is in the oven or an air fryer.
- Oven: Preheat your oven to 400°F (200°C). Place the tenders on a wire rack set on a baking sheet and bake for 10 to 15 minutes (or 15 to 20 minutes from frozen), until they are hot and crispy again.
- Air Fryer: Preheat your air fryer to 375°F (190°C). Place the tenders in a single layer and heat for 3 to 5 minutes, until hot and crispy.
- I would avoid reheating them in the microwave, as it will make the breading soft and chewy.
FAQ about Crispy Baked Chicken Tenders
1. Can I use chicken breasts instead of chicken tenderloins?
Absolutely! If you can’t find Chicken Tenderloins, boneless, skinless chicken breasts work perfectly. Simply slice them lengthwise into 1 inch thick strips to create your own Chicken Breast Strips. Try to make them as uniform in size as possible so they cook evenly.
2. My breading keeps falling off. What am I doing wrong?
This is a common issue! The two most important steps to prevent this are: 1) Pat the chicken completely dry with paper towels before you start breading. A dry surface helps the flour stick. 2) After breading, press the panko mixture firmly onto the chicken tender to help it adhere. Also, be sure to flip them gently halfway through cooking.
3. How do I make these Gluten-Free Chicken Tenders?
It’s very simple to make this recipe gluten free. Use a good quality all purpose gluten free flour blend in place of the regular flour, and use certified gluten free panko breadcrumbs. The texture and crispiness will be just as amazing!
4. Can I make these ahead of time?
Yes, you can do some of the prep ahead. You can bread the chicken tenders, place them on the prepared baking sheet, cover with plastic wrap, and refrigerate for up to 24 hours before baking. This is a great time saver for a busy day. When you’re ready to eat, just pop them into the preheated oven.
5. What are the best dipping sauces for these tenders?
The possibilities for Dipping Sauces are endless! Some classic favorites include honey mustard, BBQ sauce, and ranch. For something different, try a sweet chili sauce, a creamy aioli with garlic, or even a simple marinara sauce, especially with the Parmesan-Crusted Chicken Tenders.
Final Thoughts on Crispy Baked Chicken Tenders
There is something so deeply satisfying about pulling a tray of these golden, crunchy chicken tenders from the oven. It is the sight of food made with love, the promise of a meal that will make everyone happy. This recipe for Crispy Baked Chicken Tenders is more than just a set of instructions; it is a celebration of simple, good food that brings people together. It’s the answer to “what’s for dinner?” on a busy night and the star of the show at a weekend gathering.
I hope this recipe brings as much joy to your table as it does to ours. Cooking, for me, has always been about creating moments of connection and comfort, and these tenders are the very definition of comfort food. They prove that you don’t need a deep fryer or complicated techniques to make something truly delicious and memorable.
If you make these Healthy Baked Chicken Tenders, I would absolutely love to hear about it! Leave a comment below and let me know how they turned out, or if you tried any fun variations. And if you love this recipe, please consider saving it to your favorite Pinterest board to share with others. Don’t forget to subscribe to our newsletter for more family friendly recipes and stories from our kitchen delivered right to your inbox. Happy cooking!

The Easiest Crispy Baked Chicken Tenders (That Actually Stay Crispy!)
Ingredients
Equipment
Method
- Preheat your oven to 425°F (220°C). Line a large baking sheet with parchment paper. Place a wire rack on top of the baking sheet and lightly spray the wire rack with cooking spray.
- In the first dish, whisk together the all purpose flour, salt, pepper, 1/2 tsp garlic powder, and 1/2 tsp onion powder. In the second dish, crack the two eggs and whisk them until smooth and pale yellow. In the third dish, combine the Panko breadcrumbs, grated Parmesan cheese, remaining garlic powder, remaining onion powder, and smoked paprika. Mix together until evenly combined.
- Pat the chicken tenderloins completely dry with paper towels.
- Working with one chicken tender at a time, first dredge in the flour mixture, shaking off any excess. Then dip into the egg wash, letting any excess drip off. Finally, press into the panko mixture, pressing gently to help bread adhere. Place on the prepared wire rack.
- Lightly spray the tops of the tenders with olive oil or cooking spray. Bake for 15 to 20 minutes, flipping halfway through, until golden and crispy and internal temperature reaches 165°F (74°C).