
Introduction
Ever wondered if you could truly win Halloween with a treat that’s both spooky and ridiculously simple? Are you searching for a dessert that will have everyone, from tiny goblins to grown-up ghoulies, gasping in delight (and a little bit of playful horror)? You’re in for a treat that’s not just a dish, but an experience! Today, we’re diving headfirst into the eerie, delicious world of Eyeball Pudding Cups. This isn’t just another dessert; it’s a game-changer for your Halloween festivities, promising maximum impact with minimal effort. Imagine the wide-eyed stares as your guests encounter these ghoulishly delightful concoctions—perfectly edible eyeballs floating creepily in rich, creamy pudding. It’s the kind of treat that sparks conversation, invokes a festive spirit, and most importantly, satisfies that sweet tooth with a spooky twist!
For parents juggling costumes, decorations, and party planning, finding an **easy Halloween recipe** that still feels special can be a challenge. But fear not! Our Eyeball Pudding Cups are designed with you in mind. This recipe bypasses complicated baking and lengthy prep times, making it an ideal choice for busy families or anyone looking to whip up something spectacular without spending hours in the kitchen. We’re talking about a no-fuss, no-bake approach that’s entirely focused on fun. Whether you’re hosting a big Halloween bash, preparing for a school party, or simply want to surprise your kids with a memorable after-school snack, these pudding cups are your secret weapon. They are incredibly adaptable, allowing you to customize flavors and decorations to perfectly match your theme or your family’s preferences. Get ready to create some unforgettable spooky season snacks that are as fun to make as they are to eat!
Why You’ll Love These Eyeball Pudding Cups
These Eyeball Pudding Cups are more than just a dessert; they’re a celebration of all things spooky and sweet! Here’s why they’re about to become your new favorite Halloween tradition:
- Effortlessly Spooky: Forget complex baking or intricate decorating. These are **easy eyeball pudding cups** that deliver maximum eerie effect with minimal effort. They’re perfect for busy parents or first-time Halloween treat makers.
- Kid-Friendly Fun: This recipe is a huge hit with the younger crowd! Not only do kids adore the spooky presentation, but they can also get involved in the no-bake assembly and decorating, making it a fantastic activity for little hands.
- Deliciously Creamy: At its heart, this is a classic, comforting pudding dessert. The creamy texture and rich flavor base (chocolate, vanilla, or even combined!) make these irresistible, even for those who claim not to like “spooky” food.
- Perfect Party Treat: Served in individual cups, these are ideal for parties. They’re easy to grab, portion-controlled, and eliminate the need for plates and forks, making cleanup a breeze.
- Versatile & Customizable: While we love the classic look, you can easily switch up pudding flavors, add fun toppings like cookie crumbs for a “dirt” effect, or experiment with different types of “eyeballs” to make them uniquely yours.
- No-Bake Wonder: No oven required! This makes them a perfect cool treat for any climate and reduces the stress of holiday baking, allowing you to focus on other Halloween preparations.
Ingredients for Eyeball Pudding Cups
Gather your ghoulish ingredients! Here’s what you’ll need to create these delightfully creepy **Halloween pudding cups**:
- **Instant Pudding Mix:** 2 (3.9-ounce) packages of instant chocolate or vanilla pudding mix (or any flavor you prefer!). Using instant mix makes this a true **no-bake eyeball pudding cups** recipe.
- **Milk:** 4 cups cold milk (dairy or non-dairy alternatives like almond milk or oat milk work well).
- **Whipped Topping:** 1 (8-ounce) container of thawed whipped topping (like Cool Whip) or freshly whipped cream.
- **Cookies:** 1 package of chocolate sandwich cookies (like Oreos), finely crushed, for a “dirt” effect.
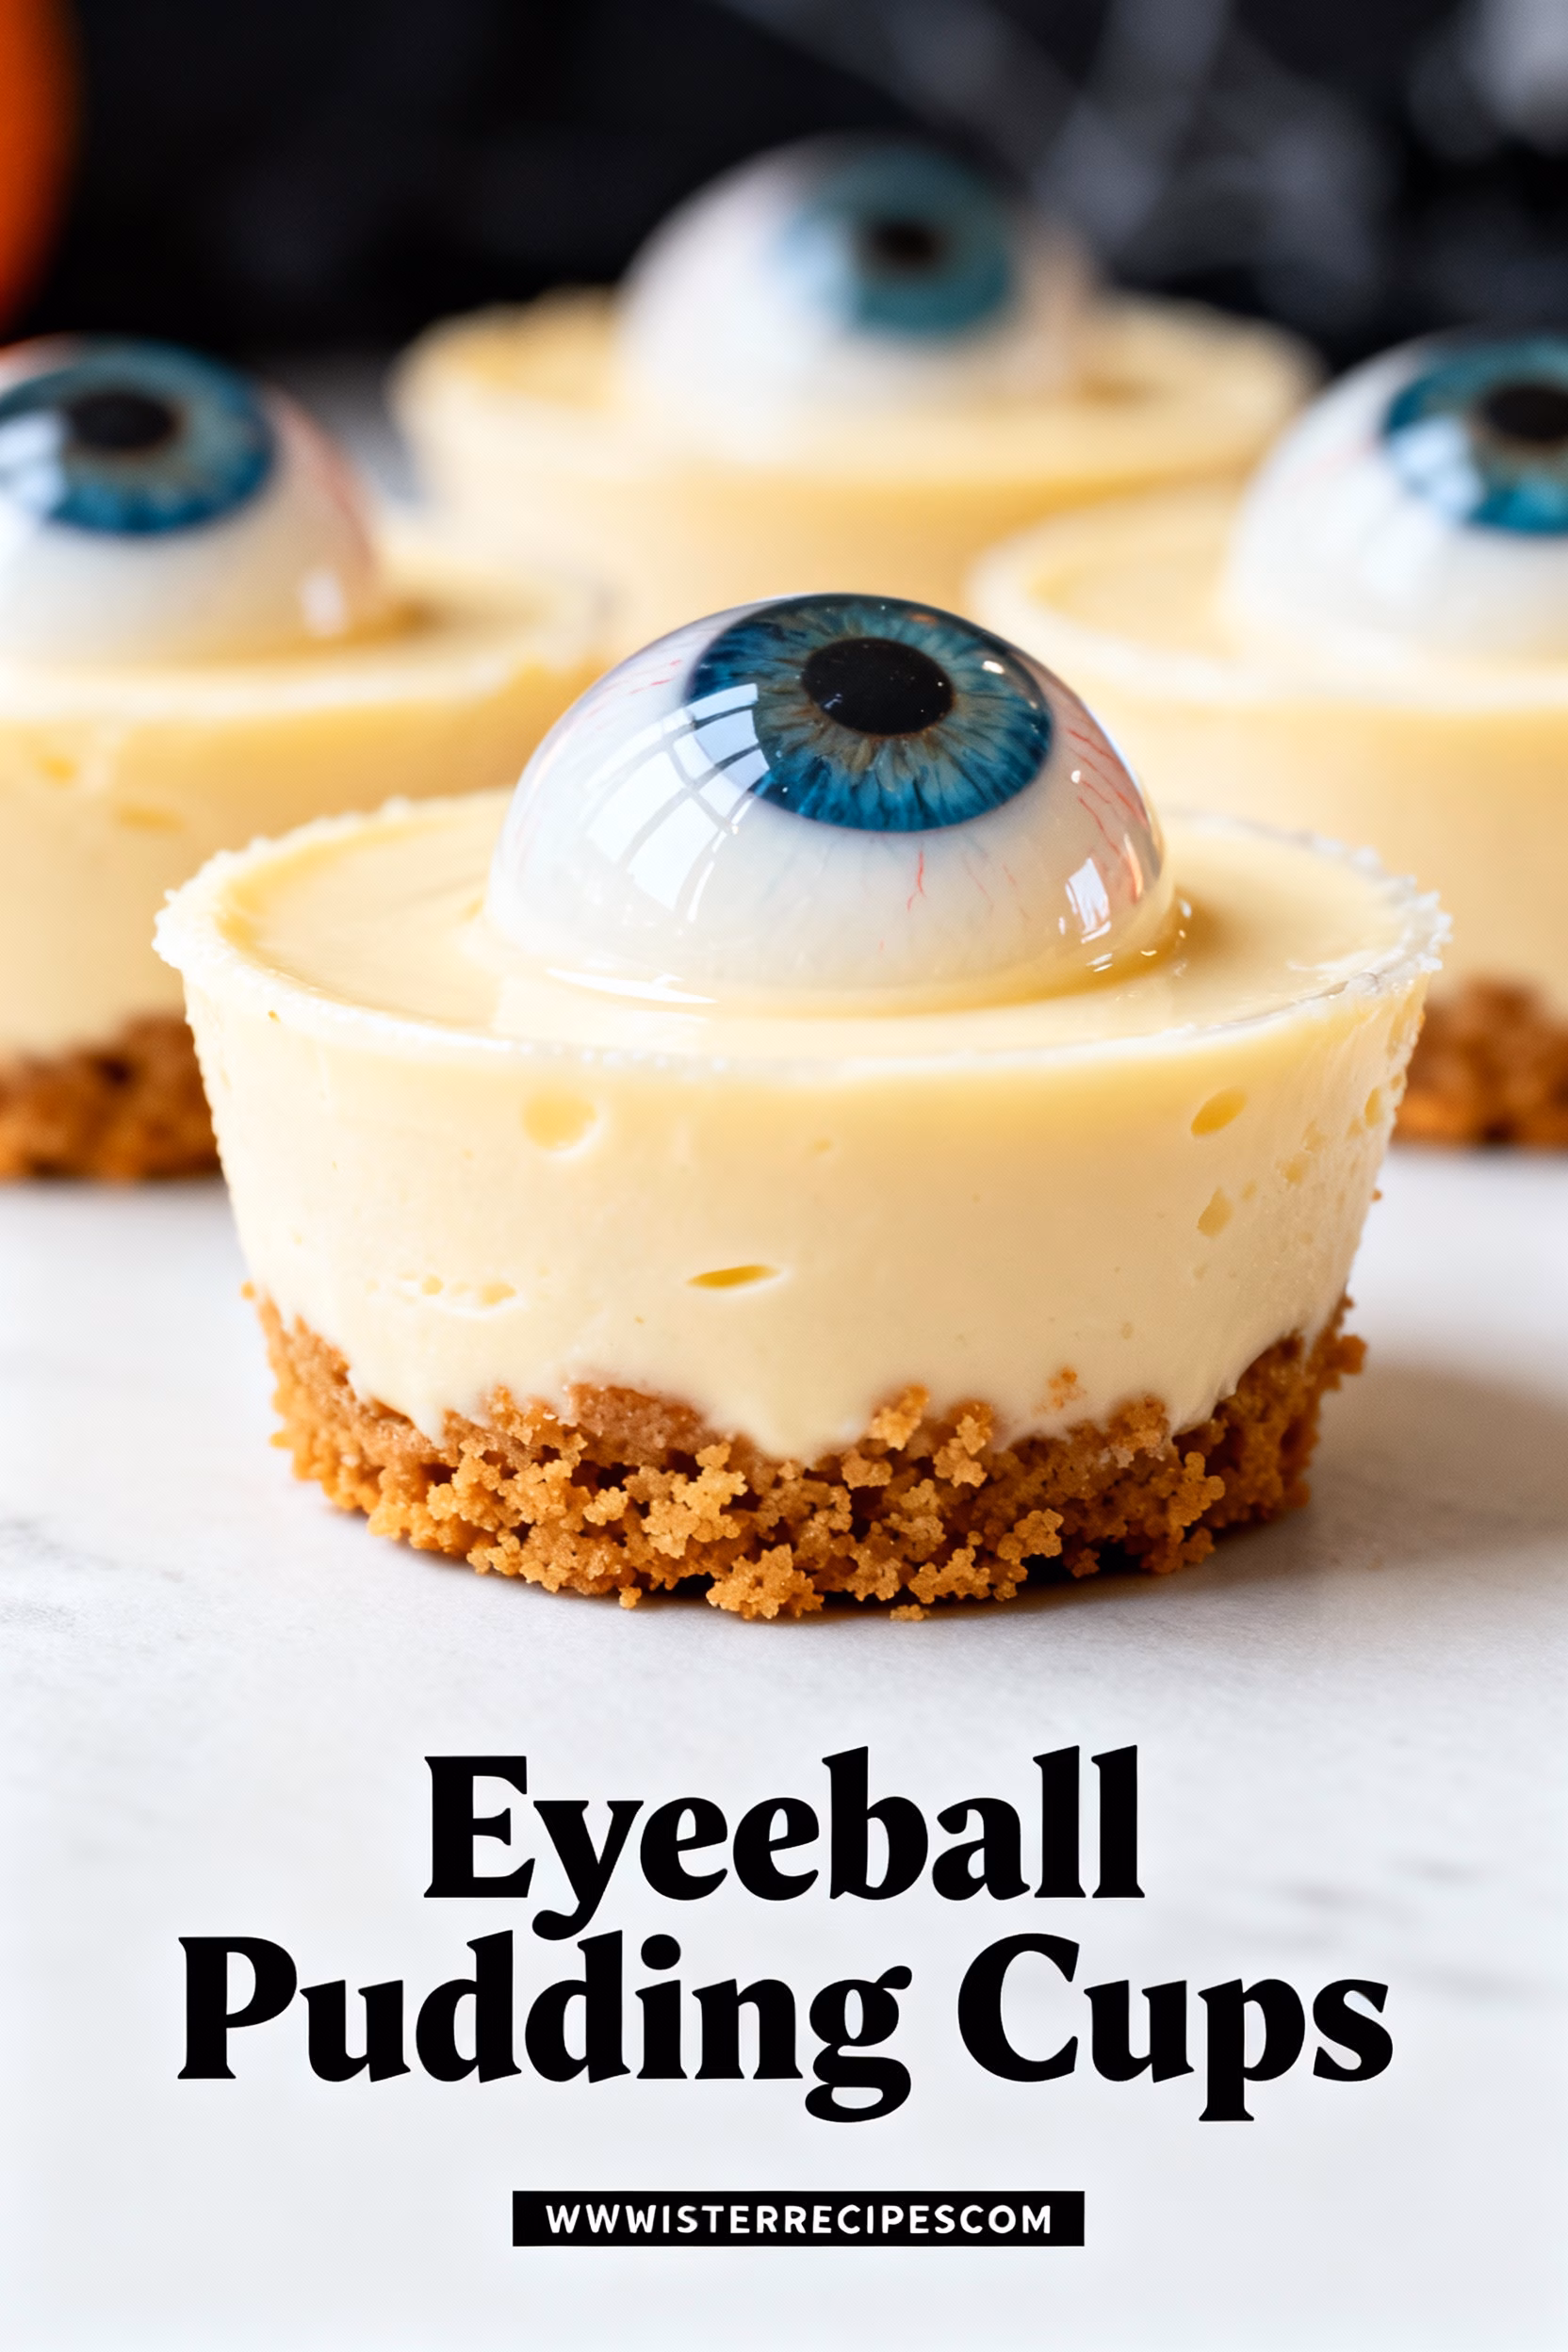
- **Gummy Eyeballs:** A bag of edible **gummy eyeball candy** or large candy eyeballs. These are the star of your **monster eye pudding**! (You can often find these in the seasonal candy aisle or craft stores.)
- **Red Gel Icing or Writing Gel:** For drawing bloodshot veins on your eyeballs, adding that extra gruesome detail.
- **Clear Plastic Cups:** Individual serving cups (5-7 ounce size) are perfect for presentation.
Substitutions & Variations:
- **Pudding Flavors:** Get creative! Butterscotch, pistachio, or even a combination of flavors can work.
- **”Dirt” Alternative:** Crushed chocolate graham crackers or even finely ground brownies can stand in for the sandwich cookies.
- **Healthier Option:** Opt for sugar-free pudding mix and a light whipped topping to make **healthy eyeball pudding cups**.
- **Dairy-Free:** Use almond or coconut milk with a dairy-free whipped topping and ensure your pudding mix is dairy-free.

How to Make Eyeball Pudding Cups
Step-by-Step Instructions
Let’s get spooky! Follow these simple steps to create your own batch of **easy eyeball pudding cups** that will be the talk of the town. This recipe is designed for beginners, ensuring awesome results every time.
- Crush Your Cookies: First, let’s create the “grave dirt” layer. Take your chocolate sandwich cookies and place them in a zip-top bag. Using a rolling pin or the bottom of a heavy glass, crush them until they resemble fine crumbs. You can also use a food processor for a quicker, finer crumb. Set aside about ¼ cup for garnish and divide the rest evenly among your plastic serving cups, creating a thin layer at the bottom of each cup. This step is crucial for that classic “dirt cup” feel, making your eyeballs seem like they’re emerging from the earth!
- Prepare the Pudding: In a large mixing bowl, combine your instant pudding mixes with the cold milk. Whisk vigorously for about 2 minutes, or until the pudding starts to thicken. Don’t worry if it seems a little loose at first; it will continue to set as it chills. If you’re using two different flavors, you can mix them in separate bowls or layer them later for a multi-colored effect. For example, a layer of chocolate and then a layer of vanilla would give a striking contrast to your **spooky pudding cups**.
- Fold in Whipped Topping: Gently fold in about half of your thawed whipped topping into the prepared pudding. This makes the pudding extra light, fluffy, and even creamier, enhancing the overall texture of your pudding cup Halloween treats. Be careful not to overmix, as this can deflate the whipped topping.
- Layer the Pudding: Spoon or pipe the pudding mixture evenly over the crushed cookie layer in each cup. Fill the cups almost to the top, leaving a little room for the remaining whipped topping and your spooky decorations. Tap the cups gently on the counter to settle the pudding and remove any air bubbles.
- Add More Whipped Topping: Top each pudding cup with a dollop of the remaining whipped topping. You can use a spoon for a rustic look or a piping bag with a star tip for a fancier, ghost-like swirl. This white layer provides a great contrast for your “bloody” eyeballs.
- Decorate with Eyeballs: Now for the fun part! Gently place one or two **gummy eyeball candy** on top of the whipped topping in each cup. Position them strategically to give the impression of eyes peering out.
- Add Bloodshot Details: Take your red gel icing. Carefully draw small, squiggly lines radiating from the pupil of each candy eyeball to create bloodshot veins. This simple detail elevates your monster eye pudding from cute to truly creepy!
- Garnish and Chill: Sprinkle the remaining crushed cookie crumbs around the base of the eyeballs for extra “dirt” or a contrasting texture. Place the finished Eyeball Pudding Cups in the refrigerator for at least 30 minutes to an hour to allow the pudding to fully set and chill thoroughly. This also helps the gel icing to firm up slightly.
- Serve and Spook! Once chilled, your **homemade eyeball pudding cups** are ready to serve! Watch as your guests are both intrigued and delighted by these creative and delicious Halloween treats. They’re perfect for any Halloween party spreading ghoulish cheer!
Pro Tips & Variations
Elevate your Eyeball Pudding Cups game with these expert tips and creative twists! Whether you’re aiming for extra spookiness or catering to specific dietary needs, these ideas will ensure your Halloween treats are a hit.
- Make Ahead Magic: These pudding cups are fantastic for making ahead! Prepare them up to 24 hours in advance, especially useful for **Halloween party eyeball dessert**. Store them covered in the refrigerator. Just be sure to add the gummy eyeballs and red gel icing closer to serving time to keep them looking fresh and vibrant.
- Textural Harmony: Don’t underestimate the power of the “dirt” layer! For an even richer, earthier flavor, consider using chocolate cookie crumbs. Some people even like to mix in a bit of toasted coconut for an extra layer of texture.
- Dairy-Free Delight: For those with dietary restrictions, creating **dairy-free eyeball pudding cups** is simple. Use a non-dairy milk alternative (almond, soy, or oat milk work beautifully) and a coconut or almond-based whipped topping. Always double-check your instant pudding mix for dairy ingredients, as some can contain them.
- DIY Eyeballs: Can’t find gummy eyeballs? No problem! You can make your own. Melt white chocolate, drop small circles onto parchment paper, and once slightly set, add a dabs of colored icing for the iris, and a tiny black dot for the pupil. For a truly unique touch, consider making **jello eyeball pudding** by setting a spherical jello mold.
- Flavor Fusion: Don’t limit yourself to just chocolate or vanilla! Experiment with other pudding flavors. A lime or pistachio pudding could offer a vibrant green base for a monster swamp theme, while strawberry pudding could create a truly gory effect. Combining two layers, like chocolate on the bottom and vanilla on top, also adds visual appeal to your **scary dessert cups**.
- Beyond Gummy Eyeballs: If you’re looking for different “eye” options, consider large white chocolate candy melts with a dab of food coloring gel for the iris and a black edible marker for the pupil. For adult parties, a lychee fruit stuffed with a blueberry or cherry creates a wonderfully realistic, albeit slightly more refined, eyeball!
- Gluten-Free Goodness: To make **gluten-free eyeball pudding cups**, simply ensure your instant pudding mix is gluten-free and use gluten-free chocolate sandwich cookies for the “dirt” layer. Most instant pudding mixes are naturally gluten-free, but it’s always best to check the label.
Serving Suggestions
These **Eyeball Pudding Cups** are fabulous on their own, but pairing them with other Halloween-themed treats can create an unforgettable spread! Here are some ideas to complete your spooky feast and make your Halloween party truly legendary:
- Mummy Hot Dogs: For a savory contrast to your sweet pudding, serve these adorable and easy-to-make mummy hot dogs. They’re a classic kid-friendly favorite and perfectly complement the playful spookiness of the pudding cups.
- Witches’ Brew Punch: Wash down your creepy treats with a vibrant green or purple “Witches’ Brew” punch. You can even add some dry ice for a dramatic, fog-spewing effect that will mesmerize your guests.
- Monster Rice Krispie Treats: Continue the monster theme with these colorful and crunchy treats. Decorate them with candy eyes and sprinkles to match the fun vibe of your pudding cups.
- Spiderweb Dip with “Bat” Chips: A savory dip designed to look like a spiderweb, served with blue corn tortilla chips cut into bat shapes, would be a fantastic appetizer before diving into the desserts.
- Witch Finger Cookies: These gruesome-looking cookies with their almond “fingernails” are another perfectly unsettling dessert to serve alongside your eyeball creations. They add another layer of edible horror to your table.
Storage & Reheating
Proper storage is key to keeping your **Eyeball Pudding Cups** fresh and delicious, especially if you’ve made them in advance for a party!
- Refrigeration: Store any leftover pudding cups in the refrigerator. Make sure each cup is covered tightly with plastic wrap or an airtight lid to prevent them from absorbing odors from other foods and to keep the pudding from drying out.
- Shelf Life: When properly stored, these **simple eyeball pudding cups for kids** will stay fresh for up to 2-3 days in the refrigerator. The crushed cookies might soften slightly over time, but the pudding and eyeballs will remain delicious.
- Freezing: While the pudding itself can be frozen (though it might alter the texture slightly), we generally don’t recommend freezing the assembled **Eyeball Pudding Cups**. The whipped topping and especially the gummy eyeballs tend to get watery or rubbery upon thawing, compromising their texture and appearance. It’s best to enjoy these fresh!
- Best Before Display: If you’re decorating with the red gel icing, it’s best to add this detail closer to serving time (within a few hours) to prevent it from bleeding too much into the whipped topping or getting absorbed by the gummy eyeballs, which can happen over extended refrigeration.
FAQ about Eyeball Pudding Cups
Are these Eyeball Pudding Cups suitable for very young children?
Yes, absolutely! These are incredibly **kid-friendly eyeball dessert** cups. The soft pudding and whipped topping make them easy to eat, and the spooky appearance is usually a huge hit with toddlers and preschoolers. Just be mindful of the portion size for very little ones.
Can I make the pudding from scratch instead of using instant mix?
Certainly! If you prefer a homemade touch, you can make your favorite pudding recipe from scratch. Just ensure it’s well chilled and set before layering it into the cups. This might add a bit more prep time, but the outcome will be just as delicious for your **Halloween desserts for kids**. This recipe focuses on easy prep, often favoring convenience items.
What if I can’t find gummy eyeballs?
No gummy eyeballs? No problem! As mentioned in our pro tips, you can get creative. Use large white candy melts with a drop of food coloring for the iris and an edible marker for the pupil. Alternatively, a whole peeled lychee fruit with a blueberry or blackberry tucked into its core makes a surprisingly realistic “eyeball” and adds a unique flavor twist to your **decorate eyeball pudding cups ideas**.
How far in advance can I prepare these?
You can prepare the pudding and layer the cups (pudding, whipped topping, and cookie crumbs) up to 24 hours in advance. However, to keep your **eyeball dessert cups with gummy eyes** looking their freshest and most gruesome, add the gummy eyeballs and draw the red gel “veins” no more than a few hours before you plan to serve them.
Can I make these dessert cups healthier?
Yes, you can! Opt for sugar-free instant pudding mixes and a light or sugar-free whipped topping. You can also use a non-dairy milk alternative to reduce fat and calories. While we love the classic cookie “dirt,” you could even experiment with a small amount of dark chocolate shavings for a slightly healthier crunch.
Final Thoughts on Eyeball Pudding Cups.
And there you have it, fellow Halloween enthusiasts! Your guide to creating the most delightfully spooky and effortlessly delicious **Eyeball Pudding Cups** that will undoubtedly be the highlight of your seasonal celebrations. We’ve explored every angle, from the initial creamy base to those perfectly bloodshot **gummy eyeball candy**, ensuring that your journey from kitchen to festive table is as fun and seamless as possible.
This isn’t just about a dessert; it’s about crafting memories, sparking joy, and adding that extra touch of playful horror that makes Halloween so special. Imagine the gasps of delight and the wide-eyed smiles as your guests, especially the little ones, encounter these ghoulishly good treats. They’re a testament to the fact that you don’t need to spend hours slaving away to achieve a show-stopping result. These **Halloween pudding cups** are perfectly designed for busy parents, enthusiastic hosts, and anyone looking for a quick and impressive dessert solution.
Whether you’re aiming for the ultimate **Halloween party eyeball dessert** or simply a fun surprise for your family, these pudding cups deliver. Remember our pro tips, experiment with flavors, and don’t be afraid to get creative with your decorations. Each cup is a miniature canvas waiting for your spooky artistic touch! So, go ahead, gather your ingredients, follow our easy steps, and get ready to be crowned the master of **spooky snacks** this Halloween season.
If you loved making these and want to continue your spooky culinary adventures, don’t forget to explore our other fantastic Halloween recipes! And if you’ve tried this recipe, we’d love to hear from you. Leave a comment below with your spooky creations and favorite variations. Don’t forget to save this recipe on Pinterest for next year’s celebrations and subscribe to our newsletter for more frightfully good ideas right to your inbox!
Eyeball Pudding Cups
Ingredients
Equipment
Method
- Crush chocolate sandwich cookies finely using a rolling pin or food processor, reserving about ¼ cup for garnish. Divide the rest among clear plastic cups to form a ‘dirt’ layer.
- In a large bowl, whisk together the instant pudding mixes with cold milk for about 2 minutes until it starts to thicken. If using two flavors, mix separately or layer them later.
- Carefully fold in half of the thawed whipped topping into the pudding mixture to enhance creaminess without deflating it.
- Spoon or pipe the pudding evenly atop the cookie crumb layers in each cup, filling nearly to the top. Gently tap the cups to settle the pudding.
- Top each cup with the remaining whipped topping, using a spoon for rustic look or a piping bag for a swirl effect.
- Place one or two gummy eyeballs on top of the whipped topping in each cup, positioning them to appear as eyes peering out.
- Use red gel icing to carefully draw bloodshot veins radiating from the pupils of the gummy eyeballs to heighten the creepy effect.
- Sprinkle the reserved crushed cookie crumbs around the base of the eyeballs for extra texture and ‘dirt’ effect. Refrigerate the pudding cups for at least 30 minutes to allow them to set and chill.
- Serve chilled and enjoy the spooky, creamy delight with your guests.