

Introduction
Hi there! I’m Benjamin, the home cook behind Mister Recipes. I still remember the first time my kids, Adams and Jana, had a real bakery chocolate croissant. Their eyes lit up, and that flaky, chocolatey explosion of happiness was something I knew I wanted to recreate in our own kitchen. Have you ever wondered if you can capture that authentic, buttery, melt in your mouth pastry magic at home, without needing a culinary degree? Many people believe that making Homemade Chocolate Croissants is a complicated affair reserved only for professional bakers. But what if I told you that with a little patience and a lot of love, you can pull a tray of these golden, glorious pastries right out of your own oven? This recipe isn’t just about flour and butter; it’s about creating a memory, filling your home with an intoxicating aroma, and sharing a truly special treat with the people you love. It’s the perfect weekend baking project that turns your kitchen into the best bakery in town. This journey is one of the most rewarding in baking, and I’m here to walk you through every single step. So, grab your apron, and let’s create something amazing together.
Why You’ll Love This Homemade Chocolate Croissants Recipe
This recipe is more than just a set of instructions; it’s an invitation to create something truly special. It’s a weekend project that pays off in delicious dividends, filling your home with the unbeatable aroma of a French bakery. The process itself is a mindful, rewarding experience, but the real joy comes from that first bite of a warm, flaky croissant you made with your own hands. Here’s why you and your family will fall in love with this recipe:
- Incredibly Flaky and Buttery: This recipe is designed to achieve maximum lamination, creating dozens of paper thin layers of butter and dough that puff up in the oven for that signature honeycomb interior and shatteringly crisp exterior.
- Rich Chocolate Filling: We use high quality dark chocolate batons that melt into a luscious, gooey center, perfectly complementing the buttery pastry. It’s a classic combination for a reason!
- A Fun and Rewarding Baking Project: While it takes time, the process is straightforward and incredibly satisfying. It’s perfect for a lazy weekend when you want to dive into a project and see amazing results. It’s a great way to learn a new skill and impress your family and friends. For a simpler but equally rewarding project, you could try these easy Biscoff truffles.
- Far Better (and Cheaper!) Than Store-Bought: Nothing compares to a freshly baked croissant, still warm from the oven. You control the quality of the ingredients, and the taste is infinitely superior to any pre-packaged version.
- Beginner Friendly Instructions: I’ve broken down the lamination process into simple, manageable steps with plenty of tips to ensure your success, even if you’ve never made laminated dough before. This detailed guide, much like this one for homemade chocolate croissants, will help you succeed.
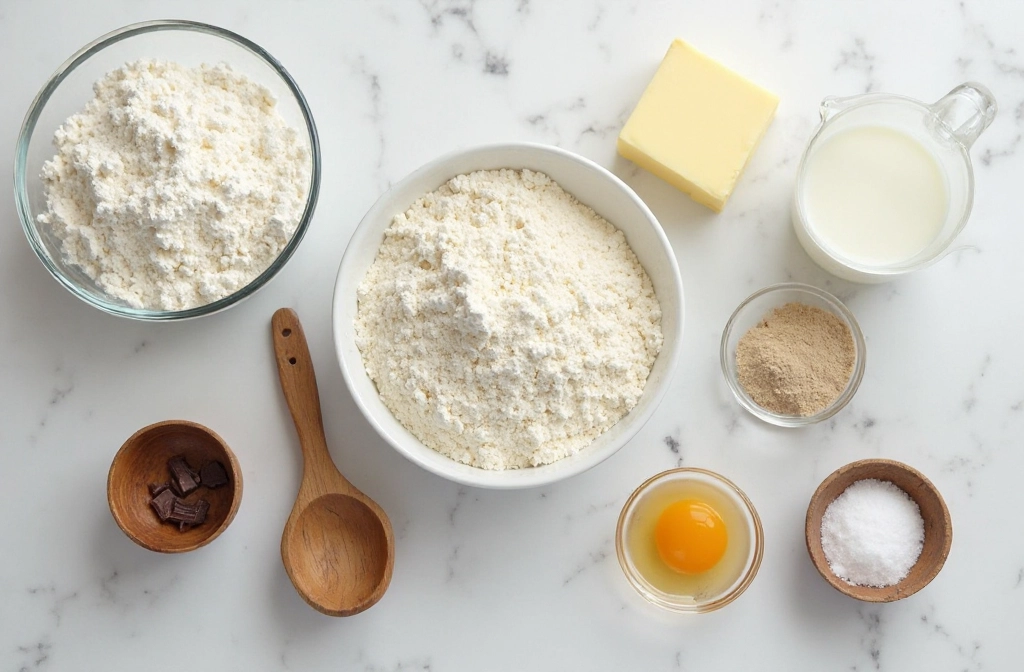
Ingredients for Homemade Chocolate Croissants
- All purpose flour
- Granulated sugar
- Active dry yeast
- Salt
- Whole milk, lukewarm
- Unsalted butter, high quality (European style preferred), cold
- Dark chocolate batons or a high quality dark chocolate bar, chopped
- 1 large egg (for the egg wash)
Substitutions:
- Chocolate: You can use semi sweet chocolate chips or even a filling like a cranberry cream cheese mixture for a festive twist.
- Flour: Bread flour can be substituted for a slightly chewier texture.
How to Make Homemade Chocolate Croissants
Step-by-Step Instructions
Making croissants is a labor of love, but each step is simple. The key is chilling the dough, so be prepared for some wait times. It’s the perfect, relaxing project for a Saturday or Sunday at home.
- Make the Dough (Détrempe): In the bowl of a stand mixer fitted with the dough hook, combine the flour, sugar, yeast, and salt. With the mixer on low, slowly stream in the lukewarm milk. Mix until a shaggy dough forms, then increase the speed to medium and knead for about 5 minutes, until the dough is smooth and elastic.
- First Chill: Form the dough into a rectangle, wrap it tightly in plastic wrap, and refrigerate for at least 1 hour, or overnight. This allows the gluten to relax.
- Create the Butter Block (Beurrage): Place your cold butter between two sheets of parchment paper. Using a rolling pin, pound and roll the butter into a flat 6×8 inch rectangle. Try to keep it even. If it gets soft, pop it back in the fridge for 10-15 minutes. The butter and dough should be a similar consistency when you’re ready to laminate.
- Laminate the Dough: On a lightly floured surface, roll your chilled dough into a rectangle about 8×12 inches. Place the butter block in the center. Fold the dough over the butter like a letter, ensuring the butter is completely enclosed. Press the seams to seal.
- The First Turn: Roll the dough packet into a long rectangle, about 8×24 inches. Fold it into thirds, like a business letter. This completes the first “turn.” Wrap in plastic and refrigerate for 30 minutes.
- The Second and Third Turns: Repeat the process two more times: roll into an 8×24 inch rectangle, fold into thirds, and chill for 30 minutes after each turn. You will have completed 3 turns in total.
- Final Chill: After the third turn, wrap the dough tightly and refrigerate for at least 1-2 hours, or up to 24 hours. This is crucial for the layers to set.
- Shape the Croissants: On a lightly floured surface, roll the dough into a large rectangle about 16×20 inches. Trim the edges to make them neat. Cut the dough into long rectangles, about 4×6 inches each.
- Add Chocolate and Roll: Place a chocolate baton at the shorter end of a rectangle. Roll it up tightly, placing a second baton about halfway through the roll so there’s chocolate in every bite. Place the rolled croissant seam side down on a parchment lined baking sheet.
- Proofing: Cover the croissants loosely with plastic wrap and let them proof in a warm place for 1-2 hours, or until they are visibly puffy and feel airy. They should jiggle slightly when you move the pan.
- Bake: Preheat your oven to 400°F (200°C). Brush the croissants gently with the egg wash. Bake for 15-20 minutes, or until they are a deep golden brown. Let them cool slightly on the baking sheet before transferring to a wire rack. They are best enjoyed warm!
Pro Tips & Variations
Ready to take your Homemade Chocolate Croissants to the next level? These tips will help you get that perfect bakery result every time, and a few variations will let you customize this classic treat.
- Use High-Quality European Butter: This is my number one tip. European style butters have a higher fat content and less water, which is essential for creating distinct, flaky layers. It’s a small change that makes a huge difference in flavor and texture.
- Keep Everything Cold: The key to lamination is keeping the butter solid. If at any point the dough or butter feels soft or greasy, don’t hesitate to put it back in the refrigerator for 15-20 minutes. A cold dough is a happy dough!
- Don’t Over-Proof: If you let the croissants proof for too long, the butter can melt out before it even hits the oven, leading to greasy, dense pastries. They should be puffy and airy, but not look like they’re about to burst.
- Egg Wash is a Must: For that beautiful, shiny, golden brown finish, don’t skip the egg wash. Brush it on gently to avoid deflating the delicate, proofed dough.
Variations:
- Nutella Stuffed: Swap the chocolate batons for a generous smear of Nutella before rolling.
- Almond Chocolate: Sprinkle some almond frangipane and sliced almonds over the chocolate before rolling for a classic Pains au Chocolat aux Amandes.
- Sweet and Salty: Sprinkle a touch of flaky sea salt on top of the croissants right after the egg wash for a delightful contrast. The saltiness will amplify the buttery notes, much like in our butter toffee pretzels.
- Add a Fruity Twist: Add a thin layer of raspberry or a tasty Amish Christmas jam along with the chocolate for a burst of fruit flavor.
Serving Suggestions
A warm, flaky chocolate croissant is a treat all on its own, but pairing it with the right beverage or a simple side can elevate the experience into a truly memorable meal. Whether you’re enjoying a slow weekend morning or hosting a special brunch, here’s how to serve your beautiful homemade creations.
- With Your Favorite Coffee: The classic pairing! A strong, dark roast coffee, a creamy latte, or a frothy cappuccino cuts through the richness of the buttery pastry beautifully. The bitterness of the coffee is a perfect counterpoint to the sweet chocolate.
- A Simple Glass of Milk: For the kids (and the kids at heart!), a cold glass of milk is the perfect companion. It’s simple, classic, and lets the flavor of the croissant shine.
- With Fresh Berries: A side of fresh raspberries, strawberries, or blueberries adds a touch of brightness and acidity that cleanses the palate between buttery, chocolatey bites. Their natural sweetness is a wonderful complement.
- Dusting of Powdered Sugar: For an extra touch of elegance and sweetness, give the cooled croissants a light dusting of powdered sugar right before serving. It makes them look even more professional and special.
Storage & Reheating for Homemade Chocolate Croissants
While Homemade Chocolate Croissants are undeniably best on the day they’re baked, you can certainly store them for later. Proper storage and reheating will help you enjoy that flaky, buttery goodness for a few more days.
Storing:
Let the croissants cool completely to room temperature. This is important to prevent condensation from making them soggy. Store them in an airtight container or a paper bag at room temperature for up to 2 days. The paper bag helps maintain some of the crispness, while an airtight container will make them softer.
Freezing:
For longer storage, freezing is your best option. You can freeze either unbaked or baked croissants.
- Unbaked: After shaping and filling the croissants, arrange them on a baking sheet and freeze until solid. Then, transfer them to a freezer safe bag or container. They can be frozen for up to 1 month. To bake, place them on a parchment lined baking sheet and let them proof at room temperature until puffy (this may take 3-4 hours), then egg wash and bake as directed.
- Baked: Let the baked croissants cool completely. Wrap each one individually in plastic wrap, then place them in a freezer bag. They can be frozen for up to 2 months.
Reheating:
To bring a day old or frozen croissant back to life, the oven is your best friend. Preheat your oven to 350°F (175°C). Place the croissants on a baking sheet and heat for 5-8 minutes, or until they’re warmed through and the exterior is crisp again. This method works perfectly for both room temperature and frozen baked croissants (add a few extra minutes for frozen ones). Avoid the microwave, as it will make them soft and chewy.
FAQ about Homemade Chocolate Croissants
- Can I use store bought puff pastry for this recipe?
- Absolutely! Using a high quality, all butter puff pastry is a fantastic shortcut. While you won’t get the exact same flavor and texture as the homemade laminated dough featured in recipes like this pain au chocolat recipe, you’ll still end up with a delicious, flaky pastry. Just thaw the pastry, cut it, fill with chocolate, and proceed with the proofing and baking steps.
- Why are my croissants not flaky?
- This is a common issue and it usually comes down to the butter. If the butter gets too warm during the lamination process and melts into the dough instead of staying in distinct layers, you won’t get that flaky separation. Make sure your dough and butter are always well chilled throughout the process. Don’t be afraid to refrigerate the dough between steps if your kitchen is warm.
- Can I make the dough ahead of time?
- Yes, and it’s a great way to break up the work. The dough (détrempe) can be refrigerated for up to 48 hours after the initial mix. The fully laminated dough can also be refrigerated for up to 48 hours before you shape and bake the croissants. This flexibility makes the process much more manageable.
- What is the best chocolate to use for chocolate croissants?
- The best option is to use chocolate batons (also called “bâtons de boulanger”), which are specifically designed for this purpose as they hold their shape well during baking. If you can’t find them, a high quality dark or semi sweet chocolate bar (around 60% cacao) chopped into stick shapes works perfectly. Avoid chocolate chips, as they have stabilizers that prevent them from melting as smoothly.
Final Thoughts on Homemade Chocolate Croissants
There is nothing quite like the pride and pure joy you feel when you pull a tray of perfect, golden Homemade Chocolate Croissants from your oven. Every flaky layer tells a story of patience and care. I truly hope this recipe inspires you to dive into the wonderful world of laminated dough. It’s more than just baking; it’s creating a moment of edible magic for your family. If you make these croissants, I would absolutely love to hear about it! Leave a comment below and let me know how they turned out. And if you’re looking for more baking inspiration, don’t forget to subscribe to our newsletter for recipes delivered straight to your inbox. Pin this recipe on Pinterest to save it for your next baking adventure!


