
Introduction
Have you ever wondered why, out of all the festive traditions, the act of building a house from cookies has become such a cherished centerpiece of the American holiday season? Every year, millions of us clear our kitchen tables, unwrap sticks of butter, and measure out spices, all for the singular goal of creating a sweet, edible architectural marvel. The magic isn’t just in the candy, it’s in the creation. I still remember the first time my kids, Adams and Jana, attempted their own. Flour dusted their cheeks, and their tiny fingers carefully placed each gumdrop. It was chaotic, beautiful, and it cemented in my mind what my grandmother always said: cooking isn’t just about food, it’s about making people happy. Crafting a homemade gingerbread house is the ultimate expression of that philosophy.
This recipe isn’t just a list of ingredients and instructions; it’s a blueprint for connection. In a world that moves so fast, this project forces us to slow down, to work together, and to create something tangible and joyful with our own hands. It’s for the parents who want to start a new tradition, the friends looking for a festive group activity, and anyone who believes that the best holiday memories are made in the heart of the home: the kitchen. Forget the perfectly sterile, store bought kits. We’re going to build a house with character, a house that tells a story, a house that fills your home with the incredible aroma of ginger and cinnamon, and most importantly, A house that’s built with love.
Why You’ll Love This Homemade Gingerbread House
When I set out to create the ultimate guide for a homemade gingerbread house, my goal was simple. I wanted a recipe that was sturdy enough for aspiring architects (like my son, Adams) but delicious enough that you’d actually want to sneak a piece of the wall. This recipe is the culmination of years of testing, tweaking, and celebrating the glorious, sticky-fingered results with my wife, Emily, and our kids. It’s more than a recipe; it’s an invitation to create a tradition.
- Perfectly Sturdy Construction Grade Dough: This gingerbread dough is a marvel. It’s engineered to bake up hard and flat, which is exactly what you need for strong walls and a roof that won’t sag. Unlike softer cookie recipes, this one holds its shape beautifully, giving you a reliable foundation for your masterpiece.
- Delicious and Wonderfully Spiced: While it’s strong, we don’t sacrifice flavor. The dough is packed with a warm blend of ginger, cinnamon, and cloves, making your entire house smell like Christmas. The pieces that don’t make it onto the house (and there are always a few!) are a delicious snack on their own, perfect for dunking in milk.
- A Recipe for Family Connection: This is the ultimate family friendly project. It’s an activity that bridges generations. One person can mix the dough, another can roll and cut the pieces, and everyone can join in for the best part: decorating. It’s a guaranteed way to make lasting memories, one candy-adorned wall at a time. I love making festive cookies like Jam Thumbprints to enjoy while we decorate.
- Endless Creative Freedom: This recipe provides the canvas; you provide the creativity. I’ll guide you through making the structure, but the decorating is all you. From creating intricate gingerbread house windows with melted hard candies to designing a whole gingerbread house yard, the possibilities are truly endless.
- The Ultimate Holiday Centerpiece: A beautifully decorated Christmas gingerbread house is more than just a dessert; it’s a work of art. It will be the star of your holiday table, a conversation starter, and a proud display of your family’s creativity.
Ingredients for Homemade Gingerbread House
Before we begin, let’s gather our tools. The ingredients are simple, but together they create magic. I’ve broken them down into what you’ll need for the house structure and the all important “cement” that holds it together.
For the Gingerbread Dough:
- ¾ cup unsalted butter, softened
- ¾ cup packed dark brown sugar
- ½ cup dark molasses
- 1 large egg
- 3 ½ cups all purpose flour, plus more for dusting
- 1 tablespoon ground ginger
- 1 teaspoon ground cinnamon
- ½ teaspoon ground cloves
- ½ teaspoon baking soda
- ¼ teaspoon salt
For the Royal Icing (The “Glue”):
- 4 cups powdered sugar, sifted
- 3 tablespoons meringue powder
- 6 to 9 tablespoons warm water
For Decorating (Your Creative Palette!):
- An assortment of your favorite gingerbread house candy! Think gumdrops, M&M’s, candy canes, licorice strings, sprinkles, chocolate chips, and small cookies.
- Pretzels can make great fences or log piles.
- Fondant is excellent for creating detailed figures or a smooth covering.
How to Make Homemade Gingerbread House
Step-by-Step Instructions
Alright, let’s roll up our sleeves and get started! Building a homemade gingerbread house is a process, but I’ve broken it down into simple, manageable steps. Just remember my grandmother’s advice: the most important ingredient is patience.
Create the Dough: In the bowl of a stand mixer fitted with the paddle attachment (or using a hand mixer and a large bowl), cream together the softened butter and brown sugar until light and fluffy, about 3 minutes. Beat in the molasses and the egg until fully combined, scraping down the sides of the bowl as needed.
Combine Dry Ingredients: In a separate medium bowl, whisk together the flour, ginger, cinnamon, cloves, baking soda, and salt.
Mix the Dough: With the mixer on low speed, gradually add the dry ingredients to the wet ingredients. Mix until just combined. The dough will be thick and slightly sticky.
Chill the Dough: Divide the dough in half, flatten each half into a 1 inch thick disk, and wrap tightly in plastic wrap. Refrigerate for at least 3 hours, or preferably overnight. This step is crucial for A dough that’s easy to roll and won’t spread during baking.
Cut Your Pieces: Preheat your oven to 350°F (175°C). Line several baking sheets with parchment paper. On a lightly floured surface, roll out one disk of dough to about a ¼ inch thickness. Using a gingerbread house template (you can find many online or draw your own), carefully cut out your pieces: two side walls, a front and back wall, and two roof panels. A pizza cutter works wonders for straight lines! Transfer the pieces to your prepared baking sheets.
Bake the Structure: Bake for 12 to 15 minutes, until the edges are firm and the centers are set. Let the pieces cool on the baking sheets for 5 minutes before transferring them to a wire rack to cool completely. They must be 100% cool before you start building.
Make the Royal Icing: While the pieces cool, prepare your cement. In a large, grease free bowl, whisk together the sifted powdered sugar and meringue powder. Add 6 tablespoons of warm water and beat with an electric mixer on medium high speed until stiff, glossy peaks form, about 5 to 7 minutes. It should be the consistency of spackle. If it’s too thick, add more water, one teaspoon at a time. If it’s too thin, add more powdered sugar.
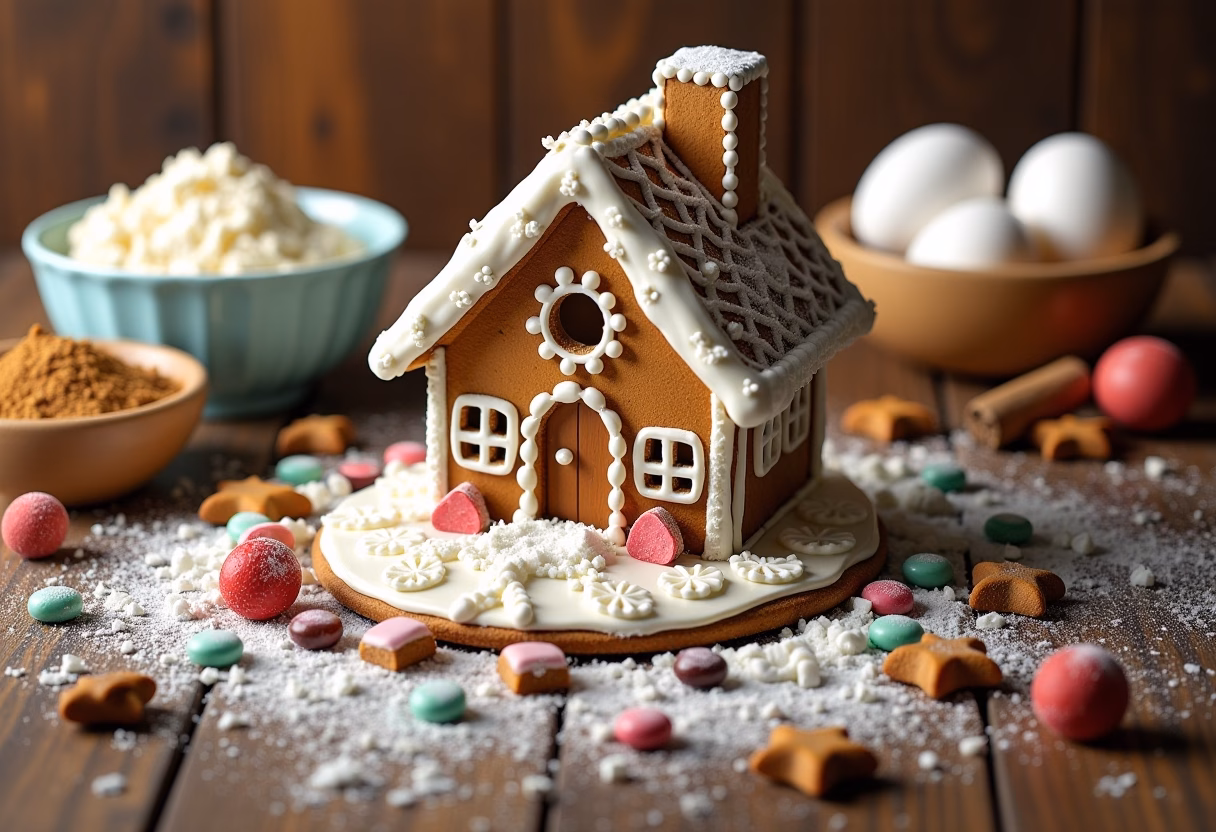
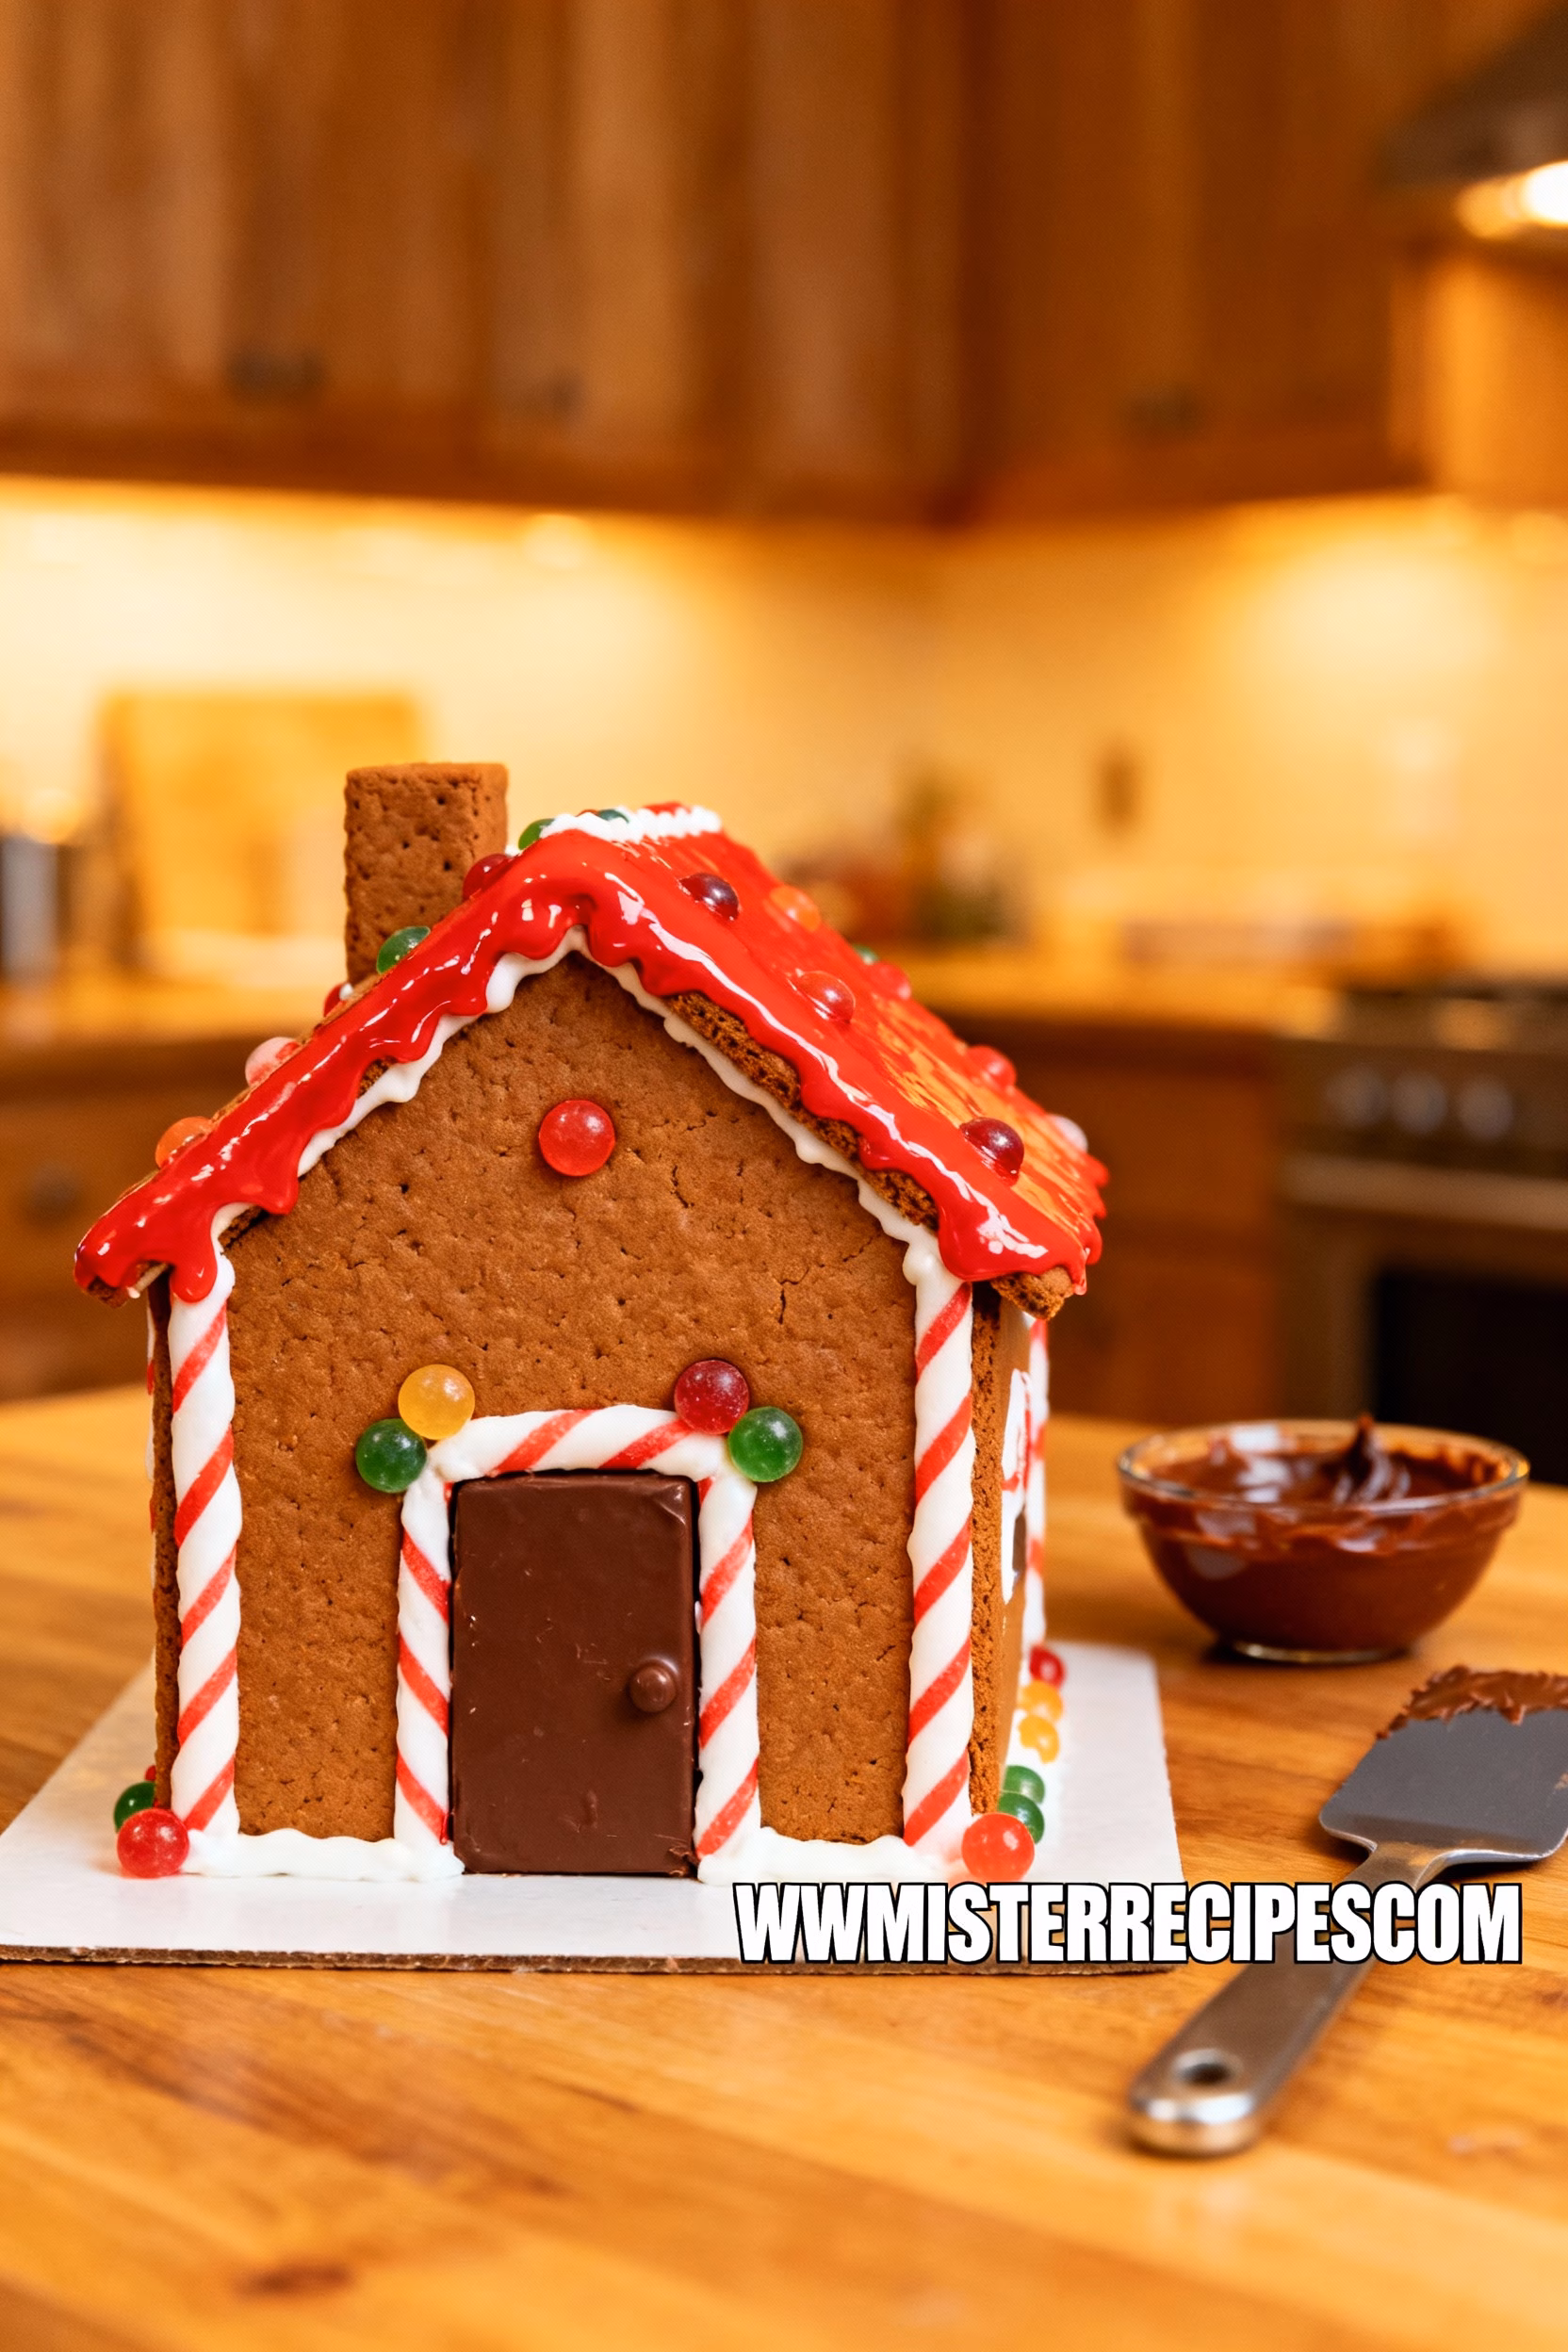
Assemble and Decorate: Transfer the icing to a piping bag. Pipe a thick line of icing along the bottom and side edges of your wall pieces and assemble them on your serving platter or cardboard base. Use canned goods to prop up the walls as they set for about 30 minutes. Once the walls are sturdy, pipe icing along the top edges of the walls and gently place the roof panels on top. Let the entire structure dry for at least 1 hour before you start decorating. For a detailed visual guide on assembly, The Kitchn has a fantastic step by step tutorial. Now for the fun part! Use the icing to glue on your candy canes, gumdrops, and other treasures. Outline the gingerbread house door and windows, and create icicles hanging from the gingerbread house roof.
Pro Tips & Variations
Over the years, our family has learned a few tricks that make the gingerbread building process smoother and more fun. Think of these as the little secrets passed down from our kitchen to yours.
- Patience is Your Best Friend: I cannot stress this enough. Rushing is the enemy of a sturdy gingerbread house. Let your baked pieces cool completely, absolutely completely, before you even think about assembly. After you build the walls, give them at least 30 minutes (an hour is even better) to set before attempting to add the heavy roof. This downtime is perfect for sorting your candy or baking a batch of Snickerdoodles no dough chilling to snack on.
- The Icing Consistency Test: Your royal icing is the glue that holds your dream house together. It needs to be just right. A good test is to drag a spoon through it; the line it creates should hold for a few seconds before slowly closing. If it’s too runny, the walls will slide apart. If it’s too stiff, it will be impossible to pipe. Find that happy medium.
- Create Stained Glass Windows: This is one of my favorite gingerbread house ideas and it’s surprisingly easy. Before baking, place your cut wall pieces on the parchment lined baking sheet. Fill the window cutouts with a single layer of crushed hard candies (like Jolly Ranchers). As the gingerbread bakes, the candy will melt into a beautiful, translucent “glass.”
- Variation: Mini Gingerbread Houses: If a large house feels too ambitious, make a mini gingerbread house! Use a smaller template (you can often find these online) and let each family member decorate their own little cottage. It’s a wonderful activity for a kids’ Christmas party.
- Variation: Vegan or Gluten Free Gingerbread House: Everyone should be able to join the fun!
- For a Gluten free gingerbread house, substitute the all purpose flour with a good quality 1 to 1 gluten free baking flour blend that contains xanthan gum.
- For a Vegan gingerbread house, use a flax egg (1 tablespoon ground flaxseed mixed with 3 tablespoons water) in place of the regular egg and use your favorite vegan butter sticks. For the icing, use an aquafaba based royal icing recipe.
Serving Suggestions
While you might not “serve” the gingerbread house in the traditional sense, creating a scene around it transforms it from a simple project into a full blown holiday experience. It’s all about building a world around your sweet creation. Here’s how we do it in our home.
First, you need a festive beverage. We love setting up a hot cocoa bar right next to the finished house. Fill mugs with rich hot chocolate and let everyone customize their own with a spread of mini marshmallows, whipped cream, chocolate shavings, and a sprinkle of cinnamon. It’s the perfect warm drink to enjoy while admiring your handiwork.
Next, a house shouldn’t stand alone! Surround your Christmas gingerbread house with a platter of other holiday treats. The different shapes and colors add to the festive display. I love to bake a batch of our family’s favorite soft molasses cookies, as their spicy sweetness perfectly complements the gingerbread. Simple, buttery cookies also work beautifully.
Finally, turn the project into an event. Declare a homemade gingerbread house building night! Put on your favorite holiday movie, turn up the festive music, and make the construction the main event of the evening. It’s not just about the final product, but the joy and laughter that happen during the process. You can even build out a whole gingerbread house yard on the platter. A dusting of powdered sugar makes perfect snow. Stand up ice cream cones and cover them with green icing and sprinkles to make gingerbread house trees, and use pretzels to build a rustic fence. Let your imagination run wild and create a whole edible winter wonderland.
Storage & Reheating
Your masterpiece is complete! Now, how do you make it last through the holiday season? A homemade gingerbread house is more of a decoration than a dessert to be stored for later eating, so our focus here is on preservation.
To keep your house looking its best, place it in a cool, dry area of your home, away from direct sunlight or any sources of heat or humidity. A humid environment is the number one enemy, as it can soften the gingerbread and icing, leading to a potential collapse. If you live in a particularly humid climate, you might consider running a dehumidifier in the room.
You can lightly cover the house with plastic wrap to protect it from dust, but be careful not to press against any delicate decorations. A properly baked and assembled gingerbread house, kept in ideal conditions, can last for several weeks, and sometimes even months, as a beautiful holiday decoration.
As for “reheating,” there’s no need! However, you may need to perform some minor repairs. If a piece of candy falls off or a small crack appears, don’t worry! Just whip up a tiny bit of extra royal icing and use it as “spackle” to make fixes. It’s your secret construction crew, ready to keep the house standing tall all season long.
FAQ about Homemade Gingerbread House
Why did my gingerbread house collapse?
This is the most common fear, but it’s usually preventable! The top three culprits are: 1) The gingerbread dough was too soft, either from not being chilled long enough or from a recipe designed for eating, not building. My recipe is specifically for construction! 2) The pieces were not completely cool before assembly. Even a little residual warmth can cause the icing to melt and slide. 3) The gingerbread house icing was too thin. It needs to be thick and stiff, like spackle, to hold the weight of the walls and roof.
What’s the best candy for a homemade gingerbread house?
This is the most fun part! A great gingerbread house candy selection can take your house to the next level. For the roof, I love using Necco wafers, shredded wheat cereal, or rows of M&M’s as shingles. Gumdrops and Dots are perfect for lining pathways or decorating the roof ridge. Small candy canes are essential for the corners of the house or as a classic gingerbread house door frame. Round peppermints and pinwheel candies make gorgeous decorative windows. Don’t forget sprinkles for a touch of magic!
Can I eat my homemade gingerbread house?
Absolutely! It is 100% edible. The gingerbread will be quite hard (by design), but the pieces that don’t make the final cut are delicious, especially when dunked in coffee or milk. The house itself will become very stale and hard after a few days on display, so while you can eat it, it might not be the most pleasant experience. If you’re craving that gingerbread flavor, I recommend baking a separate batch of cookies just for eating, like this wonderful Gingerbread Cookies II recipe from Allrecipes.
Is it better to use a gingerbread house kit or make it from scratch?
A store bought gingerbread house kit is a great starting point and can be a lot of fun, especially for very young children. However, making a homemade gingerbread house from scratch is a deeply rewarding experience. The taste is infinitely better, the house smells incredible as it bakes, and you have complete creative control over the shape and size. Think of this recipe as the next step up, a way to create a truly personal and memorable family heirloom.
Final Thoughts on Homemade Gingerbread House
In the end, this recipe is about so much more than a house made of cookies. It’s a recipe for joy. It’s about the powdered sugar that dusts the table, the scent of ginger that fills the air, and the focused silence that falls over the room as everyone works on their little piece of the project. It’s about building something together, side by side. It’s the physical embodiment of my grandmother’s simple, profound wisdom: “Cooking isn’t just about food, Ben. It’s about making people happy.”
From my family to yours, I hope this homemade gingerbread house becomes a treasured part of your holiday tradition. I hope it brings you closer, sparks your creativity, and creates a memory that you’ll talk about for years to come. Mister Recipes is more than just a food blog; it’s a community of home cooks who believe in the power of a shared meal and a kitchen filled with love.
If you make this recipe, please let me know how it turned out! Leave a comment below with your stories and photos. And if you’re looking for more holiday baking inspiration, don’t forget to check out our recipe for Peanut Butter Blossoms.
Now, grab your apron, gather your loved ones, and let’s get building. Don’t forget to save this post to your favorite holiday board on Pinterest so you can find it year after year
Homemade Gingerbread House
Ingredients
Equipment
Method
- In the bowl of a stand mixer fitted with the paddle attachment (or using a hand mixer and a large bowl), cream together the softened butter and brown sugar until light and fluffy, about 3 minutes.
- Beat in the molasses and the egg until fully combined, scraping down the sides of the bowl as needed.
- In a separate medium bowl, whisk together the flour, ginger, cinnamon, cloves, baking soda, and salt.
- With the mixer on low speed, gradually add the dry ingredients to the wet ingredients. Mix until just combined. The dough will be thick and slightly sticky.
- Divide the dough in half, flatten each half into a 1 inch thick disk, and wrap tightly in plastic wrap. Refrigerate for at least 3 hours, or preferably overnight.
- Preheat your oven to 350°F (175°C). Line several baking sheets with parchment paper.
- On a lightly floured surface, roll out one disk of dough to about a ¼ inch thickness. Using a gingerbread house template (you can find many online or draw your own), carefully cut out your pieces: two side walls, a front and back wall, and two roof panels.
- Transfer the pieces to your prepared baking sheets.
- Bake for 12 to 15 minutes, until the edges are firm and the centers are set.
- Let the pieces cool on the baking sheets for 5 minutes before transferring them to a wire rack to cool completely.
- While the pieces cool, prepare your royal icing. In a large, grease free bowl, whisk together the sifted powdered sugar and meringue powder.
- Add 6 tablespoons of warm water and beat with an electric mixer on medium high speed until stiff, glossy peaks form, about 5 to 7 minutes.
- The icing should be the consistency of spackle. If it’s too thick, add more water, one teaspoon at a time. If it’s too thin, add more powdered sugar.
- Transfer the icing to a piping bag.
- Pipe a thick line of icing along the bottom and side edges of your wall pieces and assemble them on your serving platter or cardboard base.
- Use canned goods to prop up the walls as they set for about 30 minutes.
- Once the walls are sturdy, pipe icing along the top edges of the walls and gently place the roof panels on top.
- Let the entire structure dry for at least 1 hour before you start decorating.
- Decorate with your favorite candies. Outline the door and windows, and create icicles from candies hanging from the roof.


