
The Ultimate Chewy Peppermint Bark Cookies, Bringing the Magic of Christmas Home
It’s funny how some holiday recipes don’t just taste like Christmas, they smell like your entire childhood rolled into one perfect bite. For me, that’s these Peppermint Bark Cookies. I came up with this recipe years ago when my wife, Emily, mentioned that while she loved actual peppermint bark, it was too messy for our kids, Adams (now 12, and usually covered in something sticky anyway) and Jana (9, my meticulous little baker). She wanted something easier to grab off a holiday platter, something with that satisfying crunch, but wrapped up in a soft, chewy cookie base. Challenge accepted.
This isn’t just a recipe, it’s a strategy for making holiday cookies that absolutely disappear, whether you’re making them for a cookie swap or just a cozy night by the fireplace. We’re taking the best parts of the iconic chocolate peppermint bark, the smooth coating of white chocolate, the deep notes of dark or semi-sweet chocolate, and the sharp, minty punch of crushed candy canes, and integrating them into a moist, delightfully messy chocolate peppermint bark cookie recipe. These are the Christmas treats that Adams and Jana request every December, right after they ask to start decorating the homemade gingerbread house. If you want the absolute best peppermint bark cookie recipe, one that is easy to execute and delivers major flavor, grab your apron! We’re going to bake up some happiness.
Why You’ll Love These Easy Homemade Peppermint Bark Cookies
As a home cook, husband, and father, my entire philosophy behind MisterRecipes.com is that cooking and baking should be enjoyable, not a chore. Cooking isn’t just about food, it’s about making people happy and creating memories. I promise you, making these homemade peppermint bark cookies from scratch is incredibly straightforward, resulting in a showstopping festive dessert that looks like it took hours, but only requires minimal active preparation time. They are the perfect addition to any Christmas cookie platter.
If you’ve searched high and low for a soft chewy peppermint bark cookies recipe that hits that sweet spot of chocolate and mint, look no further. We use a base that stays moist and slightly fudgy, making it the ideal canvas for the decadent topping. Many recipes out there for peppermint bark sugar cookies or even red velvet peppermint bark cookies can turn out dry or crumbly, but my recipe is based on a classic American chocolate chew that works year after year.
- The Perfect Holiday Flavor Balance: We achieve that quintessential white chocolate peppermint flavor profile. The rich, slightly bitter cocoa in the cookie base perfectly grounds the sweet white chocolate and the cooling burst of the crushed peppermint candy canes on top.
- Holiday Baking Made Simple: While they look elaborate, these are essentially a drop-style cookie, meaning no complex rolling or cutting. They are ready to be eaten in less than 30 minutes, making them one of the easiest quick cookie recipes for those rushed holiday moments. The kids even love helping to crush the peppermint candies.
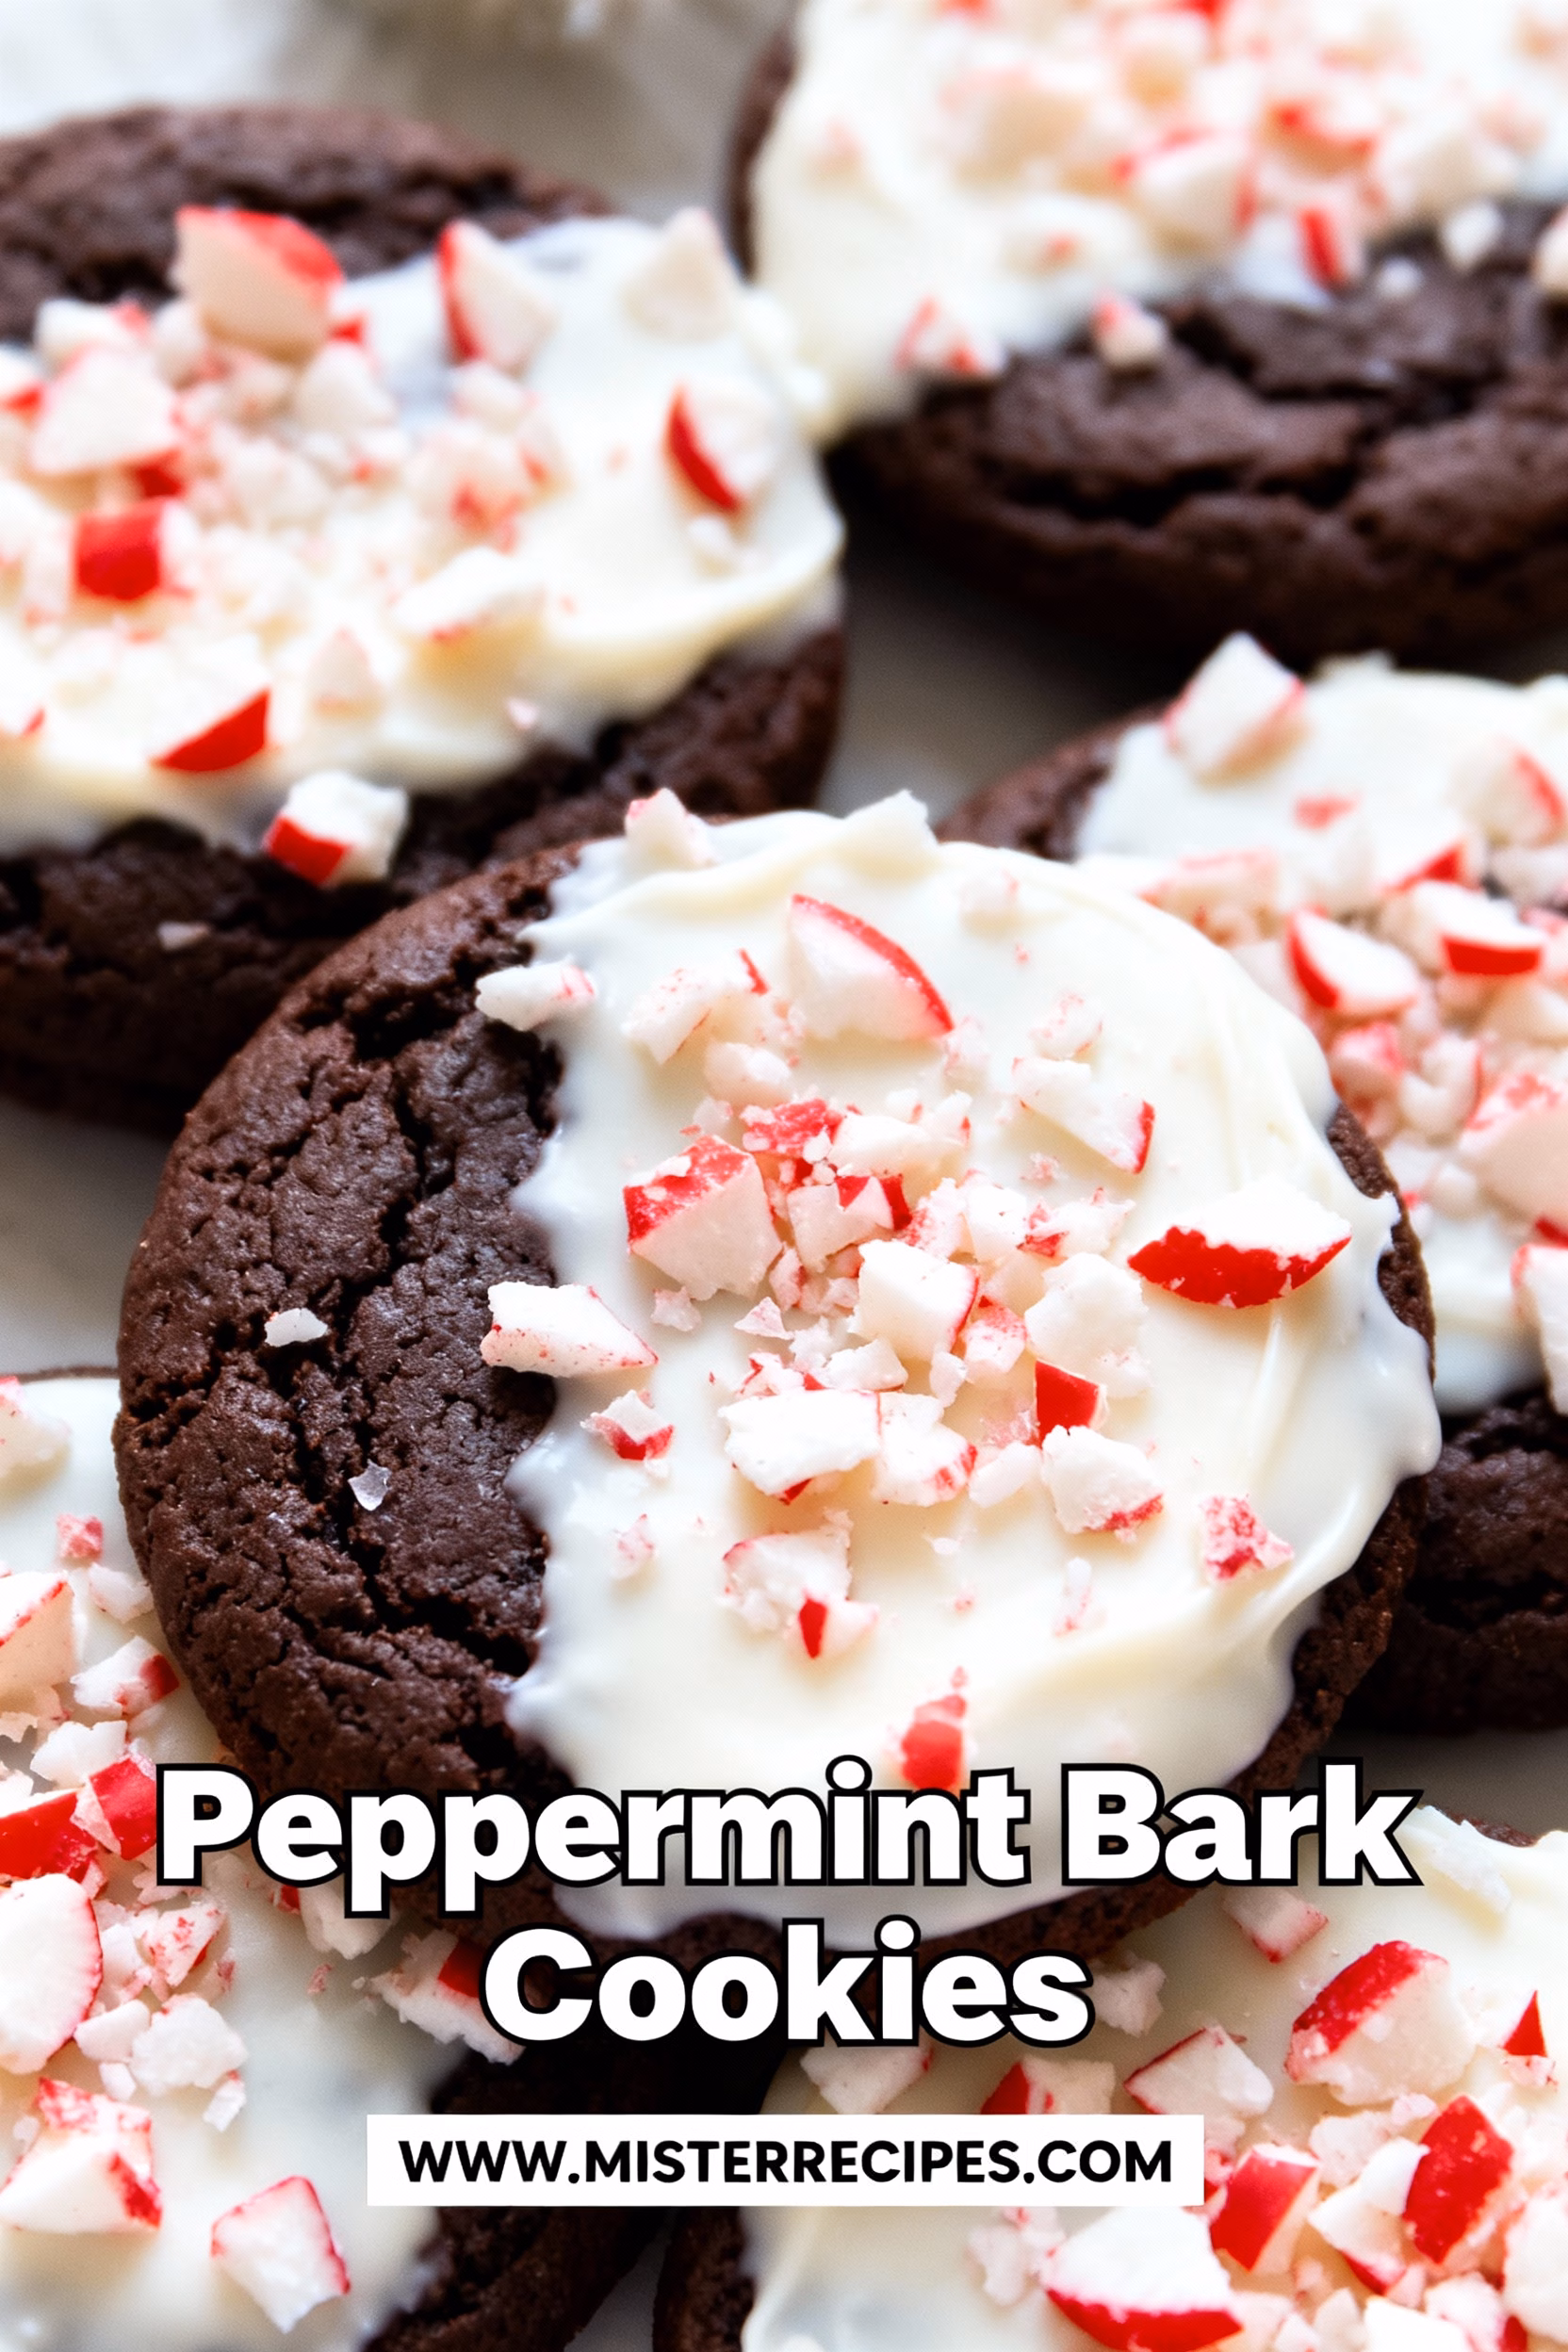
- High-Impact Visuals: The stark contrast between the dark chocolate cookie, the melting white chocolate drizzle, and the bright red speckled crushed peppermint is absolutely stunning. They’re automatically Instagram-worthy and perfect for gifting.
- Optimized for Semantic Search: When people are searching for festive peppermint cookies or candy cane chocolate cookies, they need a recipe that delivers flavor and looks good. This recipe nails both, providing a deep dive the user intent behind baking these specific Christmas peppermint cookies.
- Versatility in Chocolate: We discuss options for using dark chocolate chips or high-quality chocolate wafers for the dipping, ensuring you get that superior crackle upon cooling, crucial for true bark texture.
The Secret to the Chewy Texture
The key to keeping these chewy peppermint cookies from drying out is a combination of brown sugar and granulated sugar, and making sure you don’t overbake them. I love a slightly underbaked center, which is something I learned from watching my Grandmother make her famous Texas BBQ brisket, patience and timing are everything! These cookies should look just set at the edges when you pull them out of the oven. This ensures that the base of your peppermint bark candy cookies remains soft for days, even after they’ve been dipped in the cooling chocolate.
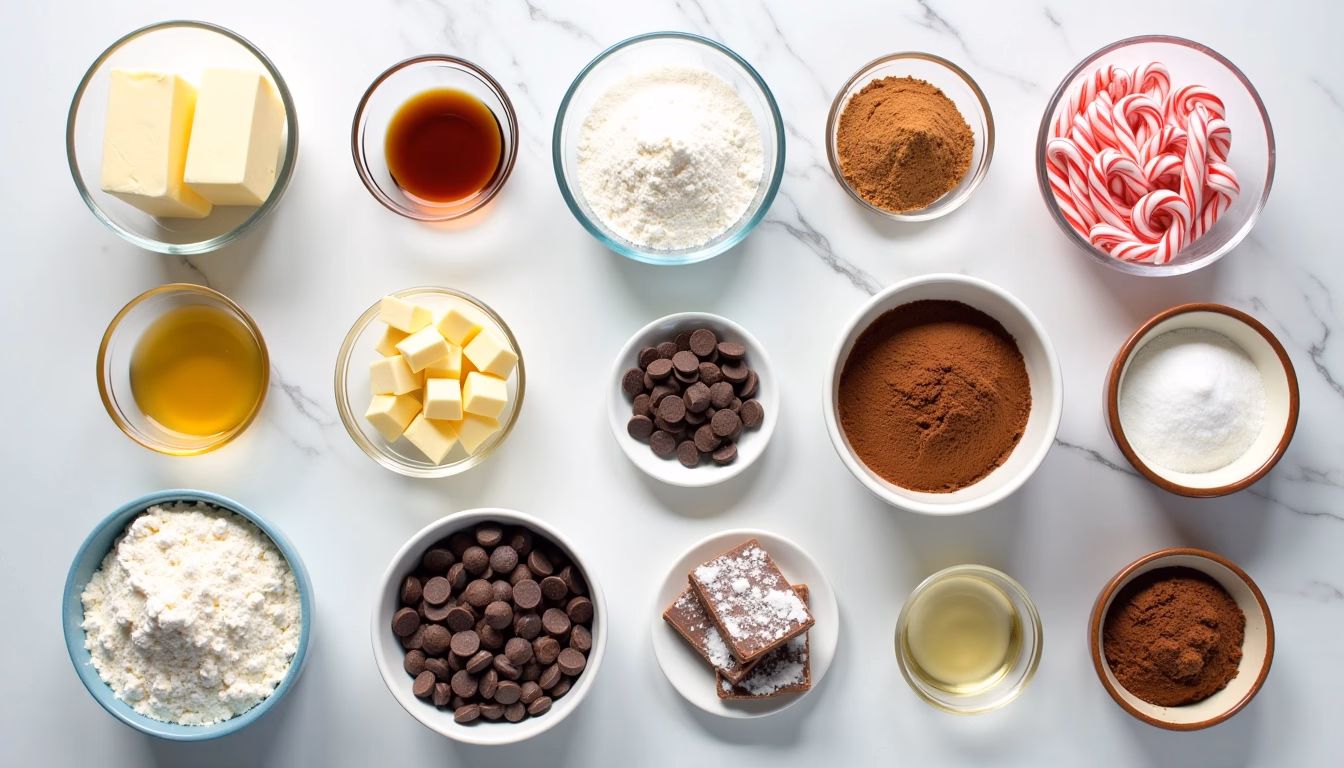
Ingredients for Peppermint Bark Cookies
You probably have most of these ingredients right in your pantry, which is why these are such great easy Christmas recipes to pull out once the holiday season hits. We’re separating the list into two parts: the cookie base, and the essential peppermint coating.
For the Soft Chocolate Cookie Base:
- All-Purpose Flour: The foundation of our cookie structure.
- Unsweetened Cocoa Powder: Use a good quality brand for a rich chocolate cookies flavor. Dutch process is excellent here for deep color.
- Baking Soda & Sea Salt: Essential leavening and flavor enhancement.
- Unsalted Butter, softened: Needs to be room temperature for proper creaming.
- Granulated Sugar & Brown Sugar: The mix provides structure and that sought-after chewy texture.
- Eggs: Large eggs, binding our delightful dough together.
- Vanilla Extract: Just a touch for aroma.
- Peppermint Extract: The secret ingredient! A little goes a long way to boost the characteristic peppermint flavored intensity without needing extra crushed candy.
For the Peppermint Bark Topping:
- White Chocolate: High-quality white chocolate chips or baking bars work best for superior melt and taste.
- Dark or Semi-Sweet Chocolate Chips: Optional, but adds a lovely layered look and stronger chocolate peppermint complexity, mimicking true peppermint bark candy.
- Crushed Candy Canes (Peppermint Candies): The star of the show. Adams and Jana love smashing these. Make sure they are finely crushed but still have some texture.
- Coconut Oil or Shortening: A small addition to the melting chocolate helps it spread smoothly and set quickly with a beautiful snap.
If you’re looking for an alternative, you can absolutely make these a peppermint bark chocolate chip cookies by adding mini chocolate chips into the dough itself. That adds even more chocolate goodness!
How to Make Peppermint Bark Cookies
Step-by-Step Instructions: The Best Peppermint Bark Cookie Recipe
Making homemade peppermint bark cookies is all about precision in baking and patience in decorating. Don’t rush the cooling process, that’s key to ensuring the white chocolate sets perfectly.
- Prep Your Station: Preheat your oven to 350°F (175°C). Line two large baking sheets with parchment paper. This is essential for these sticky, rich cookies. Gather your related ingredients: flour, cocoa, sugars, butter, the glorious peppermint extract, and your crushed holiday sparkle.
- Mix the Dry Ingredients: In a medium bowl, whisk together the flour, cocoa powder, baking soda, and salt. Set this aside.
- Cream the Fats and Sugars: In a large mixing bowl, beat the softened butter, granulated sugar, and brown sugar until light and fluffy. This step incorporates air, which helps keep the cookies soft and chewy.
- Incorporate Wet Ingredients: Beat in the eggs one at a time, ensuring each is fully mixed before adding the next. Stir in the vanilla extract and, importantly, the peppermint extract. Do a little taste test of the batter (I know, I shouldn’t, but I do!), the peppermint should be noticeable but not mouth-numbing.
- Combine Dough: Gradually add the dry ingredients to the wet mixture, mixing only until just combined. Overmixing the dough can result in tough cookies. The dough will be dark, rich, and slightly sticky.
- Scoop and Bake: Use a cookie scoop (about 1.5 tablespoons) to drop the dough onto the prepared baking sheets, leaving about two inches between them. Bake for 9 to 11 minutes. They will look slightly puffy and may seem underdone in the center, which is exactly what we want for those soft chewy peppermint bark cookies.
- Cool Completely: Remove the cookies from the oven and let them cool on the baking sheet for 5 minutes before transferring them to a wire rack to cool completely. This is the time Adams usually sneaks one or two! They absolutely must be cool before you attempt the dipping.
- Prepare the Bark Topping: In a microwave-safe bowl, melt the white chocolate (and optionally, the dark chocolate) along with the coconut oil in short 30-second intervals, stirring well between each, until smooth and glossy. If you prefer to replicate the traditional layered peppermint bark candy, melt the dark chocolate first, dip the cookies halfway, let it set, then dip the remaining half in the white chocolate. I prefer just the white chocolate for simple, stunning contrast.
- Dip and Decorate: Dip the cooled cookies halfway into the melted white chocolate. Before the chocolate sets, immediately sprinkle the crushed candy cane pieces generously over the wet chocolate.
- Set the Bark: Place the decorated peppermint bark cookies dipped in chocolate back on the parchment paper and allow them to set completely, either at room temperature (about 1 hour) or in the refrigerator (about 15 minutes). Once set, these easy peppermint bark cookies are ready to share!
Pro Tips & Variations for the Best Peppermint Bark Cookies
I find that the best recipes are those you can customize to fit your own family’s tastes or dietary needs. These holiday peppermint cookies are highly adaptable.
Mastering the Peppermint Flavor:
Be judicious with the peppermint extract. It is potent! Start with 1/2 teaspoon and taste the batter (if you dare!). Remember, the crushed candy on top will add a significant punch of mint, so you don’t want the cookie itself to be overpowering. Too much extract can lead to that medicinal taste. We want bright, fresh peppermint, not a dental cleaning!
Achieving the Ideal Crushed Peppermint Candies:
Do not use a blender to crush the peppermint candy canes, as it can turn them into sticky dust. My preferred method, which Adams and Jana absolutely love, is putting the candies in a Ziploc bag (make sure to double bag it) and beating them gently with a rolling pin or the back of a small pan. You want a mix of fine dust and small, visible chunks for texture and visual appeal.
Gluten-Free & Vegan Options:
If you need gluten free peppermint bark cookies, substitute the all-purpose flour with a high-quality 1:1 gluten-free baking blend that contains xanthan gum. The cookie structure holds up surprisingly well. For vegan peppermint bark cookies, use plant-based butter sticks and flax eggs (1 tbsp flaxmeal + 3 tbsp water per egg, rested for 5 minutes). Ensure your chocolate is certified vegan, as some white chocolates contain dairy.
Peppermint Bark Shortbread Cookies Base:
For a different texture, you can use a shortbread base (like those found in easy Christmas spritz butter cookies) instead of the chocolate chew base. This results in peppermint bark shortbread cookies, which offer a buttery, crisp snap that contrasts beautifully with the melted chocolate topping.
Cake Mix Peppermint Bark Cookies:
If you need a shortcut version, you can absolutely use a boxed devil’s food or red velvet cake mix as the base by following the common cake mix cookie technique (mix cake mix, oil, and 2 eggs). This is how you get super easy peppermint bark cookies recipe results when life gets busy. I occasionally use a mix when I’ve got fifty other things going on, though the homemade peppermint bark cookies from scratch are undeniably superior in flavor depth.
Peppermint Bark Cookies Serving Suggestions
These chocolate peppermint cookies are designed to be a centerpiece, but they pair wonderfully with a few holiday classics to create a whole winter wonderland experience in your kitchen.
The Hot Beverage Pairing:
Nothing screams holiday comfort like biting into a cooling, minty cookie while sipping something hot. My favorite pairing is a robust mug of homemade hot chocolate or a rich Peppermint Mocha. The slight bitterness of the hot chocolate compliments the sweet bark perfectly, offering that cozy feeling I remember from watching my grandpa stoke the fire after a cold day.
The Full Cookie Platter (Festive Desserts):
To create the ultimate holiday spread, pair these vibrant red and white treats with other texture and flavor contrasts. I always recommend placing them alongside something nutty and soft, like peanut butter blossoms or a dark, fudgy chocolate crinkle cookies. The variety is what makes a platter exciting.
The Peppermint Bark Ice Cream Sandwich Cookies:
If you’re hosting a party, consider elevating these to a dessert masterpiece. Sandwich a scoop of high-quality vanilla bean ice cream between two of these cookies for a spectacular peppermint bark ice cream sandwich cookies treat. This provides a truly indulgent twist on the classic mint chocolate chip experience.
Peppermint Bark Cookies Storage & Reheating
One of the best things about these peppermint treats is how well they store, meaning you can bake ahead of the holiday rush, freeing up time to spend with family.
Storing Baked Cookies:
Once the chocolate bark topping has fully set, store the cookies in an airtight container at room temperature for up to 5 days. For longer freshness, place wax paper between the layers of cookies to prevent the chocolate from sticking. Do not refrigerate the finished cookies unless your kitchen is extremely warm, as refrigeration can sometimes dull the soft, chewy texture we worked so hard to achieve.
Freezing Unbaked Dough:
If you are planning ahead, the cookie dough freezes beautifully. Scoop the dough balls onto a baking sheet, freeze solid, and then transfer the frozen balls to a freezer-safe bag or container. You can bake them straight from frozen, simply adding 2-4 minutes to the total baking time. This is a game-changer for holiday baking!
Freezing Baked Cookies:
You can also freeze the fully baked and decorated peppermint bark cookies. Wait until the bark is fully set, then flash freeze them on a tray. Once solid, transfer them to a freezer-safe container. They will last for up to 3 months. Thaw them overnight at room temperature before serving. Be warned, the crushed peppermint candy might leech a tiny bit of color onto the white chocolate after several weeks in the freezer, but the taste remains perfect.
FAQ about Peppermint Bark Cookies
How do I keep my crushed peppermints from dissolving?
This is a common issue, especially when making peppermint bark cookies with crushed peppermints directly in the batter. The key here is not to incorporate them into the dough, but to use them strictly as a topping. Because the candy only touches the fully set, cool cookie base and the melted chocolate, it maintains its integrity and crunch. Always apply the crushed candy to the chocolate while it is still wet so it adheres properly.
What is the difference between Peppermint Bark Cookies vs. Bark?
Traditional peppermint bark recipe is purely layers of melted chocolate and crushed candy cane, usually poured thin on parchment paper and broken into shards. Peppermint bark cookies, on the other hand, use a soft, baked base (often chocolate or chocolate sugar cookies) and simply use the bark as a festive, textural topping. It is far less fragile than traditional bark. Ours are essentially peppermint bark cookies dipped in chocolate, offering the best of both worlds.
Can I use pre-made chocolate peppermint bark that I bought?
Absolutely! If you have high-quality, pre-made chocolate peppermint bark (chopped), you can certainly chop it finely and fold it into the cookie dough before baking to create a peppermint bark chocolate chip cookies recipe variation. You could also use it instead of melting your own chocolate for the dipping. Just melt the chopped bark gently and follow the dipping instructions.
Do I need to chill the dough for these Peppermint Bark Cookies?
No, one of the wonderful things about this specific chocolate cookie base is that it doesn’t generally require chilling, unlike many sugar cookie or shortbread recipes. This is a true quick cookie recipe. If your kitchen is extremely warm, 15 minutes in the fridge can help prevent excessive spreading, but typically, go straight from mixer to oven!
Final Thoughts on Making Memories (and Cookies!)
Every year, when the smell of chocolate peppermint fills our kitchen, I look over and see Adams trying to swipe a few crushed candy pieces and Jana carefully arranging the finished cookies on the cooling rack, and I feel that deep sense of contentment. Cooking isn’t just about the finished product, it’s about the noise, the shared effort, and the stories we make along the way. These Christmas cookies are a symbol of that joy.
From the first crisp snap of the white chocolate coating to the soft, chewy center, these festive desserts are a guaranteed crowd-pleaser and a beautiful way to connect with your family over holiday baking. They’re a wonderful addition to any seasonal celebration.
If you loved this recipe, please save it to your favorite holiday board! Leave me a comment below and let me know how these peppermint bark cookies for Christmas turned out for your family. Happy baking from my family to yours!
The Ultimate Chewy Peppermint Bark Cookies
Ingredients
Equipment
Method
- Preheat oven to 350°F (175°C). Line two large baking sheets with parchment paper.
- In a medium bowl, whisk together flour, cocoa powder, baking soda, and salt.
- In a large bowl, beat softened butter, granulated sugar, and brown sugar until light and fluffy.
- Beat in eggs one at a time, then stir in vanilla and peppermint extract.
- Gradually add dry ingredients to wet mixture, mixing just until combined. Dough will be sticky.
- Scoop 1.5-tablespoon portions of dough onto prepared baking sheets, spacing 2 inches apart.
- Bake for 9-11 minutes, until edges are set but centers still appear soft.
- Cool cookies on baking sheets for 5 minutes, then transfer to wire racks to cool completely.
- Melt white chocolate with coconut oil in 30-second intervals, stirring until smooth.
- Dip cooled cookies halfway into melted white chocolate, letting excess drip off.
- Immediately sprinkle crushed candy canes over wet chocolate. Place on parchment to set.
- Allow chocolate to set completely at room temperature (about 1 hour) or refrigerate (15 minutes).


