
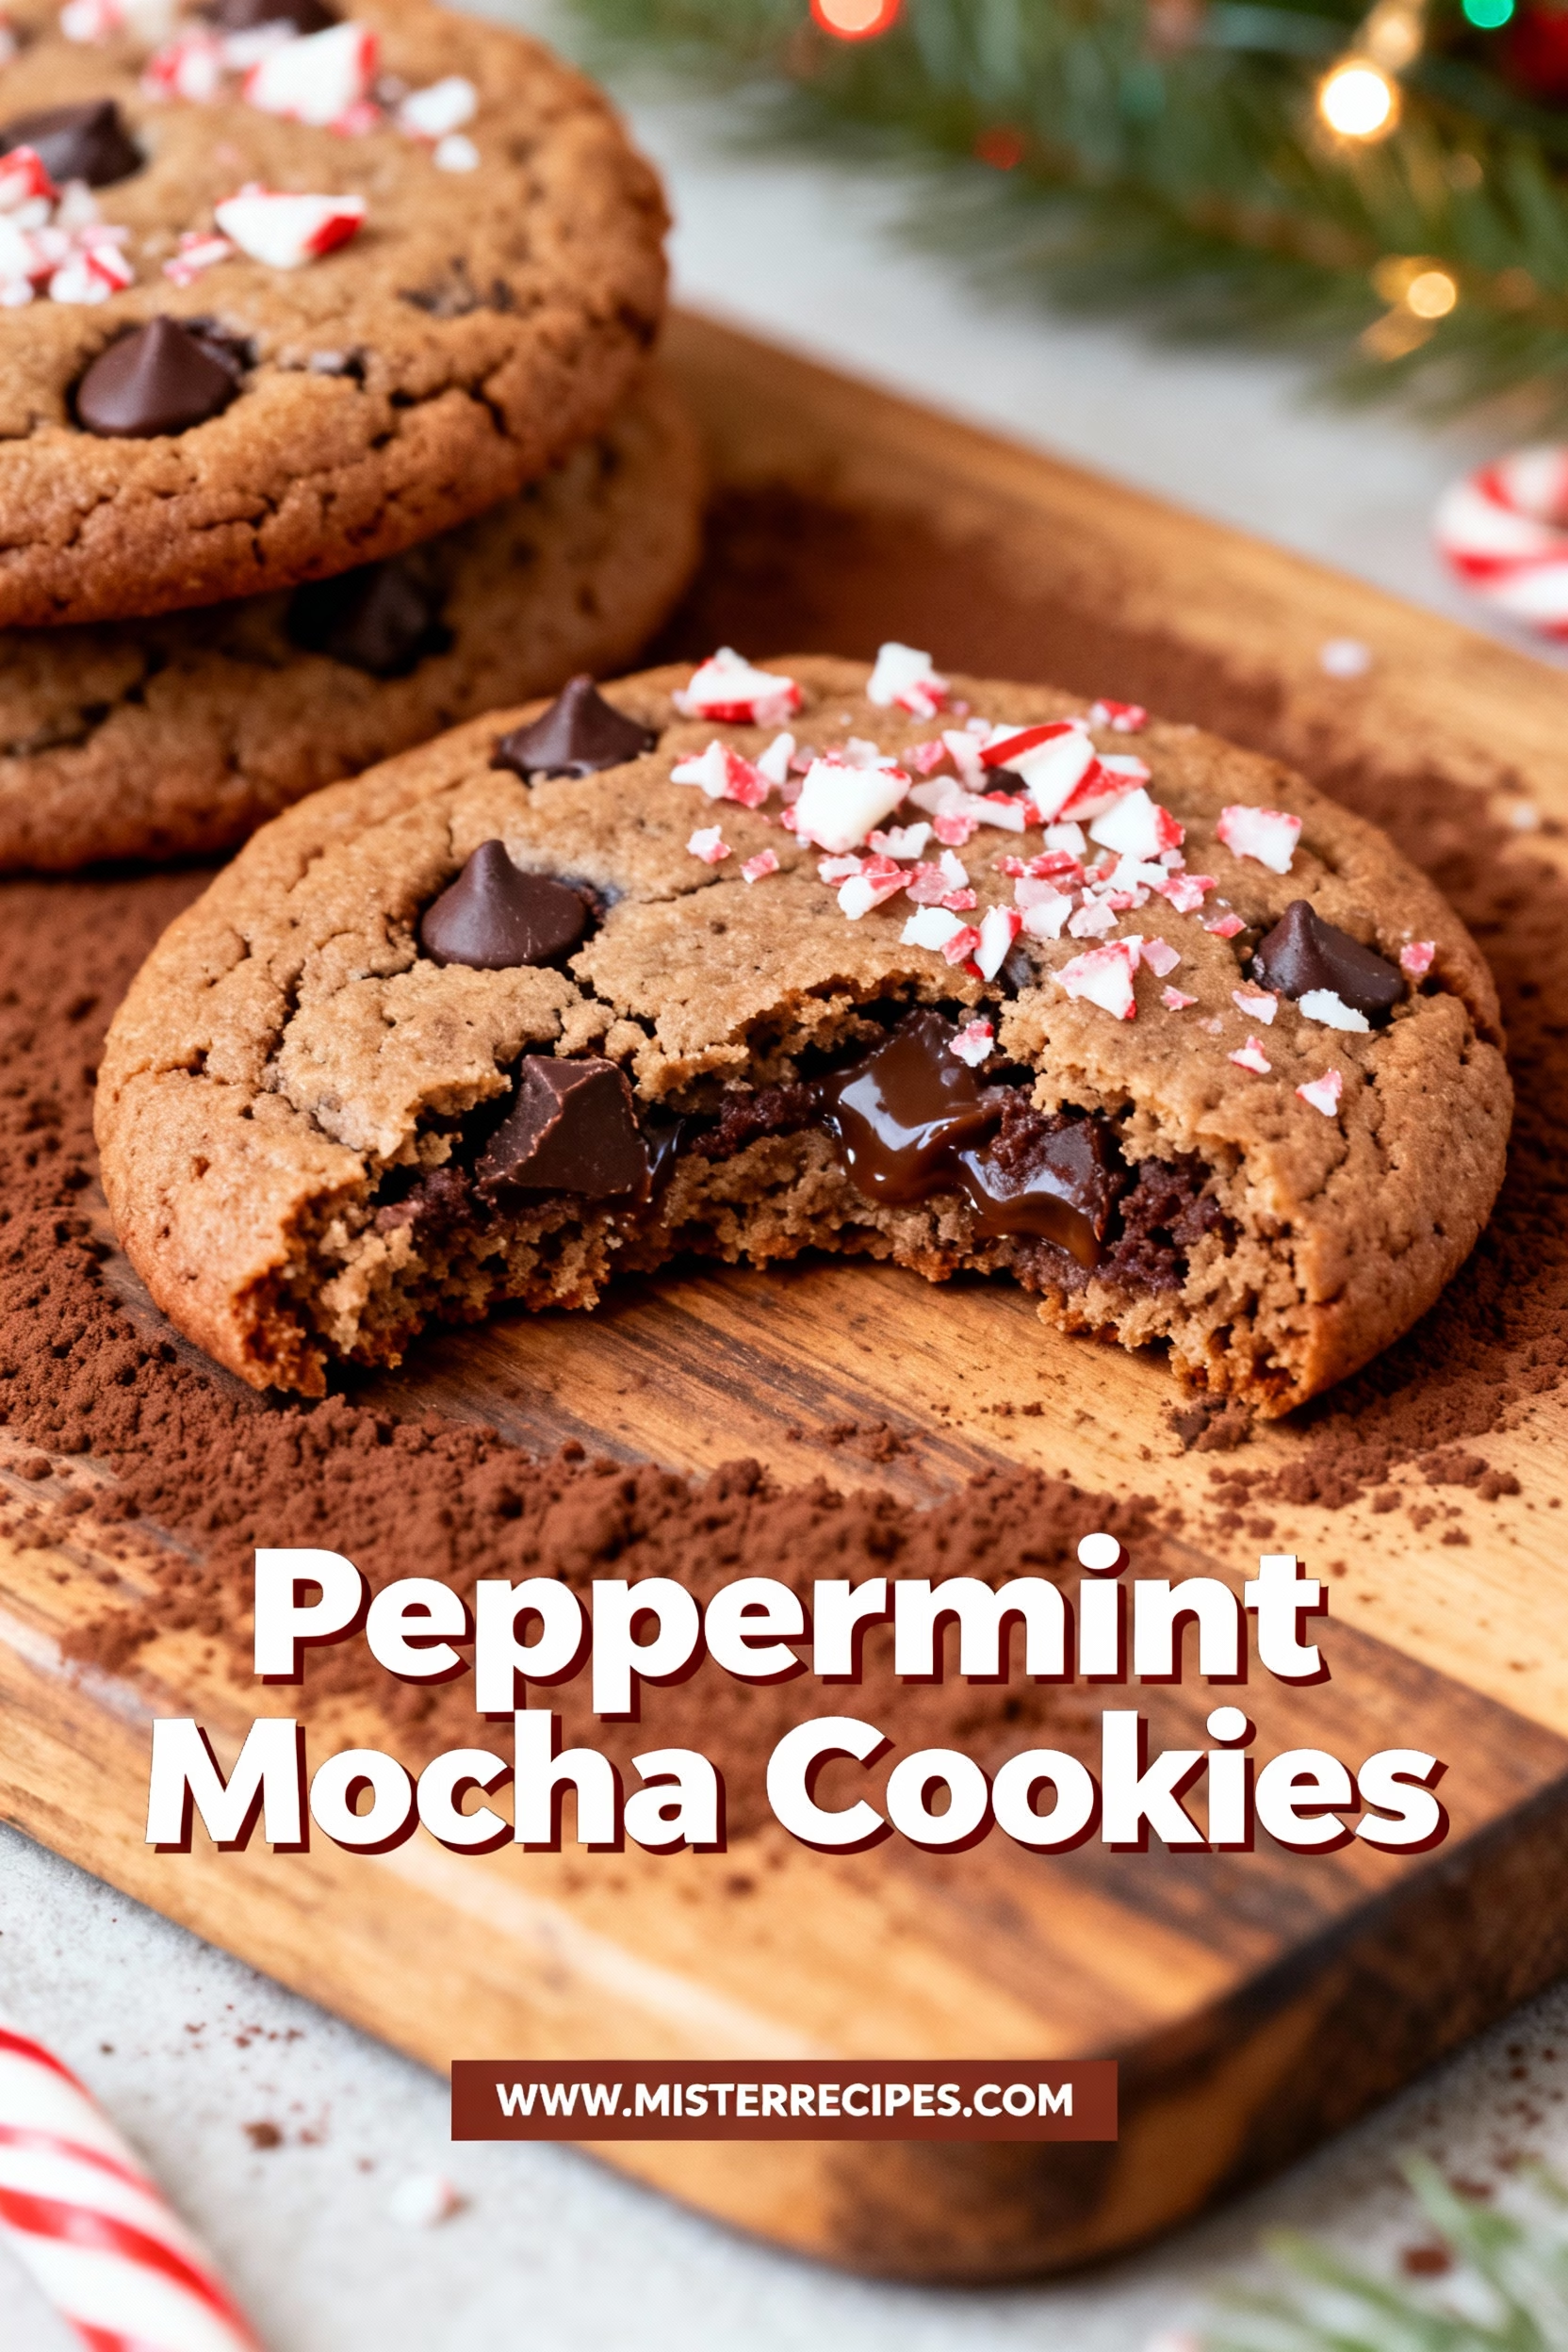
The Best Peppermint Mocha Cookies for Holiday Cheer
There’s a specific feeling in our house when the first truly cold day of the year arrives. The air gets crisp, the heat kicks on with that familiar dusty smell, and my wife, Emily, immediately switches from her regular morning coffee to a peppermint mocha latte. Last year, as she was enjoying her first one of the season, she looked over at me and said, “Ben, you should turn this into a cookie.” And that, my friends, is exactly how this recipe for the absolute best Peppermint Mocha Cookies was born. I knew right away this couldn’t just be any cookie; it had to be the perfect marriage of deep, rich chocolate, bold coffee, and that cool, festive whisper of peppermint. It had to be one of those easy, no-fuss holiday cookie recipes that brings the whole family into the kitchen. I spent a few weeks perfecting it, and now I’m so excited to share how to make these incredible peppermint mocha chocolate cookies with you. They’re soft, chewy, and guaranteed to be the star of your holiday cookie platter.
My kids, Adams and Jana, were my official taste-testers. Their only job, besides giving me a thumbs-up or thumbs-down, was to be in charge of the crushed candy topping. Hearing the tap-tap-tap of them crushing candy canes in a bag is now one of my favorite sounds of the season. It’s moments like these that remind me why I started MisterRecipes.com in the first place. Cooking isn’t just about the food; it’s about the memories we create and the people we make happy. These cookies are pure happiness. Grab your apron, and let’s get baking!
Why You’ll Love This Peppermint Mocha Cookies Recipe
When it comes to holiday baking, I look for recipes that deliver maximum joy with minimal stress. These cookies check every single box. They’ve quickly become a new tradition in our home, right alongside our other favorite mint-chocolate treats like these incredible Andes Mint Chocolate Cookies. Here’s why I know you and your family will fall in love with them too:
- Irresistible Flavor Combination: This isn’t just a chocolate cookie. It’s a symphony of flavors. We use real espresso powder to create a deep, robust mocha base that perfectly complements the rich cocoa. The peppermint isn’t overpowering; it’s a bright, cool finish that makes each bite feel like a celebration. It’s the essence of your favorite coffee shop drink in a warm, chewy cookie.
- Perfectly Soft and Chewy Texture: I am very particular about cookie texture. These are soft peppermint mocha cookies with a delightful chewiness in the center and slightly crisp edges. The secret is the combination of melted butter and just the right amount of brown sugar, which adds moisture and that classic chewy bite we all crave. They have a similar satisfying chewiness to my classic Soft Molasses Cookies.
- A Quick, No-Fuss Recipe: I know how busy the holidays can get. That’s why I designed this as a no chill peppermint mocha cookie recipe. You can go from mixing bowl to cooling rack in under 30 minutes. There’s no need to wait for the dough to firm up, a huge win for impatient little bakers (and big ones, too!).
- Incredibly Festive Appearance: With their dark, crackly tops and sparkling crown of crushed candy canes, these cookies look like they came straight from a gourmet bakery. They are visually stunning on a Christmas cookies platter and make a beautiful, delicious homemade gift for neighbors, teachers, and friends.
- Kid-Friendly and Fun to Make: This is an easy peppermint mocha cookie recipe that’s perfect for getting the kids involved. Adams loves measuring the dry ingredients, and Jana is the master of crushing the candy canes and sprinkling them on top. It’s a wonderful way to spend an afternoon making memories together.
Ingredients for Peppermint Mocha Cookies
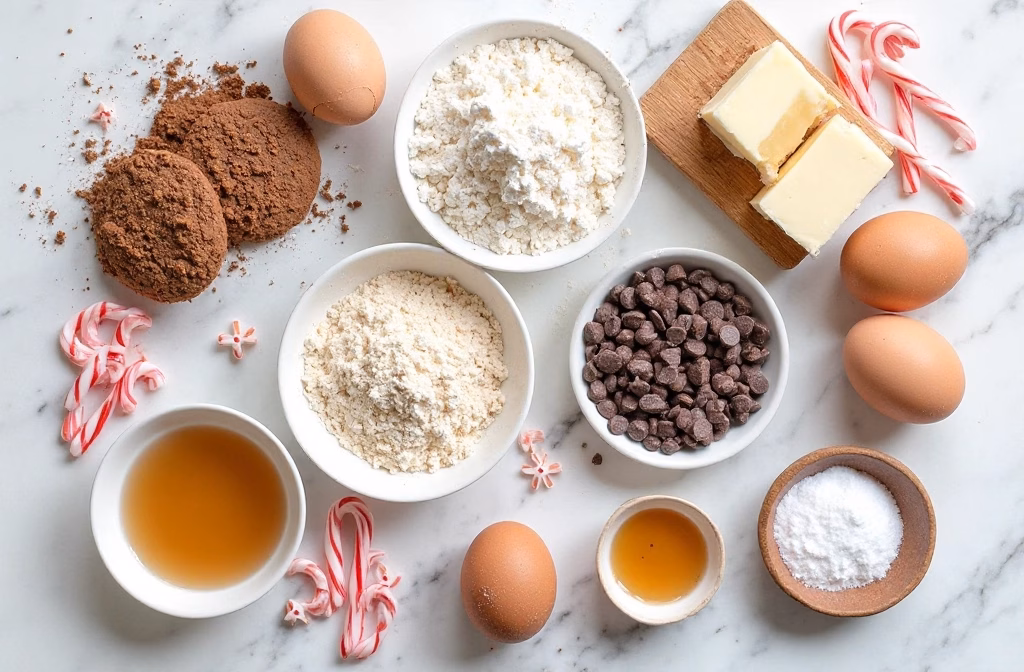
The magic of these cookies comes from simple, high-quality ingredients. No need for anything too fancy! Here’s what you’ll need to have on hand. (Full measurements are in the recipe card below!)
- All-Purpose Flour: The structural backbone of our cookies.
- Unsweetened Cocoa Powder: Use a good quality natural unsweetened cocoa powder for a rich, deep chocolate flavor.
- Instant Espresso Powder: This is a non-negotiable for that true mocha flavor! It dissolves easily and provides a concentrated coffee kick that complements the chocolate beautifully. These are true espresso powder cookies.
- Baking Soda: This gives our cookies the perfect lift and spread.
- Salt: A little salt enhances all the other flavors, especially the chocolate.
- Unsalted Butter: We’ll be melting the butter for this recipe, which helps create that wonderfully chewy texture. If you only have salted butter, you can use it and simply reduce the added salt by half.
- Granulated Sugar & Light Brown Sugar: The combination of both sugars provides sweetness, crisp edges (from the white sugar), and moisture and chewiness (from the brown sugar).
- Large Egg: This binds everything together. Make sure it’s at room temperature!
- Vanilla Extract: A splash of vanilla adds warmth and depth.
- Peppermint Extract: The star of our peppermint extract recipes! A little goes a long way, so be careful not to overdo it. It provides that signature cool, festive flavor.
- Chocolate Chips: I love using semi-sweet chocolate chips, but you can use dark chocolate or even milk chocolate if you prefer. Using peppermint mocha cookies with chocolate chips adds another layer of texture and chocolatey goodness.
- Crushed Peppermint Candies or Candy Canes: For that beautiful, crunchy candy cane topping. This is the festive finishing touch!
How to Make Peppermint Mocha Cookies
Alright, time for the fun part! This is where we turn those simple ingredients into the best peppermint mocha holiday cookies you’ve ever had. I’ll walk you through every step. It’s easier than you think!
Step-by-Step Instructions
- Preheat and Prep: First things first, get your oven preheating to 350°F (175°C). You want it nice and hot when the cookies are ready to go in. Line two large baking sheets with parchment paper. This is my secret weapon for easy cleanup and perfectly baked cookies every time.
- Whisk the Dry Ingredients: In a medium-sized bowl, whisk together your all-purpose flour, unsweetened cocoa powder, baking soda, and salt. Whisking them together now ensures that everything is evenly distributed, so you don’t get a clump of baking soda in one cookie. Set this bowl aside for a moment.
- Melt Butter and Bloom Espresso: In a separate, large microwave-safe bowl, melt your unsalted butter. It should just be melted, not boiling hot. Once it’s melted, whisk in the granulated sugar, light brown sugar, and the instant espresso powder. Whisking the espresso powder into the warm butter mixture helps it “bloom,” which means it dissolves completely and releases its deep, rich coffee flavor. This is key for getting that authentic mocha taste.
- Add the Wet Ingredients: Let the butter mixture cool for just a minute or two. You don’t want to scramble your egg! Then, whisk in your room-temperature egg, vanilla extract, and peppermint extract. Mix until everything is smooth and fully combined. The kitchen will start to smell absolutely incredible right about now—a mix of vanilla, coffee, and mint.
- Combine Wet and Dry: Pour the dry flour mixture into the large bowl with the wet ingredients. Using a rubber spatula or wooden spoon, gently fold everything together. Mix only until the last streaks of flour disappear. It’s so important not to overmix here! Overmixing develops the gluten in the flour too much, which can lead to tough, dense cookies instead of soft, chewy ones.
- Fold in the Chocolate Chips: Now, gently fold in your chocolate chips. I like to save a small handful to press onto the tops of the cookie dough balls before baking, but that’s just a little pro trick.
- Scoop and Shape: Using a medium cookie scoop (about 1.5 tablespoons), drop rounded balls of dough onto your prepared baking sheets. Leave about 2 inches of space between each cookie, as they will spread a bit.
- Add the Peppermint Topping: Here’s where the kids can jump in! Sprinkle the tops of each dough ball generously with your crushed peppermint candies. Gently press them into the dough just a little bit so they stick during baking. This is what creates those beautiful, sparkly candy cane cookies.
- Bake to Perfection: Bake for 9 to 11 minutes. The edges of the cookies should be set, but the centers will still look a little soft and underdone. That’s the secret to a chewy cookie! They will continue to bake on the hot pan after you pull them out of the oven.
- Cool and Enjoy: Let the cookies cool on the baking sheet for about 5 minutes before transferring them to a wire rack to cool completely. This resting period is crucial for them to set up properly. Once they’re cool, they’re ready to be devoured!
Pro Tips & Variations for the Best Cookies
After making a few (or a few dozen) batches of these cookies, I’ve picked up some tricks to make them absolutely perfect every time. When I first started developing this recipe, I found a lot of inspiration from the baking community, including a great version over at Sally’s Baking Addiction. That inspired me to really drill down on achieving the perfect chewy texture and a deep, authentic mocha flavor. Here are my top tips:
- Room Temperature is Your Friend: I know I mentioned it before, but having your egg at room temperature is so important. A cold egg can cause the melted butter to seize and solidify, resulting in a lumpy batter. To quickly bring an egg to room temp, just place it in a bowl of warm (not hot) water for 5-10 minutes.
- Don’t Overbake!: The number one mistake people make with cookies is overbaking them. For these peppermint mocha cookies, the goal is a soft, fudgy center. They will look slightly underdone when you pull them from the oven, and that’s exactly what you want! They will set up perfectly as they cool on the hot baking sheet. Trust the process!
- For a Fancier Look – White Chocolate Drizzle: To take these cookies over the top for a party, melt some white chocolate and drizzle it over the cooled cookies. The contrast of the white against the dark chocolate cookie is stunning, and the extra sweetness is a delicious addition.
- Variation: Gluten-Free Peppermint Mocha Cookies: Yes, you can absolutely make a gluten free peppermint mocha cookies version! Simply substitute the all-purpose flour with a high-quality 1-to-1 gluten-free baking flour blend that contains xanthan gum. The texture will be slightly different—a bit more delicate—but just as delicious.
- Variation: Marbled Mocha Cookies: For a beautiful visual twist, try making marbled mocha cookies. Prepare the dough without the cocoa powder. Then, divide the dough in half. To one half, add the cocoa powder and espresso powder. To the other half, add just a touch more vanilla. Take a small scoop of each dough, gently press them together, and roll into a ball. You’ll get a gorgeous black-and-white swirl effect with the same great flavor.
Serving Suggestions for Festive Gatherings
These Peppermint Mocha Cookies are a certified holiday showstopper, perfect on their own but even better when shared. My favorite way to enjoy one is the simple, classic way: with a tall, cold glass of milk, right after it’s cooled enough not to burn my tongue. But Emily, ever the coffee lover, insists they’re best served with a steaming hot cup of black coffee to complement the mocha flavor.
When it comes to holiday parties or family get-togethers, these cookies are the star of the dessert table. I love building a massive Christmas dessert platter with a variety of textures and flavors. These dark, sparkly cookies look absolutely stunning placed next to lighter-colored treats. For a truly impressive display, arrange them alongside our beautiful Stained Glass Window Cookies and some classic, powdered sugar-dusted Chocolate Crinkle Cookies. The variety of shapes and colors makes the platter feel abundant and special.
For a cozy night in, I recommend making a “cookie and cocoa” bar for the family. Set out a plate of these cookies, a big thermos of homemade hot chocolate, and bowls of toppings like mini marshmallows, whipped cream, and extra crushed peppermint. It turns a simple dessert into a fun, interactive experience that Adams and Jana absolutely adore. These coffee chocolate cookies are also the perfect treat to leave for Santa on Christmas Eve—if you can manage to save any!
Peppermint Mocha Cookies Storage & Reheating
One of the best things about this recipe is how well the cookies keep. This is perfect for holiday bakers who like to plan ahead!
- Storing at Room Temperature: Once the cookies are completely cool, you can store them in an airtight container at room temperature for up to 5 days. I sometimes place a slice of bread in the container with them; it sounds like an old wives’ tale my grandma taught me, but the cookies absorb moisture from the bread and stay extra soft and chewy.
- Freezing Baked Cookies: These cookies freeze beautifully! Let them cool completely, then place them in a single layer on a baking sheet and freeze until solid (about 1 hour). Once frozen, transfer them to a zip-top freezer bag or airtight container. They will stay fresh in the freezer for up to 3 months. To thaw, just let them sit at room temperature for an hour or so.
- Freezing Cookie Dough: You can also freeze the dough for baking later. Scoop the dough balls onto a parchment-lined baking sheet and freeze until solid. Transfer the frozen dough balls to a freezer bag. When you’re ready to bake, you can bake them straight from frozen! Just add 2-3 extra minutes to the baking time. This is a game-changer for having fresh-baked cookies on demand.
FAQ about Peppermint Mocha Cookies
- Can I use regular coffee instead of instant espresso powder?
- While you can try it, I highly recommend sticking with instant espresso powder for the best results. It’s specifically designed to dissolve easily and provide a very concentrated coffee flavor without adding extra liquid to the dough. Using liquid coffee would alter the cookie’s texture, potentially making them cakey or causing them to spread too much. Espresso powder is the key to that authentic, rich mocha flavor in these espresso cookies.
- My candy cane topping melted into a puddle. How can I prevent that?
- This is a common issue! The trick is twofold. First, don’t chop your candy canes into a fine powder; you want small, distinct chunks. Too fine a powder will melt instantly. Second, and this is the most important part, press the crushed candy pieces onto the dough balls just before they go into the oven. If they sit on the room-temperature dough for too long, they can start to weep and melt from the moisture in the dough. Adding them right at the end ensures they stay intact and sparkly.
- Can I make these cookies ahead of time for a party?
- Absolutely! This is one of the best holiday cookie recipes for making ahead. You have two great options. You can bake the cookies completely and store them in an airtight container for up to 3 days before your event. Or, my preferred method, you can freeze the unbaked dough balls as described in the storage section. Then, on the day of the party, you can bake them fresh. Nothing beats the smell of freshly baked cookies filling the house!
- Why are my cookies flat instead of chewy?
- Flat cookies are usually the result of a few common culprits. The most likely reason is that your butter was too hot when you mixed in the sugar and eggs. The butter should be melted but not sizzling. If it’s too warm, it will melt the sugar and create a greasy dough that spreads too much. Also, be sure to measure your flour correctly. Scooping flour directly from the bag can pack it down, leading to too little flour in the recipe. I recommend the “spoon and level” method: spoon the flour into your measuring cup and then level it off with a straight edge.
Final Thoughts on Our New Favorite Holiday Tradition
There’s something truly magical about the kitchen during the holidays. It becomes the warm, beating heart of the home. For me, the scent of chocolate, coffee, and peppermint from these cookies is now the official smell of the season starting. It’s the smell of anticipation, of family, and of simple, pure joy. Seeing the look on my kids’ faces when they take the first bite of a warm cookie they helped make is a gift in itself.
Cooking for my family has always been my love language, and I hope this recipe helps you share a little bit of that love with yours. Whether you’re making them for a quiet night in, a bustling holiday party, or a special gift for someone you care about, I hope they bring a smile to your face. Happy baking, everyone!
If you make these Peppermint Mocha Cookies, I’d love to hear about it! Please leave a comment and a rating below, and don’t forget to save this recipe to your favorite Pinterest board for later!
Peppermint Mocha Cookies
Ingredients
Equipment
Method
- Preheat the oven to 350°F (175°C). Line two large baking sheets with parchment paper.
- In a medium bowl, whisk together flour, cocoa powder, baking soda, and salt. Set aside.
- In a large microwave-safe bowl, melt the butter. Whisk in granulated sugar, brown sugar, and espresso powder until smooth. Let cool for 1–2 minutes.
- Whisk in the egg, vanilla extract, and peppermint extract until fully combined.
- Gradually fold in the dry ingredients until just combined. Be careful not to overmix.
- Fold in the chocolate chips. Reserve a small handful for topping if desired.
- Using a cookie scoop, drop rounded balls of dough (about 1.5 tablespoons each) onto prepared baking sheets, spacing about 2 inches apart.
- Sprinkle each dough ball generously with crushed peppermint candies, gently pressing them into the dough just before baking.
- Bake for 9–11 minutes, or until edges are set but centers are still slightly soft. Allow to cool on the baking sheet for 5 minutes before transferring to a wire rack.


