
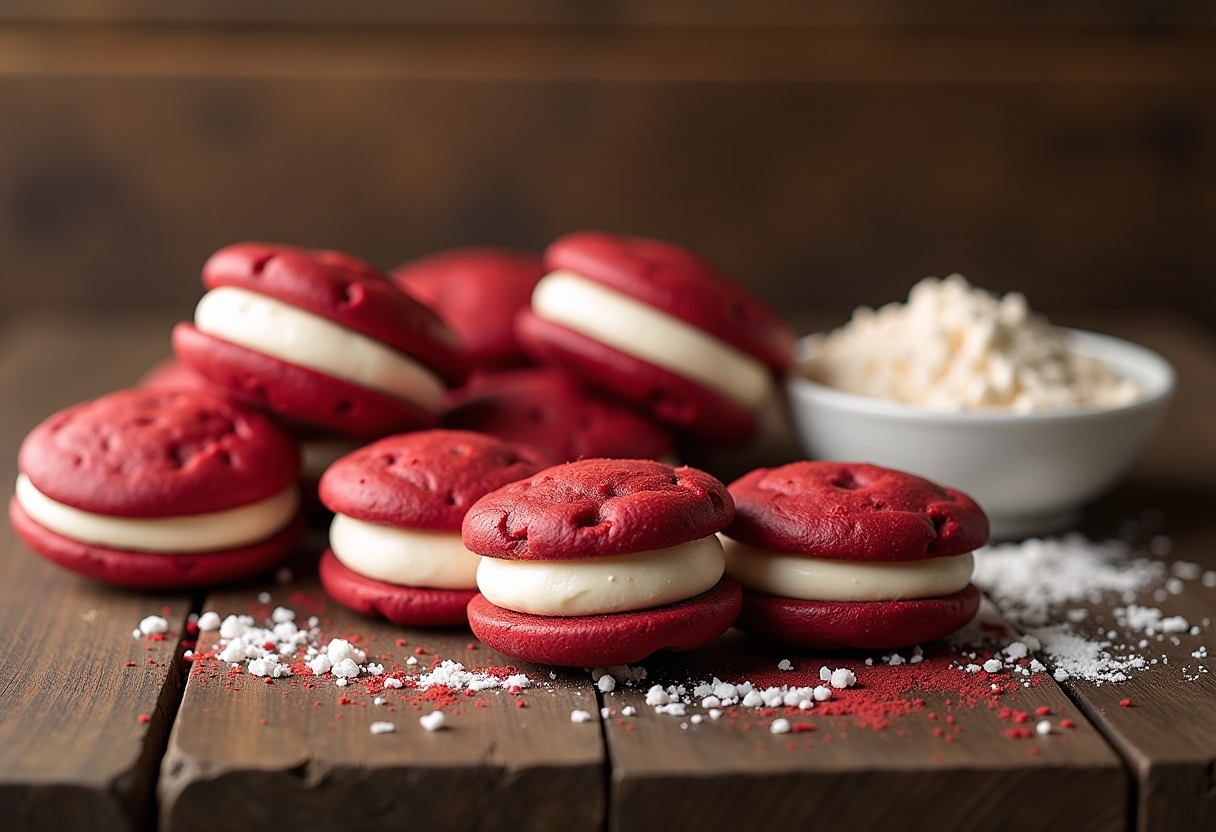
Have you ever wondered what separates a good dessert from a truly unforgettable one? I believe it’s the story and the love baked into it. I still remember the first time I tasted a proper Red Velvet Whoopie Pie. It wasn’t just the incredible flavor, it was the moment, a chilly afternoon spent with family, where the vibrant red dessert felt like a burst of warmth and joy. These aren’t just cookies sandwiched with frosting; they are little pillows of happiness. This Red velvet whoopie pies recipe from scratch is something I’ve poured my heart into perfecting, tweaking until it captured that exact feeling. In our house, baking is a way we connect. Whether it’s a lazy Sunday or a festive holiday, the kitchen becomes the heart of our home. I wanted to create an easy red velvet whoopie pies recipe that any home cook, from beginner to expert, could master and share. The beauty of this dessert lies in its delightful contrast, the soft, cake like cookies with their subtle cocoa flavor against the sweet tang of a classic cream cheese frosting. It’s a texture and taste combination that feels both nostalgic and wonderfully decadent. In a world of complicated recipes and fancy techniques, there’s something deeply satisfying about making a classic dessert that pleases everyone. This recipe is designed to be straightforward, using simple ingredients to create something truly special. It’s perfect for family gatherings, bake sales, or just a quiet afternoon treat. It’s more than just a recipe; it’s an invitation to create your own sweet memories.
Why You’ll Love This Red Velvet Whoopie Pies Recipe
- Perfectly Soft and Cakey Texture: These aren’t dry, crumbly cookies. Each half of the whoopie pie has a moist, tender crumb that melts in your mouth, much like a slice of the best red velvet cake. We achieve this texture through a careful balance of buttermilk and butter, ensuring the cookies stay soft for days.
- Classic Tangy Cream Cheese Frosting: The filling is the soul of a whoopie pie, and this recipe uses a classic, foolproof cream cheese frosting. It’s rich, creamy, and has just the right amount of tang to cut through the sweetness, perfectly complementing the subtle chocolate notes of the cookies.
- Stunning, Vibrant Color: Let’s be honest, the beautiful, deep red color is part of the magic. This recipe gives you that iconic, eye catching red velvet hue that makes these treats look as amazing as they taste. They are a showstopper on any dessert table, especially during the holidays. If you love festive baking, you have to try these Christmas Spritz Butter Cookies too.
- Surprisingly Simple to Make From Scratch: While they look impressive, this is an easy red velvet whoopie pies recipe. I’ve broken down the steps to make them completely manageable, even for baking novices. Making them from scratch is so rewarding and tastes infinitely better than any version made with cake mix.
- A True Crowd Pleaser: I have yet to meet someone who doesn’t fall in love with these at first bite. They are a hit with both kids and adults, making them the perfect dessert for parties, family dinners, or potlucks. Their individual serving size also makes them incredibly easy to share. Much like my popular Peanut Butter Blossoms, they disappear fast!
Ingredients for Red Velvet Whoopie Pies
For the Red Velvet Cookies:
- 2 cups all purpose flour
- 2 tablespoons unsweetened cocoa powder
- 1 teaspoon baking soda
- 1/2 teaspoon salt
- 1/2 cup (1 stick) unsalted butter, at room temperature
- 1 cup granulated sugar
- 2 large eggs, at room temperature
- 1 cup buttermilk, at room temperature
- 2 teaspoons red food coloring (gel preferred for vibrant color)
- 1 teaspoon vanilla extract
- 1 teaspoon white vinegar
For the Cream Cheese Frosting:
- 8 ounces cream cheese, softened
- 1/2 cup (1 stick) unsalted butter, at room temperature
- 3-4 cups powdered sugar, sifted
- 1 teaspoon vanilla extract
Substitution Tip: If you don’t have buttermilk, you can make your own! Simply add 1 tablespoon of lemon juice or white vinegar to 1 cup of regular milk and let it sit for 5 minutes.
How to Make Red Velvet Whoopie Pies
Step by Step Instructions
- Prep Your Station: First things first, get your oven preheating to 375°F (190°C). Then, line two large baking sheets with parchment paper. This is a crucial step to prevent the cookies from sticking and ensures an easy cleanup.
- Combine Dry Ingredients: In a medium bowl, whisk together the flour, cocoa powder, baking soda, and salt. Whisking helps to evenly distribute everything, which is key for a uniform cookie texture. Set this bowl aside for a moment.
- Cream Butter and Sugar: In the bowl of a stand mixer fitted with the paddle attachment, or in a large bowl with a hand mixer, beat the softened unsalted butter and granulated sugar on medium high speed until the mixture is light, fluffy, and pale in color. This process takes about 3 to 4 minutes and incorporates air, which is essential for a light, cakey cookie.
- Add Eggs and Wet Ingredients: Add the eggs one at a time, beating well after each addition until fully incorporated. Scrape down the sides of the bowl as needed. Next, beat in the vanilla extract, red food coloring, and white vinegar. Mix until the batter is a vibrant and uniform red color.
- Alternate Flour and Buttermilk: Now, you’ll add the dry ingredients and the buttermilk. With the mixer on low speed, add about one third of the flour mixture, followed by half of the buttermilk. Continue alternating, ending with the dry ingredients. Mix only until just combined. Overmixing can develop the gluten in the flour and make your whoopie pies tough, so be careful here.
- Scoop the Batter: Using a medium cookie scoop (about 1.5 tablespoons), drop rounds of batter onto your prepared baking sheets, placing them about 2 inches apart to allow for spreading. This will give you perfectly uniform cookies.
- Bake to Perfection: Bake for 10 to 12 minutes. The tops should look set and spring back when you gently touch them. Let the cookie cakes cool on the baking sheets for 5 minutes before transferring them to a wire rack to cool completely. You must let them cool completely before filling, or the frosting will melt everywhere!
- Whip Up the Frosting: While the cookies are cooling, make the delicious cream cheese frosting. In a large bowl, beat the softened cream cheese and unsalted butter together until smooth and creamy. Gradually add the sifted powdered sugar, one cup at a time, mixing on low speed until combined, then on high until fluffy. Finally, beat in the vanilla extract.
- Assemble Your Whoopie Pies: Once the cookies are completely cool, it’s time for the fun part! Turn half of the cookies flat side up. Pipe or spread a generous amount of frosting onto the flat side, then top with another cookie, pressing down gently to create your sandwich. Your Red Velvet Whoopie Pies are now ready to be devoured!
Pro Tips & Variations
Making the perfect whoopie pies is all about the details. Here are a few pro tips I’ve learned over the years. First, always use room temperature ingredients. This isn’t just a suggestion; it’s crucial for a smooth, emulsified batter. Cold eggs or buttermilk can cause the butter to seize up, leading to a lumpy batter and dense cookies. Take your ingredients out of the fridge about 30 to 60 minutes before you start. Second, do not overmix the batter. This is the number one reason for tough, dry baked goods. Once you start alternating the wet and dry ingredients, mix only until the last streak of flour disappears. A few small lumps are perfectly fine. Third, a cookie scoop is your best friend for this recipe. It ensures that all your cookie halves are the same size, which means they will bake evenly and match up perfectly for sandwiching. It makes the whole process faster and gives you a much more professional looking result. For more cookie perfection, see how I get uniform shapes in my Snickerdoodles recipe.
Variations:
- Chocolate Cream Cheese Frosting: For the ultimate chocolate lover, add 1/4 cup of unsweetened cocoa powder to your cream cheese frosting for a rich, chocolatey filling.
- Add a Little Spice: A pinch of cinnamon or a tiny dash of cayenne pepper in the cookie batter can add a beautiful warmth and subtle complexity that pairs wonderfully with the cocoa and vanilla.
- Gluten Free Option: You can substitute the all purpose flour with a good quality 1 to 1 gluten free baking flour blend. Make sure the blend contains xanthan gum for the best structure.
- Go Nuts: For some added texture, consider rolling the edges of the finished whoopie pies in chopped pecans, walnuts, or even mini chocolate chips. For those who love different cookie textures, I highly recommend my Crisp Molasses Cookies.
Serving Suggestions
These Red Velvet Whoopie Pies are a spectacular treat all on their own, but pairing them with the right beverage or serving them in a creative way can elevate the experience even further. My favorite way to serve them is simply with a tall, cold glass of milk. It’s a classic for a reason; the creamy milk cuts through the richness of the whoopie pie perfectly. For a more adult pairing, a hot cup of coffee or a smooth espresso is a fantastic choice. The bitterness of the coffee beautifully contrasts with the sweet and tangy flavors of the dessert. If you’re serving these at a party, consider making a dessert platter. Arrange the whoopie pies alongside other treats like fresh berries (raspberries and strawberries are wonderful with red velvet) and perhaps some chocolate swirled meringue cookies for a different texture. They also look wonderful on a tiered cake stand as the centerpiece of a dessert table. For a fun, interactive dessert, you could even set up a “whoopie pie bar” where guests can fill their own cookies with frosting and add their own toppings like sprinkles or chopped nuts. It’s a great activity for kids and adults alike at a holiday gathering.
Storage & Reheating for Red Velvet Whoopie Pies
Proper storage is key to keeping your Red Velvet Whoopie Pies fresh and delicious. Because of the cream cheese frosting, they must be stored in the refrigerator. Place them in a single layer in an airtight container. Stacking them can cause them to stick together and get squished. They will keep well in the fridge for up to 5 days. In fact, I find that their flavor and texture are even better on the second day, as the cookies soften further and absorb some of the moisture from the filling.
If you want to make them ahead of time or store them for longer, they also freeze beautifully. You can freeze the assembled whoopie pies or freeze the cookie halves and frosting separately. To freeze them assembled, place the finished pies on a baking sheet in a single layer and freeze until solid. Then, wrap each one individually in plastic wrap and place them in a freezer safe bag or container. They can be frozen for up to 3 months. To enjoy, simply thaw them in the refrigerator for a few hours. I do not recommend reheating whoopie pies, as they are meant to be enjoyed chilled or at room temperature. The frosting will melt if heated.
FAQ about Red Velvet Whoopie Pies
Can I use a different frosting?
Absolutely! While cream cheese frosting is the classic pairing, a simple vanilla buttercream or even a marshmallow filling would also be delicious. You can find a great buttercream example on Allrecipes.
Why did my whoopie pies come out flat?
This is a common issue! It can happen if your butter was too soft, if you overmixed the batter, or if your baking soda is expired. Ensure your butter is at room temperature but not melted, mix the batter only until just combined, and always check the expiration date on your leavening agents.
What is the best way to get a vibrant red color?
For that stunning, deep red, I highly recommend using gel food coloring instead of liquid. Gel coloring is much more concentrated, so you need less of it, and it won’t water down your batter. The color will also be much more intense and stable during baking.
Do I have to use buttermilk?
Yes, I strongly recommend it. The acidity in the buttermilk is essential for reacting with the baking soda to create that signature soft, tender, and cakey texture. It also adds a subtle tang that is classic to red velvet. See the ingredient list for an easy DIY substitute if you don’t have any on hand. Another great red velvet whoopie pies resource also stresses the importance of buttermilk.
Final Thoughts on Red Velvet Whoopie Pies
Baking this Red velvet whoopie pies recipe is about more than just making a dessert. It’s about creating moments of joy and connection in the kitchen and around the table. I truly hope you and your family love these little treats as much as mine does. Every time I make them, I’m reminded that the simplest things, made with love, are often the most special.
If you make this recipe, I would be so happy to hear about it! Please leave a comment and a rating below to let me know how they turned out. And if you’re on Pinterest, don’t forget to save this recipe for later. Happy baking!
Red Velvet Whoopie Pies
Ingredients
Equipment
Method
- Preheat your oven to 375°F (190°C). Line two large baking sheets with parchment paper.
- In a medium bowl, whisk together the flour, cocoa powder, baking soda, and salt. Set aside.
- In a stand mixer fitted with the paddle attachment, beat the softened butter and granulated sugar on medium-high speed until light, fluffy, and pale (3–4 minutes).
- Add eggs one at a time, beating well after each addition. Scrape down the sides as needed. Beat in vanilla extract, red food coloring, and white vinegar until batter is vibrant red.
- With the mixer on low speed, add about one-third of the flour mixture, followed by half of the buttermilk. Continue alternating, ending with the dry ingredients. Mix only until just combined.
- Using a medium cookie scoop, drop rounds of batter (about 1.5 tablespoons) onto prepared baking sheets, spacing about 2 inches apart.
- Bake for 10–12 minutes, or until tops look set and spring back when gently touched. Let cool on baking sheets for 5 minutes, then transfer to a wire rack to cool completely.
- While cookies cool, make the cream cheese frosting. Beat softened cream cheese and butter together until smooth and creamy. Gradually add powdered sugar, one cup at a time, mixing on low until combined, then on high until fluffy. Beat in vanilla extract.
- Turn half of the cooled cookies flat side up. Pipe or spread frosting onto the flat side, then top with another cookie to form a sandwich. Press gently.


