
What if most of the smiles at your Halloween party came from desserts you can prep in under thirty minutes, with simple pantry staples, and zero baking stress. Search interest for Halloween desserts surges every October, and bite size sweets consistently outperform full size cakes at parties because guests love grab and go treats. That is the idea behind these Sweet and Spooky Halloween Dessert Recipes. They combine familiar flavors with playful presentation so you can wow a crowd without complicated techniques or specialty equipment.
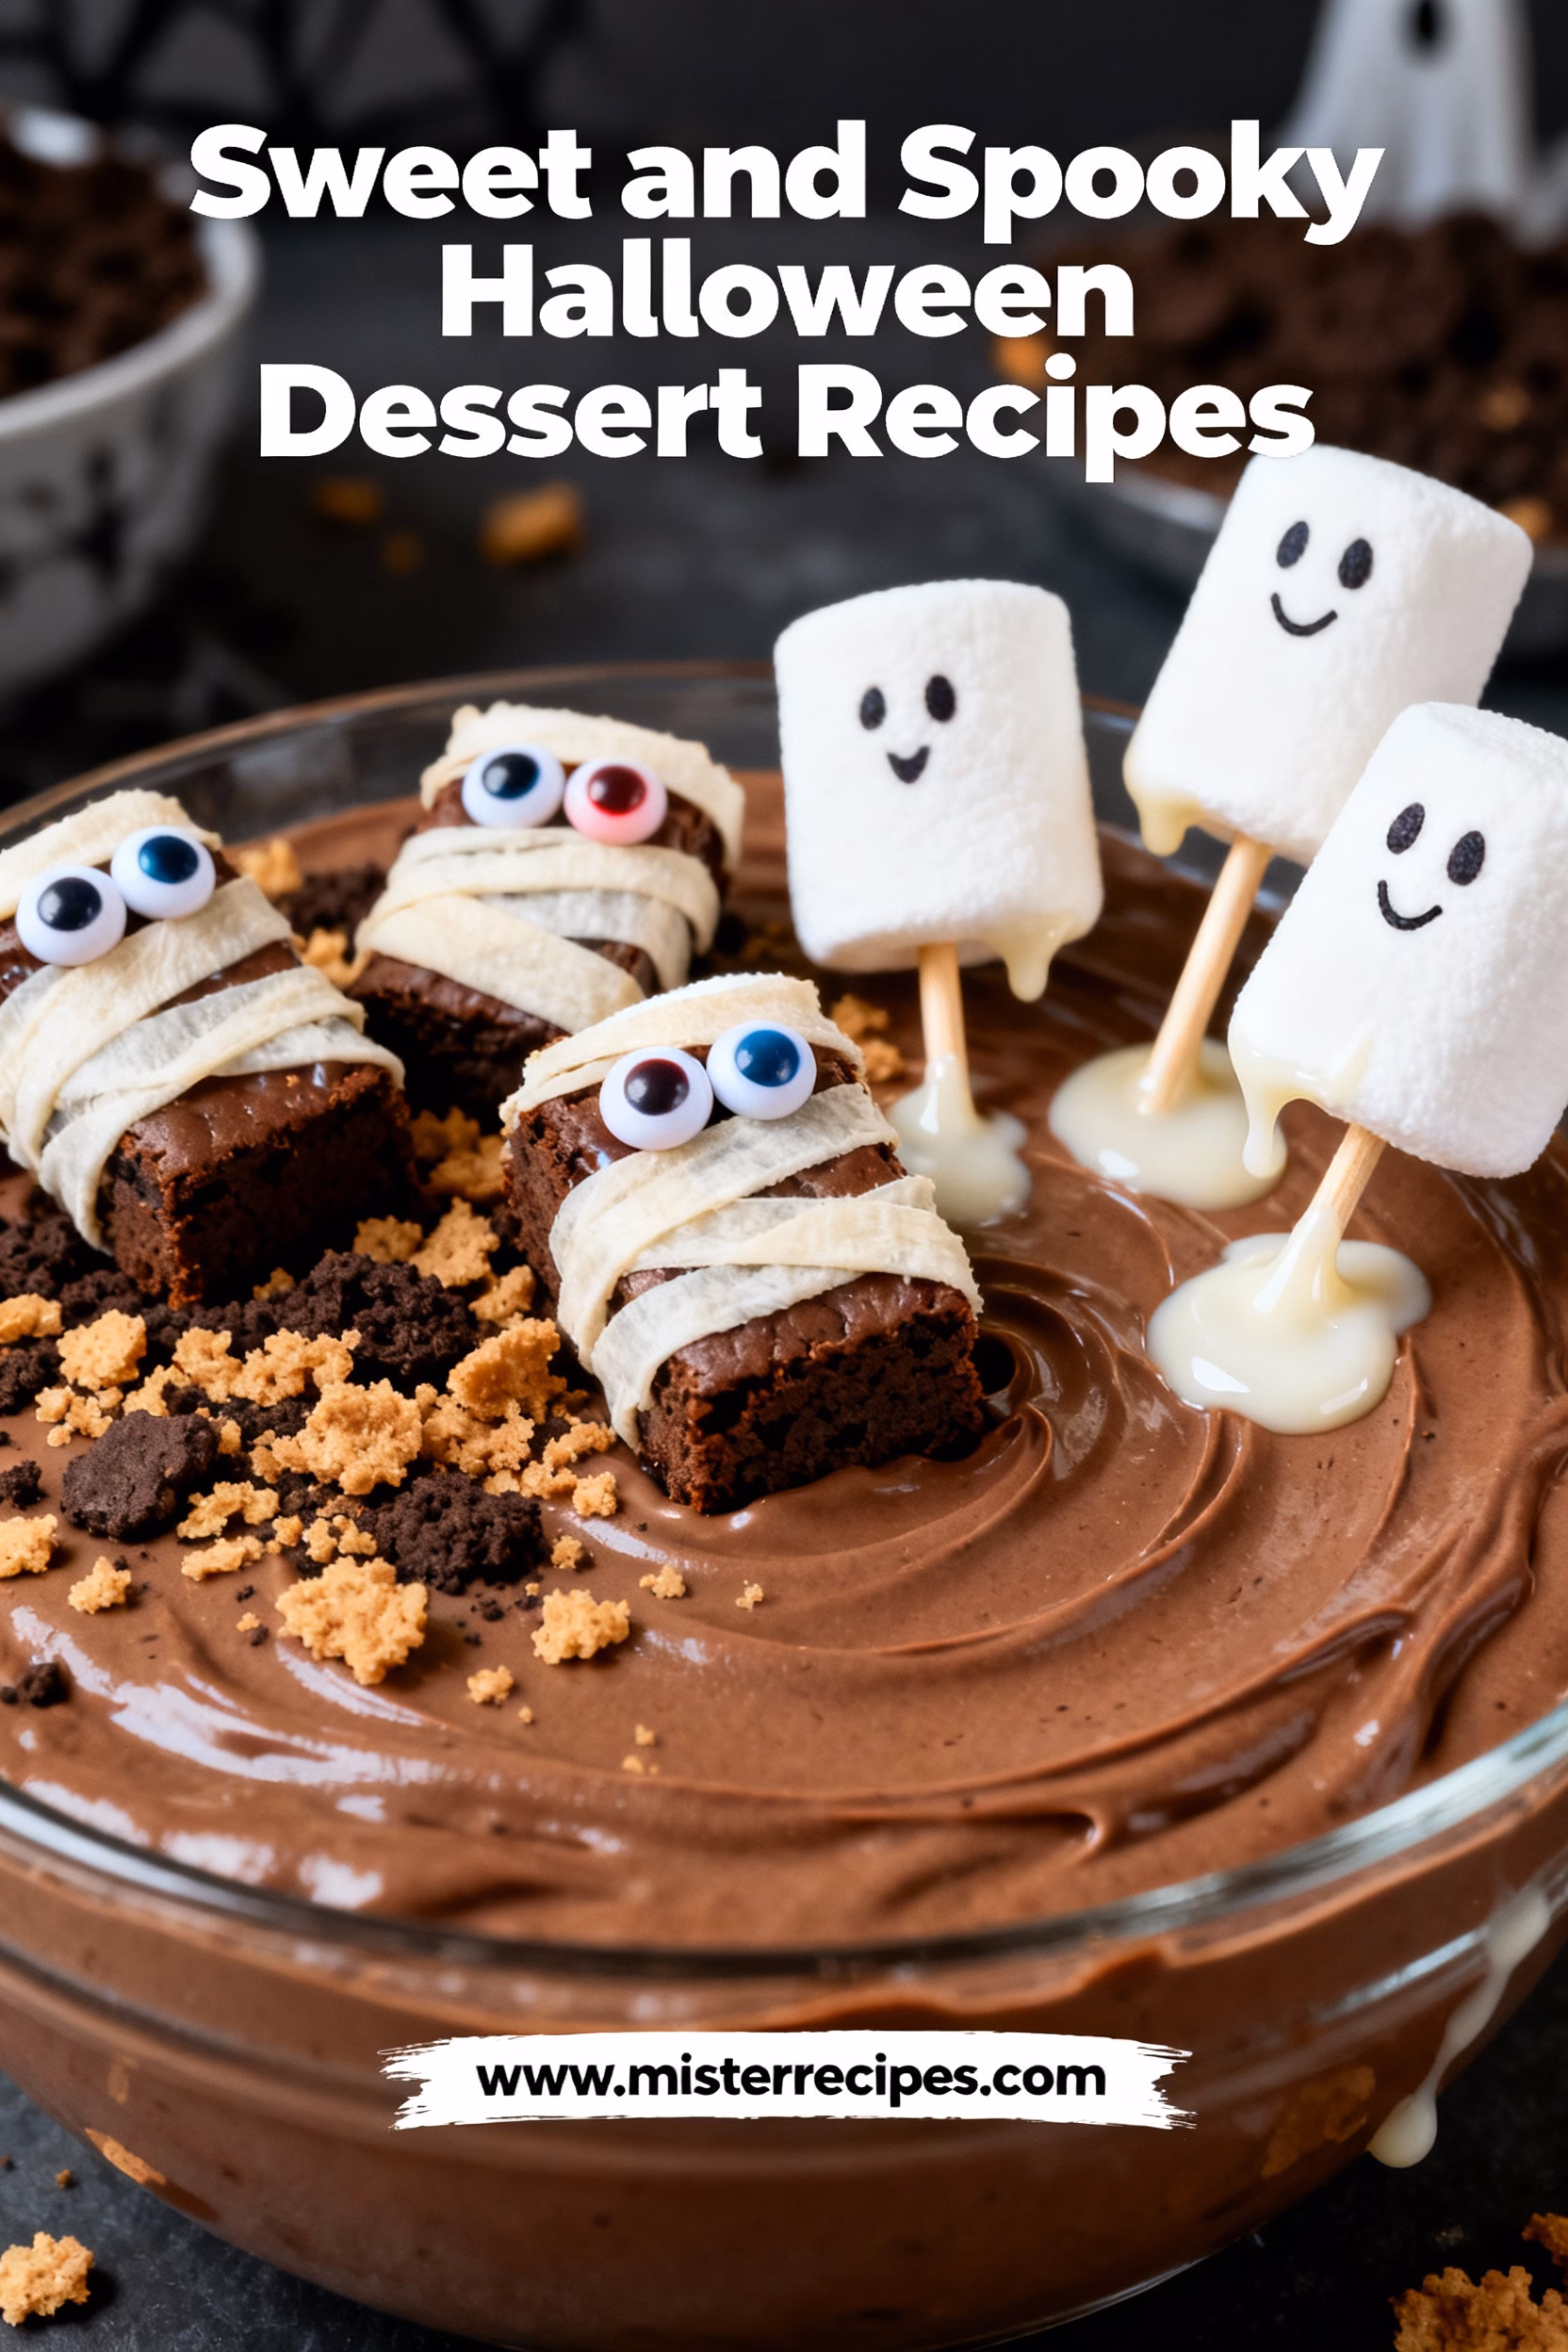
Think creamy chocolate pudding that turns into edible graveyard dirt, brownie bites wrapped like mummies with candy eyes, and marshmallow wands that look like friendly ghosts. The result is a dessert trio that looks impressive on your buffet, tastes indulgent, and still fits into a busy weeknight schedule. If you are juggling school events, office potlucks, and trick or treating, you will appreciate options that use store bought shortcuts in smart ways. You can still customize everything with flavors your family loves.
These recipes are family friendly, budget conscious, and designed to scale. Make a small batch for movie night or double the quantities for a block party. The decorations are forgiving and fun for kids to help with, and the base ingredients are available at any grocery store. As a bonus, each treat holds up well at room temperature for a few hours, which makes them perfect for buffets and bake sales.
Below, you will find exactly what to buy, how to put it all together, and ways to adapt for gluten free or dairy free needs. I will also share pro tips to keep chocolate silky, whipped cream stable, and colors vibrant so your platter stays picture ready until the last sweet bite disappears. Ready to turn simple ingredients into a frighteningly fun spread that guests will remember long after the last pumpkin is carved. Let us begin.
Why You’ll Love This Sweet and Spooky Halloween Dessert Recipes
– Zero stress, maximum wow. Each dessert relies on easy steps, supermarket shortcuts, and no fussy gear. You get stunning results with minimal effort.
– Kid helper approved. There are so many simple tasks for little hands, from sprinkling cookie crumbs to placing candy eyes. Build memories while you build your tray.
– Budget smart. Use everyday ingredients like pudding mix, sandwich cookies, brownies, and marshmallows. Seasonal candies are optional.
– Scales up fast. Hosting a crowd. Double the elements and set them out in stations so guests can decorate their own. Perfect for classroom parties or neighborhood gatherings.
– Make ahead friendly. Most components can be assembled hours in advance and hold beautifully, so you are not scrambling when the doorbell rings.
– Customizable flavors. Swap chocolate for vanilla, add peppermint for a winter twist, or use peanut butter cups on top of brownies. The base method stays the same.
This trio is an instant upgrade to your Halloween dessert table. The Monster Mash Dirt Cups deliver a creamy pudding base with a crunchy cookie crumble that looks like fresh soil, complete with gummy worms and candy bones. Mummy Brownie Bites lean on either bakery brownies or a mix, then get a quick white chocolate drizzle that sets fast and gives that iconic wrapped look. Ghostly Marshmallow Wands are simple skewered marshmallows dipped in white chocolate with tiny eyes and a smile. The combination of textures keeps guests reaching for seconds. Smooth pudding, chewy brownies, and soft marshmallows make sure there is something for everyone.
If you are brainstorming halloween food that looks party worthy without a long prep time, this menu hits the sweet spot. For even more party friendly ideas, browse these linked resources as you plan. You will find plenty of halloween recipes , plus inspiration for decor and fun ways to style your buffet.
Ingredients for Sweet and Spooky Halloween Dessert Recipes
Monster Mash Dirt Cups
– Chocolate instant pudding mix, 2 boxes, any brand
– Cold milk, 4 cups, or use dairy free milk like almond milk, but adjust thickness with less liquid
– Chocolate sandwich cookies, 24 to 30, crushed
– Whipped topping, 2 cups, or freshly whipped cream
– Gummy worms, candy bones, and candy eyes for decoration
– Optional flavor boost, 1 teaspoon instant espresso powder to deepen chocolate flavor
Mummy Brownie Bites
- Brownie bites, 24, store bought or cut from a baked pan
- White chocolate chips or melting wafers, 1 and a half cups
- Coconut oil or neutral oil, 1 teaspoon, to thin chocolate if needed
- Candy eyes, 48
- Optional add on, crushed peppermint, chopped nuts, or sprinkles
Ghostly Marshmallow Wands
- Large marshmallows, 24
- White chocolate chips or melting wafers, 1 and a half cups
- Lollipop sticks or pretzel rods, 24
- Black edible marker or tiny dots of melted chocolate for faces
- Optional, shredded coconut for a fuzzy ghost effect
Substitutions
- Gluten free. Choose gluten free sandwich cookies and gluten free brownie mix.
- Dairy free. Use dairy free chocolate alternatives, coconut whipped topping, and plant based milk. Use melting wafers labeled dairy free.
- Lower sugar. Pick sugar free pudding mix and reduced sugar sandwich cookies. Sweetness will be lower, so add a bit of vanilla to boost flavor.
How to Make Sweet and Spooky Halloween Dessert Recipes
Step-by-Step Instructions
-
Set up your station
Clear counter space and set out bowls for each dessert. Line a sheet pan with parchment to hold dipped marshmallows and decorated brownies. This keeps cleanup painless and speeds up assembly. -
Make the pudding base for Dirt Cups
In a large mixing bowl, whisk the instant pudding mix with cold milk for two minutes until thick. If using a dairy free milk, start with three cups and add more a splash at a time until you reach a spoonable consistency. Fold in one cup of whipped topping for extra creaminess. Refrigerate while you crush cookies. -
Crush the cookies
Place chocolate sandwich cookies in a large zip top bag. Seal and roll with a rolling pin until you have a mix of fine crumbs and small pebbles. You want a soil like texture so it looks like fresh dirt. Reserve one cup of crumbs for topping. -
Assemble Dirt Cups
Spoon pudding into clear cups, filling about two thirds full. Add a thick layer of cookie crumbs on top. Press in gummy worms so they peek out. Add candy eyes or bones for fun. Chill for at least fifteen minutes to set. If you like a lighter texture, add a dollop of whipped topping just before serving. -
Prep Mummy Brownie Bites
If using a pan of brownies, cut into one inch squares. Place brownie bites on the lined sheet pan. Chill for ten minutes to firm up. This helps the drizzle set quickly. -
Melt white chocolate for mummies
Place white chocolate chips in a microwave safe bowl. Heat in short bursts of twenty seconds, stirring between each burst, until smooth. If the chocolate seems thick, stir in a teaspoon of oil to loosen. Do not overheat, as white chocolate scorches easily. -
Create the mummy wrap
Transfer melted white chocolate to a zip top bag or piping bag. Snip a tiny corner. Drizzle back and forth over each brownie bite to form crisscrossing lines. While the drizzle is still wet, add two candy eyes to each brownie. Let set at room temperature for fifteen minutes or in the fridge for eight minutes. -
Prepare Ghostly Marshmallow Wands
Insert a lollipop stick or pretzel rod into each marshmallow. If the marshmallow is too sticky, chill them for five minutes first. This step turns them into easy to handle pops. -
Dip the ghosts
Melt white chocolate as in step six. Dip each marshmallow to coat, letting excess drip off. Set each pop upright in a foam block or lay it on the parchment lined pan. For a fuzzy look, sprinkle with shredded coconut before the chocolate sets. -
Add the ghost faces
When the coating is set but still slightly soft, dot on eyes and a small smile using an edible marker. If using melted chocolate, dip a toothpick and carefully draw the features. Let set completely until dry to the touch. -
Clean edges and arrange
Use a small paring knife to tidy any chocolate drips once set. Arrange Dirt Cups, Mummy Brownie Bites, and Ghostly Marshmallow Wands on a tray. Vary heights and add a few extra candy eyeballs or sprinkles on the platter to fill gaps. -
Time your make ahead
Dirt Cups can be fully assembled eight hours ahead. Mummy Brownie Bites keep their texture for a full day. Marshmallow Wands are best within twelve hours for the softest bite. Bring chilled items to room temperature for ten minutes before serving for best flavor. -
Invite a decorating station
Set out extra candy eyes, gummy worms, and colored melts. Guests love to add their own twist. This works especially well for easy halloween food at classroom tables or after school club events. -
Keep portions small
Use mini cups and bite size brownies. Smaller servings encourage guests to sample each dessert without waste. It also turns your table into a tasting experience. -
Final check before guests arrive
Wipe the rims of cups, straighten candy eyes, and add a final sprinkle of cookie crumbs. Small details make your spread look professional in photos.
Pro Tips & Variations
– Keep white chocolate smooth. Always melt low and slow. Stir often. If it seizes, whisk in a teaspoon of warm milk or oil until it relaxes. Work in small batches so you always have fluid chocolate.
– Upgrade texture. Mix chopped chocolate or mini chips into the pudding for pops of chocolate. Toss a few crushed cookies into the brownie batter if you bake from a mix.
– Stabilize whipped topping. If using fresh whipped cream, add one tablespoon of instant pudding powder to two cups of cream while whipping. This keeps swirls perky for hours.
– Color like a pro. Gel food colors offer vibrant shades without watering down chocolate. Stir in a tiny amount to melted white chocolate to make green Frankenstein brownie drizzles or orange pumpkin stripes.
– Style your platter. Use contrasting colors. White ghosts next to dark dirt cups. Stack brownies on a cake stand and tuck in plastic spiders or tiny pumpkins between pieces.
Variations
- Vegan. Choose plant based pudding mix, plant milk, and dairy free whipped topping. Use dark chocolate labeled vegan or dairy free white style melts. Swap brownie bites for a vegan brownie mix baked in mini muffin pans. Ensure your sandwich cookies are vegan, many brands are.
- Gluten free. Use certified gluten free sandwich cookies and brownie mix. Double check that candy decorations are gluten free.
- Nut free. Most base ingredients are nut free, but always confirm labels if serving to a crowd with allergies. Skip pretzel rods if cross contact is a concern and use paper sticks.
- Pumpkin patch cups. Replace chocolate pudding with pumpkin spice pudding or vanilla pudding stirred with pumpkin puree and pie spice. Top with green sprinkles and a candy pumpkin.
- Graveyard pans. Scale Dirt Cups into a single trifle dish. Press cookie tombstones at the top and pipe RIP with melted chocolate. This creates a dramatic centerpiece.
- Minty mummies. Add peppermint extract to the white chocolate and sprinkle crushed peppermint on brownie bites.
- Caramel drizzle. Warm jarred caramel and zigzag over brownies and cups for an extra decadent finish.
- Candy corn layers. Alternate vanilla pudding and crushed golden sandwich cookies to mimic candy corn layers. Finish with a tiny dollop of whipped topping and an actual candy corn.
If you are mapping out fun halloween food for a crowd, set out these variations as build your own stations. Guests pick a base, a drizzle, and a topping. This keeps your buffet interactive and reduces prep pressure.
Serving Suggestions
Make your dessert table memorable with contrast, color, and flow. Place each dessert type in its own zone with a simple sign so guests know what they are grabbing. Use different heights to add drama, such as cake stands, overturned bowls under a cloth, or a cutting board on soup cans. Finish with a sprinkle of cookie crumbs, a few candy eyes scattered around, and some plastic spiders for atmosphere.
Pairings your guests will love
- Hot sips. Offer warm apple cider with cinnamon sticks and a bowl of whipped cream. A spiced hot cocoa bar works too. Sit a shaker of pumpkin spice nearby so guests can dust their drinks.
- Chilled sparkling. Serve a citrus sparkling punch or a lime soda with floating orange slices. Add green grapes as spooky eyeballs. Keep a non alcoholic option for kids and drivers.
- Savory balance. Provide a small savory station to offset sweetness. A simple cheese board with crackers and apple slices, salted popcorn, or veggie sticks with ranch. If you want more themed items for a party, you might enjoy browsing ideas tagged as halloween food for party .
- Crunchy add ons. Bowls of pretzels, chocolate covered nuts, and kettle corn add texture and give guests something to nibble between desserts.
- Fruit forward bites. Balance the chocolate with fresh orange wedges and strawberries. A platter of apple slices next to caramel dip is always a hit.
Plating tips
- Color balance. Place white ghosts between darker items so they pop. Use a black tray for contrast or a white platter with a dark tablecloth.
- Portion guides. Plan two to three small desserts per person. For kids, aim for two. For adults at a long party, plan three.
- Flow matters. Put plates at the start, napkins midway, and forks at the end so the line moves naturally.
- Safety first. Keep a few treats without common allergens grouped and labeled. For gluten free guests, set their items on a separate tray to avoid crumb cross contact.
If you are hunting for more halloween food ideas that complement this dessert trio, consider adding rice cereal monsters, vampire donuts, or ghost cookies. Mix in a few fruity sips and you have a complete party spread.
Storage & Reheating
– Dirt Cups. Cover each cup with plastic wrap and refrigerate up to two days. Add gummy worms and any whipped topping just before serving so they stay perky. Do not freeze, as pudding can separate.
– Mummy Brownie Bites. Store in an airtight container at room temperature for two days or refrigerate up to five days. To refresh, let them sit at room temperature for fifteen minutes. If you prefer them warm, a five second microwave zap softens the crumb without melting the drizzle.
– Ghostly Marshmallow Wands. Keep at cool room temperature in an airtight container up to two days. Avoid the fridge, where marshmallows can firm up too much. If they get a little chewy, rest them at room temperature for twenty minutes and they will soften.
FAQ about Sweet and Spooky Halloween Dessert Recipes
Q. Can I make these the night before
A. Yes. Assemble Dirt Cups and cover. Decorate brownies completely and store airtight. Dip marshmallow wands, then add faces the next day if your kitchen is warm. Everything will hold nicely without weeping or smudging.
Q. How do I keep white chocolate from cracking
A. Let chocolate set at room temperature whenever possible. If you must chill to speed up, bring items back to room temperature slowly so the coating does not contract too quickly.
Q. What are quick halloween recipes to add if I need more variety
A. Brownies with green frosting, ghost cookies, and popcorn mixes come together fast. Choose two or three flavors and repeat them across your table for a cohesive look.
Q. Any halloween food ideas for kids who do not like chocolate
A. Use vanilla pudding with orange food color for Dirt Cups, dip marshmallows in strawberry candy melts, or make lemon brownies for the mummies. Fresh fruit skewers with candy eyes are another hit.
Q. How can I make these look extra creepy without being gross
A. Lean into color and texture. Add candy bones to Dirt Cups, splatter a little red gel on brownie wraps, or draw longer ghost faces. It reads spooky not scary, perfect for family friendly events.
Final Thoughts on Sweet and Spooky Halloween Dessert Recipes
You do not need advanced pastry skills to deliver a dessert table that stops guests in their tracks. These Sweet and Spooky Halloween Dessert Recipes prove that a few simple techniques, some clever decorations, and supermarket shortcuts can turn weeknight ingredients into party showpieces. You get creamy, chewy, and fluffy textures in every bite, plus a platter that photographs beautifully for your memory book.
If this post helped you plan your party, save it to Pinterest so you can find it fast next October. I would love to hear how you styled your dessert table, which variation was the crowd favorite, and what you are excited to try next. Drop a comment with your photos and tips. If you want more seasonal inspiration, subscribe for fresh ideas, time saving strategies, and more links to easy halloween food and treats your guests will love.
Sweet and Spooky Halloween Dessert Recipes
Ingredients
Equipment
Method
- Set up your station with bowls for each dessert and line a sheet pan with parchment for dipped marshmallows and brownies to keep cleanup easy and speed assembly.
- Whisk together instant pudding mix and cold milk for two minutes until thick, folding in whipped topping for creaminess. Refrigerate while crushing cookies.
- Crush chocolate sandwich cookies in a sealed bag using a rolling pin until soil-like texture is achieved. Reserve some crumbs for topping.
- Layer two-thirds pudding, topped with cookie crumbs, gummy worms, candy eyes/bones in clear cups. Chill at least 15 minutes. Add whipped topping just before serving if desired.
- Cut brownies into bites if using a pan. Chill bites to firm. Melt white chocolate in bursts, stirring, adding oil if thick.
- Drizzle melted white chocolate over brownie bites in crisscross pattern using a bag with snipped corner. Add candy eyes while drizzle is wet. Let set.
- Insert sticks into marshmallows and chill briefly if sticky. Dip in melted white chocolate, let excess drip off, place upright or on pan.
- Add shredded coconut if desired before chocolate sets for fuzzy effect. Use edible marker or melted chocolate dots to add faces when coating is nearly set.
- Tidy chocolate drips with knife when set. Arrange desserts on tray with varied height and extra decorations for visual appeal.
- Make ahead timing: Dirt Cups up to 8 hours ahead, brownies up to 1 day, marshmallow wands best within 12 hours. Bring to room temp before serving.
- Invite guests to decorate with extra candy eyes, gummy worms, and colored melts for interactive fun at parties or classroom events.
- Use mini cups and bite-sized brownies to encourage sampling and make a tasting experience.
- Final touches: Wipe cup rims, straighten candy eyes, sprinkle cookie crumbs for professional and photo-ready appearance.