
I remember when I first encountered a Walking Taco. It wasn’t at a fair or a tailgate, but at a chaotic, wonderful third-grade birthday party for a boy named Kevin who lived down the street. Kevin’s mom, Mrs. Rodriguez, was famous for her genius party hacks, and this portable meal, served right inside individual chip bags, felt like an act of pure culinary genius. It was pure joy, messy, unconventional, and ultimately, so satisfying.
It was a stark contrast to the careful, sit-down meals I knew, yet it captured the spirit of communal eating in a way that resonated deeply. Now, decades later, with my own twins, Aria and Kai, constantly moving and always hungry, I revisit this brilliant concept. It’s the ultimate solution for an easy, fun weeknight dinner, perfect for busy families, and the best host for savory, delicious ground beef. It’s truly a taco in a bag, the ultimate portable comfort food, and one of the best easy walking tacos recipes you will find.
This recipe for Walking Tacos with Ground Beef blends the simplest ingredients, rich, perfectly seasoned meat, and a load of fresh toppings, making it kid-friendly, adult-approved, and ready in minutes. It simplifies taco night into an exciting, mobile feast, transforming humble easy ground beef tacos into a playful experience. It speaks to my culinary philosophy, which centers on lowering the barrier to entry for connection, making food less about formality and more about joyful moments.
Table of Contents
- Why You’ll Love This Walking Tacos with Ground Beef
- Ingredients for Walking Tacos with Ground Beef
- How to Make Walking Tacos with Ground Beef
- Pro Tips & Variations
- Walking Tacos with Ground Beef Serving Suggestions
- Walking Tacos with Ground Beef Storage & Reheating
- FAQ about Walking Tacos with Ground Beef
- Final Thoughts
Why You’ll Love This Walking Tacos with Ground Beef
This isn’t just a recipe, it’s a party trick disguised as an effortless dinner idea. When I tell Lena and the kids we’re having walking tacos, the energy in the kitchen immediately jumps. There’s a reason this humble dish is a superstar at concessions, tailgates, and family gatherings, and it speaks directly to the need for simple, joyful food.
For parents and busy home cooks, the appeal of this easy walking tacos recipe is undeniable. It cuts down on dishwashing dramatically, which, let’s be honest, is half the battle on a Tuesday night. Everything is contained within the chip bag, transforming the vessel into the plate itself. This makes clean-up almost non-existent.
Furthermore, it’s highly customizable. Setting up a walking taco bar allows everyone, from my picky 6-year-old to my food-adventurous wife, to choose their own adventure. Kai loves extra sour cream and zero tomatoes, while Aria stacks hers high with black olives and jalapeños. This sense of ownership over the meal makes dinner less of a struggle and more of a creative endeavor. It’s what makes this the best kid friendly walking taco recipe with Doritos or Fritos.
Using quality ground beef and a robust homemade taco seasoning or a quality pre-made mix ensures the foundation is flavorful. The meat is where the magic starts. We want savory, deeply seasoned meat that melts into the crunchy crevices of the chips. This version focuses on how to make walking tacos with ground beef that is juicy and tender, not dry or bland.
This recipe embodies intention and ease. It’s perfect for casual events like a football game viewing or a large gathering where you need portable, simple food. It’s a portable taco dinner that handles a crowd seamlessly. After all, who wants to wash a million plates after hosting? Not me. The individual packaging means zero fuss, zero mess, and maximum flavor delivery right to your happily messy face. This is the definition of fun, functional cooking.
- Minimal Cleanup: Serving tacos right in the bag means fewer bowls and plates to wash. It’s the ultimate low-effort, low-mess meal.
- Highly Customizable: The perfect foundation for a taco bar. Offer various chips (Doritos walking tacos and Fritos walking tacos are classics) and a wide array of toppings.
- Quick Weeknight Dinner: With the meat ready in under 20 minutes, this is a lifesaver for busy evenings. This is great for an easy weeknight taco idea.
- Budget-Friendly: Ground beef is economical, and the chips and simple toppings keep costs down, making this a great cheap family dinner.
- Excellent for Crowds: Whether you’re hosting a party or need food for a concession stand, this is the ideal walking tacos for a crowd solution. It’s excellent for game day!
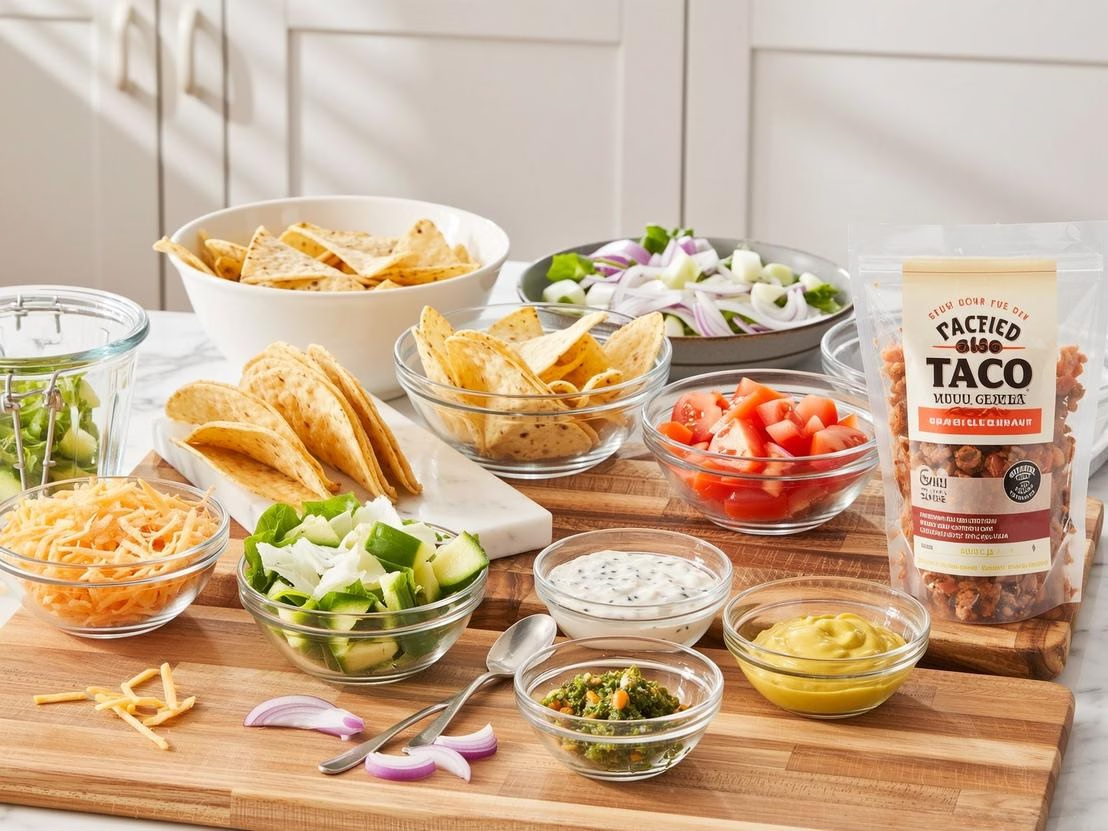
Ingredients for Walking Tacos with Ground Beef
The beauty of the Walking Taco lies in its simplicity. You need great seasoned meat, fantastic chips, and fresh toppings. That’s it.
For the Taco Meat:
- Ground Beef: 1 pound (80/20 is great for flavor, but leaner works too). Ground turkey is a fine substitute if you prefer.
- Taco Seasoning: 1 packet (about 1 oz) or 2 tablespoons of homemade seasoning. We want that classic, savory-spicy profile.
- Water or Broth: 1/2 cup. This helps the seasoning fully coat the meat and creates a juicy, saucy texture essential for coating the chips.
- Oil: 1 tablespoon (optional, but helps brown the meat).
For Assembly and Toppings:
- Individual Bags of Chips: 8 small bags (1 oz size) of Nacho Cheese Doritos or classic Corn Chips (Fritos are traditional). This is the key to the tacos in a bag concept.
- Shredded Cheese: 1 cup (cheddar, Monterey Jack, or a Mexican blend).
- Shredded Lettuce: 1 cup.
- Diced Tomatoes: 1 cup or equivalent cherry tomatoes.
- Salsa: Your favorite mild or medium salsa.
- Sour Cream (or Greek Yogurt): For that creamy, cooling finish.
- Optional Add-ins: Black olives, diced onions, jalapeños, or black beans.
Easy Walking Tacos With Ground Beef Recipe You’ll Love.
How to Make Walking Tacos with Ground Beef
The entire process focuses on efficiency and flavor, ensuring the ground beef taco filling is ready the moment the bags are opened.
Step-by-Step Instructions (400–650 words)
- Brown the Ground Beef: Place a large skillet over medium-high heat. Add your tablespoon of oil if using, then crumble in the ground beef. Cook, stirring occasionally and breaking up the chunks with a wooden spoon, until the meat is completely browned and no pink remains. This usually takes about 5-7 minutes.
- Drain Excess Fat: Once browned, carefully drain any excess grease from the skillet. If you skip this step, your tacos will feel overly oily and heavy.
- Season the Meat: Reduce the heat to medium-low. Stir in the taco seasoning mix and the water or broth. The moment the dry seasoning hits the warm, moist meat, the aroma should explode, filling your kitchen with the promise of taco night. The water is critical, as it blooms the spices and creates that slightly saucy texture we need for the chips to absorb maximum flavor.
- Simmer to Thicken: Bring the mixture to a gentle simmer. Let it cook for 5-8 minutes, stirring occasionally, until most of the liquid has been absorbed or evaporated, leaving the meat perfectly coated and moist. The meat should glisten and smell incredible.
- Prep the Bags: While the meat simmers, prepare your chip bags. Locate the sealed end of each small bag (Fritos or Doritos) and carefully slice it open with scissors or tear it open about halfway down the side. This creates a larger opening and a deeper pocket for the fillings.
- Crush the Chips (Optional but Fun): Gently crush the chips inside the bag just a bit. This creates more surface area for the meat and toppings to cling to, ensuring every bite is layered with flavor.
- Set Up Your Bar: Place the seasoned ground beef taco filling in a slow cooker (set to Warm) or a serving dish to keep it hot. Arrange your toppings, cheeses, salsa, and sour cream around the warmed meat.
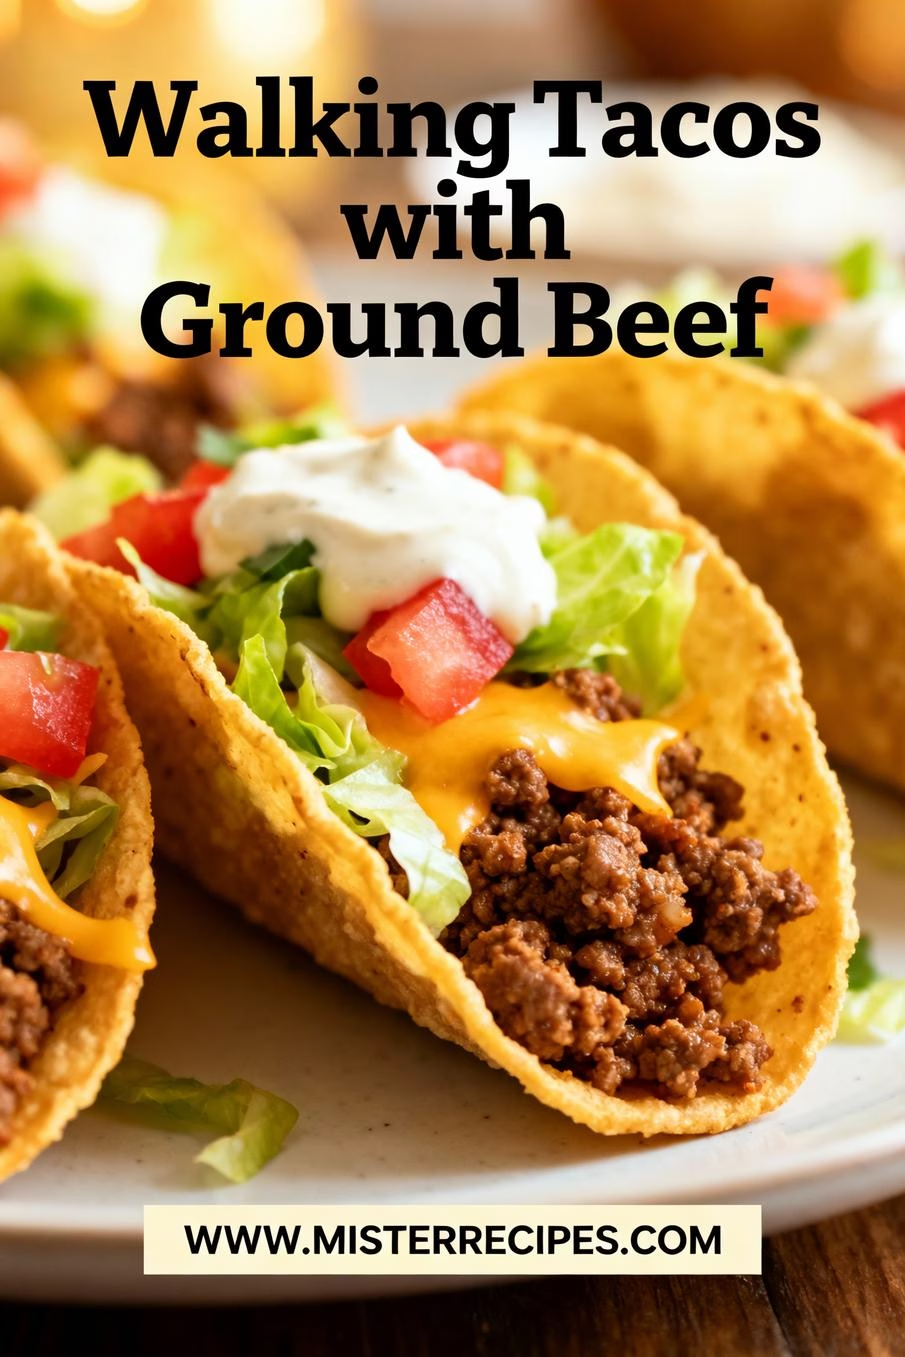
- Assemble and Serve: Here’s where the fun begins. Take an open chip bag. Spoon two large scoops of the hot taco meat directly into the bag. Top with shredded cheese (the heat from the meat will start to melt it instantly), then add a scoop of lettuce, tomatoes, and a dollop of sour cream or salsa.
- The “Walking” Part: Give the bag a gentle shake or use a fork to mix the contents slightly. Insert a fork and hand it over. Guests or family members can now literally walk around while enjoying their full, contained meal. It’s a game-changer for a family-friendly dinner!
Pro Tips & Variations (400–650 words)
Making a great Walking Taco is easy, but making a stellar one requires a few intentional moves. After years of perfecting this for birthday parties and school events, I’ve gathered some insights. Remember that cooking is an act of creativity; always feel free to experiment!
Pro Tips for Best Results
- Keep the Meat Moist: The critical difference between a good and great taco in a bag is the moisture level of the meat. The chips need a little liquid to soften slightly and absorb the intense spices. Don’t let all the water cook off in step 4, leave a little sauce behind.
- The Chip Question: While Fritos are the classic choice, Doritos walking tacos are immensely popular, especially with kids. The Nacho Cheese flavor adds an extra layer of cheesy, zesty profile. Always offer a mix! For a deeper flavor, try Chili Cheese Fritos.
- Serve the Meat Hot: The heat of the seasoned ground beef is what starts the mini-melting process for the cheese inside the bag. If serving for a crowd, keep the meat in a small slow cooker set to the ‘Warm’ setting.
- Prepare Toppings Ahead: Dice your tomatoes, shred your lettuce, and have all your toppings ready in assembly line fashion. This makes the entire assembly process flow smoothly, especially if you have an impatient crowd waiting. This is key for a seamless walking taco bar experience.
Variations on Your Ground Beef Walking Tacos
- Spicy Kick: If you like heat, stir in a diced jalapeño or half a teaspoon of cayenne pepper when seasoning the meat. A dash of hot sauce right before serving also works wonders.
- Ground Turkey or Chicken: For a lighter option, substitute the ground beef with ground turkey or chicken. You might need a touch more oil to prevent sticking, and season liberally to ensure the flavor is robust.
- Vegetarian/Vegan Version: Skip the meat entirely and use seasoned black beans, pinto beans, or lentils as your filling. Season them just as you would the beef. For strict vegans, ensure chips are certified vegan (some Fritos are, but check the Doritos label) and swap sour cream for a vegan Crema or guacamole. This caters to the gluten friendly walking tacos niche, as well (ensure chips are GF).
- Frito Pie Style: Instead of traditional taco toppings, lean into the Frito Pie concept. Add a scoop of chili (like our best veggie loaded ground beef chili), then cheese, and maybe some green onions. This is a richer, heartier take on the classic.
- Casserole Option: If you love the flavor but need a non-portable dish, spread the crushed chips in the bottom of a 9×13 pan, top with the seasoned ground beef, cheese, and bake until melted. Top with the cold toppings afterward for a delicious walking taco casserole idea.
Walking Tacos with Ground Beef Serving Suggestions (400–650 words)
While the Walking Taco is a complete meal in its own right, incorporating a few simple sides can elevate the experience and balance the richness of the ground beef and chips. When serving this to Aria and Kai and their friends, I always focus on fresh, vibrant additions that require little effort.
Setting Up the Ultimate Taco Bar
The success of the walking tacos for a crowd depends largely on the quality and variety of your topping bar. Think of bright colors, cool textures, and complementary flavors.
Essential Toppings:
- Pico de Gallo or Chopped Cilantro: Move beyond basic salsa. Fresh tomatoes, red onion, lime juice, and cilantro chop deliver a burst of acidity that cuts through the rich ground beef beautifully.
- Avocado or Guacamole: Diced avocado adds a rich, healthy fat that takes the taco flavor profile to the next level. If you want to make it fancier, a fresh, homemade guac is always a winner.
- Black Olives and Green Onions: These staples add a lovely salty quality and crunch.
- Hot Sauce Selection: Offer a range of heat levels, from mild Verde sauce to a fiery chipotle blend, allowing adults to customize their spice level.
What to Serve Alongside the Tacos
These sides keep the meal balanced and festive. Since the main dish requires little dedicated cooking time once the meat is seasoned, focus on quick, fresh preparations.
- Mexican Street Corn Salad (Esquites): This smoky, creamy side dish is spectacular against the savory meat. Mix grilled or roasted corn kernels with mayo, cotija cheese, chili powder, and lime juice. It’s light, vibrant, flavorful, and incredibly easy to make ahead. The char on the corn adds depth.
- Cilantro-Lime Rice: A simple, bright side that offers a fresh counterpoint to the seasoned beef. Cook perfect white rice, then stir in fresh lime juice and generous amounts of chopped cilantro. It’s cooling and refreshing. This is a must if you are serving this for a large gathering.
- Simple Black Bean and Corn Salsa: A chunky, refreshing dip or side made simply with canned black beans (rinsed), corn (frozen or canned), red onion, and bell peppers, dressed with a vinaigrette. It’s high in protein and fiber, ensuring a satisfying meal.
- Fresh Fruit Skewers: Especially helpful when serving kids. A simple platter of sliced watermelon, pineapple, and berries offers a sweet, cooling dessert or side that cleanses the palate after the spicy, savory tacos.
Walking Tacos with Ground Beef Storage & Reheating
One of the best benefits of this recipe is the versatility of the components when stored separately. While you can’t really store a prepared taco in a bag, you can easily prepare the two main components ahead of time, which makes this perfect for make ahead walking tacos for parties or future weeknight meals.
Storing the Taco Meat
- In the Fridge: The seasoned ground beef stores exceptionally well in the refrigerator. Cool the meat completely, then transfer it to an airtight container. It will keep safely for 3-4 days. This is perfect for meal prepping a quick lunch or dinner later in the week.
- In the Freezer: For longer storage, freeze the seasoned, saucy meat. Scoop the taco filling into freezer-safe zip-top bags, squeezing out as much air as possible, or use airtight containers. It can be frozen for up to 3 months. Thaw overnight in the refrigerator before reheating.
Storing Toppings
Always store cold toppings like shredded lettuce, tomatoes, and sour cream separately. Keep lettuce and tomatoes in airtight containers in the crisper drawer to maintain freshness and crunch. Shredded cheese can also be stored in the fridge for several days.
Reheating the Ground Beef
There are two primary methods for bringing the frozen or refrigerated meat back to temperature:
- Stovetop (Recommended): Place the refrigerated or thawed meat in a skillet over medium heat. Add 1-2 tablespoons of water or broth to restore moisture. Heat for about 5-7 minutes, breaking up the meat chunks, until it is steaming hot throughout.
- Microwave: Place a portion of the meat in a microwave-safe bowl. Cover loosely (using a paper towel works well) and heat in 60-90 second increments, stirring well between intervals, until heated through.
FAQ about Walking Tacos with Ground Beef
What is a Walking Taco, and why is it called that?
A walking taco, also known as a taco in a bag, is a serving style where taco filling and toppings are poured directly into a snack-sized bag of chips, typically Fritos or Doritos. The name comes from the fact that you can easily hold the bag and walk around while eating it, making it the ultimate portable meal, perfect for concession stands, fairs, and tailgates. It offers the full portable taco dinner experience without needing a plate.
How to make walking tacos with Doritos and Ground Beef?
The process is simple: Season your ground beef (as described in the steps above) and prepare your toppings. Instead of Fritos, choose individual bags of Nacho Cheese or Cool Ranch Doritos. Gently crush the Doritos slightly inside the bag, slice open the side, scoop in the seasoned ground beef taco filling, and finish with your favorite toppings like cheese, lettuce, salsa, and sour cream. The method remains the same whether you use Fritos or Doritos.
What are the best chips for walking tacos with ground beef?
The ‘best’ chip often comes down to personal preference! Classically, Fritos (corn chips) are used to create the classic Frito Pie walking tacos flavor profile. However, Nacho Cheese Doritos are incredibly popular and introduce a strong, zesty cheese flavor right at the base. Offering both Fritos and Doritos is the best way to satisfy everyone at your walking taco bar.
Can I make walking tacos for a crowd with a taco bar?
Absolutely, it’s the ideal way to serve them! Prepare a large batch of the seasoned ground beef and keep it hot in a slow cooker. Set up a dedicated walking taco bar with bowls of toppings (cheese, lettuce, salsa, beans, etc.) and a large bowl holding the individual chip bags. Guests can grab a bag, crush the chips, serve the hot meat, and customize their toppings. This method makes serving a breeze for walking tacos for a crowd with a taco bar.
Final Thoughts
Food, for me, has always been tied to memory and permission, permission to be messy, to be loud, and to just be. When I see Aria and Kai carefully customizing their own walking tacos, their faces smeared with sour cream and salsa, it reminds me that the simplest meals often create the most profound connections. This dish strips away the formality of dinner, replacing it with pure, unadulterated pleasure.
It’s a recipe born of necessity and elevated by creativity. It’s an homage to all the busy parents and concession stand heroes who realized that the best plate might just be the one you can throw away. Try making this easy walking tacos with ground beef and Fritos recipe this week. I promise it will bring a smile to your table, whether you’re sitting down or walking around.
If you loved this simple, high-impact dinner idea, don’t keep it a secret! Pin it for later, leave a comment below telling me if you prefer Doritos or Fritos, and subscribe to MisterRecipes.net for more tales from my kitchen. To find more quick and creative ground beef ideas like this one, follow this external link to The Cookie Rookie’s Walking Taco guide or read Eating on a Dime’s ideas for budget-friendly walking tacos.
Walking Tacos with Ground Beef
Ingredients
Equipment
Method
- Place a large skillet over medium-high heat. Add the oil if using, then crumble in the ground beef. Cook, stirring occasionally and breaking up the chunks with a wooden spoon, until the meat is completely browned and no pink remains, about 5-7 minutes.
- Carefully drain any excess grease from the skillet to avoid oily tacos.
- Reduce the heat to medium-low. Stir in the taco seasoning and water or broth. Let the mixture simmer gently for 5-8 minutes, stirring occasionally, until most of the liquid has been absorbed, leaving the meat moist and flavorful.
- While the meat simmers, prepare the chip bags. Locate the sealed end of each small bag and carefully slice it open with scissors about halfway down the side to create a larger opening.
- Gently crush the chips inside the bag slightly to create more surface area for toppings.
- Place the seasoned ground beef in a slow cooker (set to Warm) or a serving dish to keep it hot. Arrange toppings nearby.
- Take an open chip bag. Spoon 2 large scoops of the hot taco meat into the bag. Top with shredded cheese, lettuce, tomatoes, salsa, and sour cream. Shake gently to mix, then enjoy!


