Halloween Pizza Skulls: A Spooktacularly Delicious Treat!
Get ready to sink your fangs into the most fun and creepy Halloween food imaginable! These Halloween Pizza Skulls are not only incredibly delicious but also super easy to make, making them the perfect addition to your Halloween festivities. They are totally family-friendly and guaranteed to be a hit with kids and adults alike. If you’re looking for Halloween dinner ideas that are both practical and fun, then look no further. These creepy pizza skulls are sure to bring a smile (or a shriek!) to everyone’s face.
Why You’ll Love This Halloween Pizza Skulls
- Easy to make: This recipe requires minimal effort and uses simple ingredients.
- Kid-friendly: Kids will love helping to assemble and decorate their own spooky skulls.
- Customizable: Get creative with your toppings and make each skull unique.
- Perfect for parties: These pizza skulls are a great way to add a festive touch to any Halloween party.
- Delicious: Who can resist a warm, cheesy pizza? These are packed with flavor.
- Quick to prepare: From start to finish, you’ll have spooky snacks ready in no time!
Ingredients for Halloween Pizza Skulls
- Pizza Dough: 1 pound, either store-bought or homemade
- Pizza Sauce: ½ cup
- Mozzarella Cheese: 2 cups, shredded
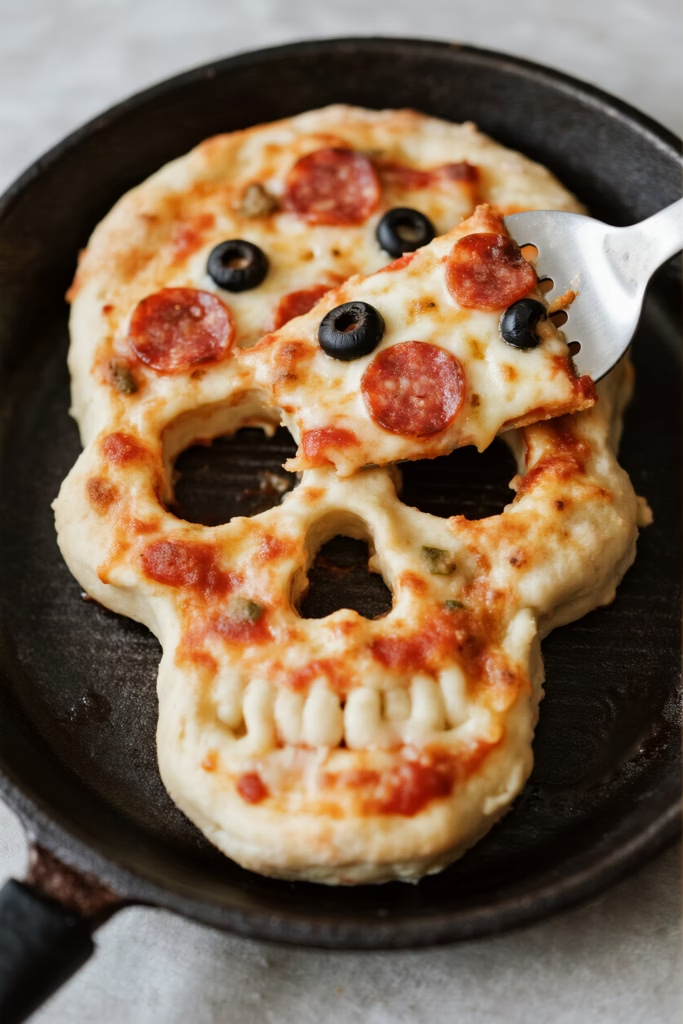
- Pepperoni: Sliced, for decorating (You can also use black olives for a vegetarian option!)
- Black Olives: Sliced, for decorating
- Bell Peppers: thinly sliced, for decorating if desired.
Substitutions: For a gluten-free option, use a gluten-free pizza dough. For vegan pizza skulls, use vegan cheese and omit pepperoni, or use plant-based pepperoni alternative.
How to Make Halloween Pizza Skulls
Step-by-Step Instructions
- Preheat your oven to 400°F (200°C).
- Roll out the pizza dough to about ¼ inch thickness.
- Use a skull-shaped cookie cutter (or a template and knife) to cut out skull shapes from the dough.
- Place the skull-shaped dough onto a baking sheet lined with parchment paper.
- Spread a thin layer of pizza sauce over each skull.
- Sprinkle mozzarella cheese generously over the sauce.
- Decorate with pepperoni and black olives to create spooky skull faces. Have fun and get creative!
- Bake for 12-15 minutes, or until the crust is golden brown and the cheese is melted and bubbly.
- Let cool slightly before serving.
Pro Tips & Variations
- Tip 1: Don’t overload the pizza with sauce, or it may get soggy.
- Tip 2: Use a pizza stone for an extra crispy crust.
- Tip 3: Prepare the skulls ahead of time and bake just before your Halloween party to serve them fresh.
Variations:
- Spicy: Add a pinch of red pepper flakes to the sauce for a spicy kick.
- Vegetarian: Use a variety of veggies like mushrooms, bell peppers, and onions for toppings.
- Deluxe: Add cooked sausage or bacon for a heartier pizza.
Serving Suggestions
- Serve with a side of Caesar salad for a balanced meal.
- Pair with a spooky punch or Halloween-themed cocktails.
- Offer a dipping sauce like ranch or garlic butter for dipping.
Storage & Reheating
Storage: Store leftover pizza skulls in an airtight container in the refrigerator for up to 3 days.
Reheating: Reheat in the oven at 350°F (175°C) for 5-10 minutes, or until heated through. You can also microwave them, but the crust may become soft.
FAQ about Halloween Pizza Skulls
Q: Can I make these Halloween Pizza Skulls ahead of time?
A: Yes! You can prepare the pizza skulls ahead of time & refrigerate until you’re ready to bake them.
Q: What are some other Halloween themed food toppings I could use?
A: You can use anything you like! Consider using sliced bell peppers for “stitches” or mushroom slices for creepy eyes. Get creative!
Q: Are Halloween Pizza Skulls good as Halloween party food?
A: Absolutely! Halloween Pizza Skulls are fantastic Halloween finger foods and are always a huge hit with guests of all ages. They also make for great spooky snacks!
Q: Can I freeze these Halloween Food Recipes for later?
A: Yes, you can freeze baked (or unbaked) pizza skulls. Wrap them individually in plastic wrap and then place them in a freezer bag. They can be stored for up to 2 months.
Final Thoughts on Halloween Pizza Skulls
These Halloween Pizza Skulls are the perfect way to add some fun and flavor to your Halloween celebration. They’re easy to make, customizable, and totally delicious. So, get ready to impress your family and friends with these spooky treats. Don’t forget to save this recipe on Pinterest for easy access and leave a comment below to let me know how yours turned out! And while you’re here, subscribe for more fun and easy recipes!

Halloween Pizza Skulls
Ingredients
Equipment
Method
- Preheat your oven to 400°F (200°C).
- Roll out the pizza dough to about ¼ inch thickness on a lightly floured surface.
- Use a skull-shaped cookie cutter or a template and knife to cut out skull shapes from the dough.
- Place the skull-shaped dough onto a parchment-lined baking sheet.
- Spread a thin layer of pizza sauce over each skull, then sprinkle generously with mozzarella cheese.
- Decorate each skull with pepperoni and black olives to create spooky faces. You can also use bell peppers to add additional details.
- Bake for 12-15 minutes, or until the crust is golden brown and the cheese is melted and bubbly.
- Let the pizza skulls cool slightly before serving.