Introduction
Have you ever wondered if holiday cooking could be both incredibly charming and profoundly simple? As the leaves turn crisp and the air fills with a hint of autumn magic, our kitchens often become hubs of creative expression. But let’s be honest, sometimes the elaborate festive recipes can feel like more trick than treat! What if I told you there’s a dish that perfectly marries the cozy comfort of home cooking with the whimsical spirit of Halloween, without requiring you to be a culinary wizard? Prepare yourselves for the star of this spooky season: Jack-O’-Lantern Mac and Cheese Cups.
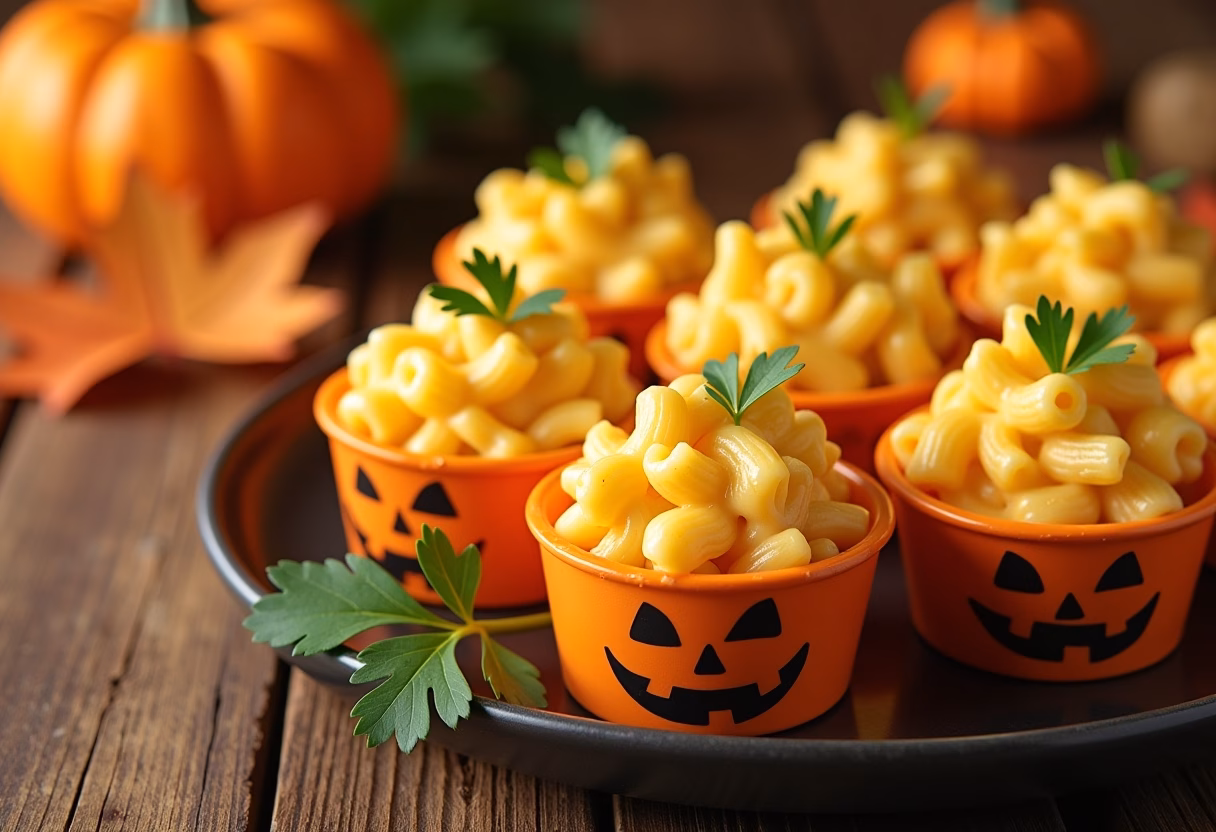
These delightful, individual servings of creamy, cheesy goodness are not just a meal; they’re an experience! Imagine the delight on your little ghoul’s face as they discover their very own personal pot of mac and cheese, adorned with a cheeky, edible jack-o’-lantern grin. This recipe isn’t just easy jack-o’-lantern recipe; it’s a game-changer for parents, party hosts, and anyone looking to infuse a bit of festive fun into their dinner table without spending hours slaving away.
We’re taking a classic beloved dish and giving it a Halloween makeover that is so adorable, it’s almost scary! What makes these Jack-O’-Lantern Mac and Cheese Cups truly special is their universal appeal. We’re talking about a dish that satisfies picky eaters, delights adults with its nostalgic charm, and serves as the ultimate crowd-pleaser for any Halloween gathering. Forget the stress of elaborate party spreads; these individual cups are perfect for little hands at a kids’ party or as a fun appetizer for grown-up celebrations. They are oven-baked to golden perfection, offering a slightly crispy top with a gooey, cheesy interior – pure comfort in every bite!
So, if you’re looking to add a touch of whimsy to your Halloween culinary repertoire, join me as we dive into this incredibly simple yet utterly captivating recipe. These Jack-O’-Lantern Mac and Cheese Cups are designed to make your holiday cooking enjoyable, memorable, and absolutely delicious. Let’s get cooking and conjure up some magic!
Why You’ll Love These Jack-O’-Lantern Mac and Cheese Cups
Let’s be real, who doesn’t adore a good mac and cheese? Now, imagine that classic comfort food infused with Halloween spirit, made perfectly portioned for individual enjoyment. That’s exactly what you get with these incredible Jack-O’-Lantern Mac and Cheese Cups. This isn’t just another recipe; it’s a ticket to a happier, less stressful, and more festive Halloween.
Here’s why these delightful cups are about to become your new favorite spooky season tradition:
- Effortless Elegance: Despite their charming appearance, these mac and cheese cups are surprisingly simple to make. No complicated techniques or obscure ingredients here! We’re talking about a straightforward process that even novice cooks can master. The “elegance” comes from the presentation – individual, perfectly formed cups with adorable jack-o’-lantern faces are inherently more refined than a simple casserole, yet they require minimal effort compared to, say, sculpting mini meatloaf ghosts or intricate face pies.
- Kid-Friendly Fun (and Food!): Let’s face it, getting kids to eat something new can be a challenge. But when their mac and cheese looks like a friendly, grinning pumpkin, resistance melts away. The individual portions are ideal for little hands, making them less messy and more appealing at parties. Plus, it’s a fantastic way to involve them in the kitchen – they can help with the “face” creation, turning cooking into a fun pre-Halloween activity! This makes it a great alternative to other cute Halloween treats like easy adorable ghost cookies or even easy mummy hot dogs.
- Party Perfection: Planning a Halloween bash? These cups are your secret weapon. They are super easy to serve, no need for ladling or cutting. Just grab and go! Their individual nature also makes them ideal for safe, hygienic serving at larger gatherings, reducing communal contact points – a definite bonus for modern entertaining. They pair wonderfully with other festive finger foods like easy spider web pizza mini Halloween pizzas or even easy bloody eyeball meatballs.
- Customizable Comfort: While the classic mac and cheese is divine, this recipe offers endless possibilities for customization. Want a little spice? Add some smoked paprika or a pinch of cayenne. Looking for added veggies? Finely chopped broccoli or bell peppers can be easily folded in. This versatility means you can tailor the flavor profile to suit any palate, making it a truly personalized culinary experience.
- Make-Ahead Magic: In the busy lead-up to Halloween, anything that can be prepared in advance is a blessing. These cups can be assembled ahead of time and baked just before your guests arrive, or even frozen for later enjoyment. This convenience frees you up to enjoy the festivities rather than being stuck in the kitchen.
- The Ultimate Comfort Food with a Twist: At its heart, this is still a warm, gooey, cheesy mac and cheese – the ultimate comfort food. The jack-o’-lantern design simply adds a whimsical, festive layer, transforming a beloved classic into something truly special for the season. It’s a delightful surprise for anyone expecting regular old mac and cheese!
These Jack-O’-Lantern Mac and Cheese Cups are more than just a meal; they’re a celebration of Halloween, comfort, and culinary creativity, all wrapped up in an adorable, edible package.
Ingredients for Jack-O’-Lantern Mac and Cheese Cups
Gathering your ingredients is the first step to creating these enchanting Jack-O’-Lantern Mac and Cheese Cups. Most of these items are likely already in your pantry or easily found at any grocery store, making this a fuss-free recipe!
- 1 pound elbow macaroni (or other small pasta shape like shells or ditalini)
- 1/2 cup unsalted butter
- 1/2 cup all-purpose flour
- 4 cups whole milk, warmed
- 1 teaspoon salt
- 1/2 teaspoon black pepper
- 1/4 teaspoon ground mustard (or mustard powder)
- 1/4 teaspoon smoked paprika (for a subtle smoky flavor and orange hue)
- 4 cups shredded sharp cheddar cheese, divided (about 16 ounces)
- 1 cup shredded Monterey Jack cheese (for extra creaminess, optional)
- 1/2 cup shredded Parmesan cheese, divided (optional, for flavor and topping)
- 1/4 cup finely grated orange cheddar cheese (for the “faces”)
- Non-stick cooking spray
Substitutions & Tips:
- Pasta: Feel free to use gluten-free elbow macaroni for a gluten-free version. Small shells or ditalini also work beautifully to hold that creamy sauce!
- Milk: While whole milk provides the richest, creamiest sauce, 2% milk can be used. Avoid skim milk as it won’t create the same luxurious texture. For a richer flavor profile, you could even use half-and-half.
- Cheese: The combination of sharp cheddar and Monterey Jack creates a perfect balance of flavor and meltiness. You can experiment with other melting cheeses like gruyere, colby, or even a pre-shredded “Mexican blend” for ease. For an extra pop of color in the “jack-o’-lantern carving,” a small amount of finely grated extra-sharp orange cheddar is ideal.
- Spices: Ground mustard is a secret weapon in mac and cheese, enhancing the cheesiness without adding a mustard flavor. Smoked paprika adds depth and a lovely orange tint which helps with the festive look, much like the vibrant colors in easy candy corn parfaits.
How to Make Jack-O’-Lantern Mac and Cheese Cups
Step-by-Step Instructions
Creating these adorable Jack-O’-Lantern Mac and Cheese Cups is a fun and straightforward process. Follow these detailed steps to ensure your spooky treats turn out perfectly every time!
- Prep Your Oven and Muffin Tins: Preheat your oven to 375°F (190°C). Lightly spray two 12-cup muffin tins with non-stick cooking spray. This is crucial for preventing sticking and ensuring your cups pop out cleanly. If you only have one tin, you can bake in batches.
- Cook the Macaroni: In a large pot of salted boiling water, cook the elbow macaroni according to package directions until al dente (firm to the bite). This usually takes about 7-9 minutes. You want it slightly undercooked as it will continue to cook in the oven. Drain well and set aside.
- Make the Roux: While the pasta cooks, melt the unsalted butter in a large saucepan or Dutch oven over medium heat. Once melted, sprinkle in the all-purpose flour. Whisk continuously for about 1-2 minutes until a thick, smooth paste (a roux) forms. This will be the base of your creamy sauce.
- Create the Cheese Sauce Base: Gradually whisk in the warm whole milk, a little at a time, ensuring no lumps form. Continue whisking as the mixture thickens, usually about 5-7 minutes. Stir in the salt, black pepper, ground mustard, and smoked paprika. The smoked paprika not only adds a lovely subtle flavor but also enhances the orange hue, perfect for our jack-o’-lantern theme, similar to how colorful elements pop in easy Frankenstein brownies.
- Melt the Cheese: Reduce the heat to low. Add 3 cups of shredded sharp cheddar cheese, all of the shredded Monterey Jack cheese, and 1/4 cup of shredded Parmesan cheese (if using) to the sauce. Stir gently until all the cheese is completely melted and the sauce is smooth and creamy. Taste and adjust seasonings if necessary.
- Combine Pasta and Sauce: Add the drained, cooked macaroni to the cheese sauce. Stir gently until the pasta is fully coated with the luscious cheese sauce. Ensure every bit of pasta is submerged in that cheesy goodness.
- Fill the Muffin Tins: Spoon the mac and cheese mixture into the prepared muffin cups, filling each cup about three-quarters full. Gently press the mac and cheese down to compact it slightly, helping the cups hold their shape. This is similar to compacting other baked goods like easy apple cider donut muffins but with a savory twist.
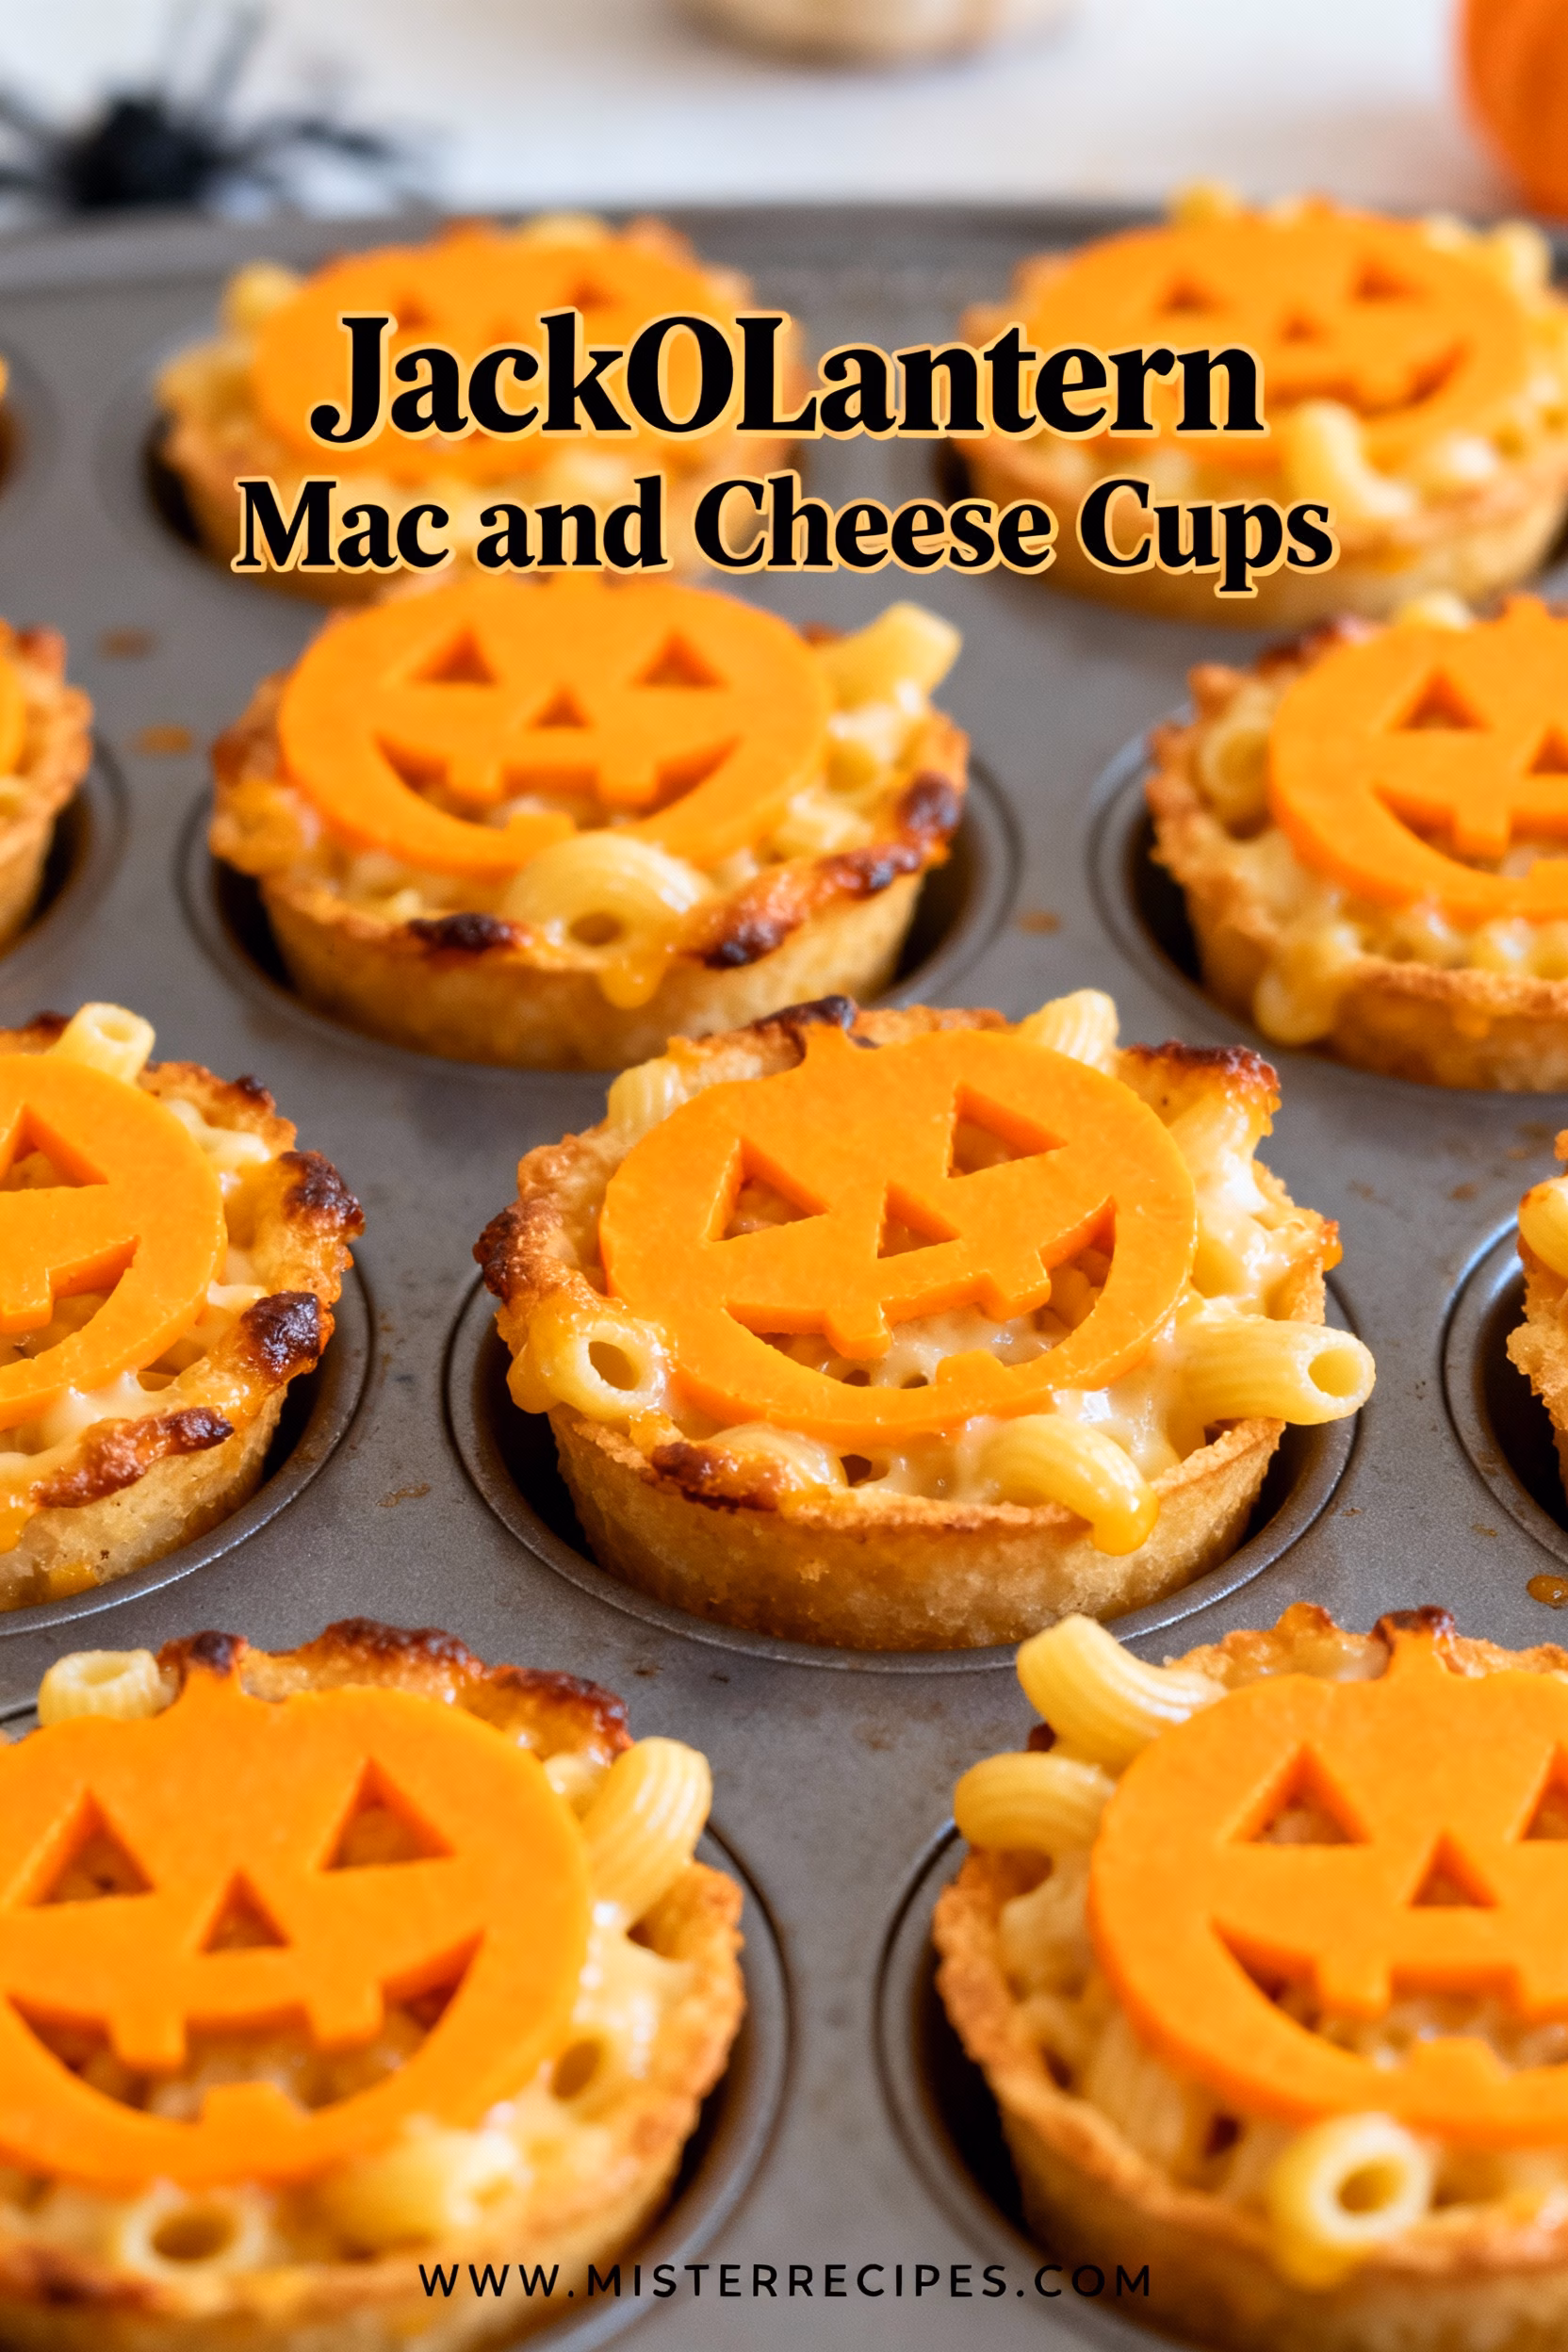
- Add the Jack-O’-Lantern Faces: Now for the fun part! Take your finely grated orange cheddar cheese (or even a mix of regular and extra-sharp for intensity) and create small triangle shapes for the eyes and nose, and a thin, jagged line or a crescent for the mouth on top of each mac and cheese cup. You can use a small sharp knife or even kitchen shears to cut the cheese into the desired shapes, or simply pinch and crumble small bits into place. Get creative with your expressions – some can be spooky, some silly!
- Bake to Perfection: Bake for 15-20 minutes, or until the mac and cheese is heated through, bubbly around the edges, and the cheese faces are slightly melted and golden. The tops should be lightly crisp.
- Cool and Serve: Remove the muffin tins from the oven and let the Jack-O’-Lantern Mac and Cheese Cups cool in the tins for about 5-10 minutes. This cooling time is crucial as it allows the cups to set and makes them much easier to remove without falling apart.
- Enjoy! Carefully remove the mac and cheese cups from the muffin tins using a spoon or a small offset spatula. Serve warm and watch the smiles erupt!
These individualized portions are not only a visual delight but also incredibly convenient for any Halloween gathering.
Pro Tips & Variations
Making these Jack-O’-Lantern Mac and Cheese Cups is already a treat, but with these pro tips and creative variations, you can elevate them even further, ensuring rave reviews and perfect results every time.
Pro Tips for Flawless Jack-O’-Lantern Mac and Cheese Cups:
- Don’t Overcook Your Pasta: Cook your elbow macaroni until it’s just al dente, meaning it still has a slight bite. It will continue to cook when baked in the oven, and overcooked pasta can turn mushy in the cups. A firm base is key for well-shaped cups.
- Warm Your Milk: Using warm milk for your cheese sauce helps create a smoother, lump-free béchamel (roux) and prevents the sauce from cooling down too much when added to the hot roux. This also helps the cheese melt more evenly and quickly.
- Grate Your Own Cheese: While pre-shredded cheese is convenient, it often contains anti-caking agents that can make your cheese sauce less smooth and sometimes gritty. Grating your own block of cheese will result in a significantly creamier, more luxurious sauce. This also applies to the cheese you use for the faces – fresher cheese melts better and looks more vibrant.
- Allow Cooling Time Before Removal: This is perhaps the most important tip for beautifully formed cups. After baking, let the mac and cheese cups cool in the muffin tins for at least 5-10 minutes. This allows the cheese and pasta to set and firm up, making them much easier to remove without crumbling. If you try to take them out too soon, they might fall apart.
- Use a Non-Stick Muffin Tin & Spray Well: Even with a non-stick tin, a good coating of non-stick cooking spray (or buttering and flouring) is essential. This ensures a clean release and maintains the integrity of your adorable jack-o’-lantern shapes.
Creative Variations to Spook Up Your Cups:
- Spicy Jack-O’-Lanterns: For those who like a little heat, add a pinch of cayenne pepper or a dash of hot sauce to your cheese sauce. You could even finely chop some jalapeños and mix them into the mac and cheese before baking.
- Veggie Boost: Sneak in some extra nutrition! Finely chop some steamed broccoli, puréed butternut squash (which also enhances the orange color!), or shredded carrots and mix them into the mac and cheese. The kids won’t even know! This makes the cups a more wholesome option, even for a festive treat, much like adding veggies to jack-o’-lantern stuffed peppers.
- Bacon Lover’s Edition: Everything’s better with bacon, right? Cook and crumble some crispy bacon bits and stir them into the mac and cheese mixture before filling the muffin tins. You could even sprinkle some on top with the cheese faces for added crunch and flavor.
- Gourmet Cheese Blend: Experiment with different cheese combinations. A splash of Gruyère, Fontina, or even a smoked Gouda can add a sophisticated touch and complex flavor profile to your mac and cheese cups.
- Breadcrumb Topping: For an extra crispy top (in addition to the cheese faces), mix 1/4 cup of panko breadcrumbs with 1 tablespoon of melted butter. Sprinkle a small amount around the edges of the cheese faces before baking for a delightful crunch.
- Gluten-Free & Dairy-Free Options:
- Gluten-Free: Simply swap out regular elbow macaroni for your favorite gluten-free pasta. Ensure your flour for the roux is also gluten-free (a 1-to-1 gluten-free baking flour blend usually works well).
- Dairy-Free: This one is a bit trickier but totally doable! Use plant-based butter, unsweetened plain non-dairy milk (almond or oat milk work best), and a blend of good-quality dairy-free shredded cheeses. Nutritional yeast can also be added for an extra cheesy flavor.
With these tips and variations, your Jack-O’-Lantern Mac and Cheese Cups will be the talk of the Halloween season, whether you’re serving them as a fun family dinner or a spooky party treat!
Serving Suggestions
These delightful Jack-O’-Lantern Mac and Cheese Cups are versatile enough to stand alone as a star appetizer or complement a larger festive meal. Here are some fantastic serving suggestions to make your Halloween spread truly memorable:
- Halloween Party Platter: Arrange the cups artfully on a large platter bordered with fresh parsley or kale “vines.” They make for perfect finger food alongside other spooky snacks like easy mummy hot dogs, easy ghostly marshmallow pops, or a festive skull veggie platter. They’re easy to grab, making them ideal for mingling guests.
- Hearty Main Course Accompaniment: Pair these cheesy cups with a protein for a satisfying dinner. They are fantastic alongside grilled chicken or a simple roasted turkey breast. For a more thematic pairing, consider serving them next to mini meatloaf ghosts or even a zombie meatloaf for a truly ghoulish feast.
- Soup and Salad Pairing: A warm, creamy mac and cheese cup is a delightful accompaniment to a light autumnal soup, such as a curried pumpkin soup or a classic tomato bisque. A fresh green salad with a light vinaigrette would provide a refreshing contrast to the richness of the mac and cheese. It’s a balanced meal that still feels festive.
- Pair with “Bloody” Sides: To lean into the spooky aesthetic, consider serving them alongside “bloody” accompaniments. A vibrant cranberry sauce, or even a simple ketchup for dipping (especially for the kids), can add a fun, gory touch without being too gruesome. You could also serve them with hush puppies fried eyeballs for an extra creepy side.
- Beverage Pairings: For adults, these mac and cheese cups pair wonderfully with a crisp lager or a dry hard cider. For all ages, a homemade iced tea, sparkling cider, or even a festive candy corn mocktail would be perfect. And for a truly spooky beverage, consider a floating hand Halloween punch!
No matter how you choose to serve them, these Jack-O’-Lantern Mac and Cheese Cups are guaranteed to bring smiles and deliciousness to your Halloween celebrations.
Storage & Reheating
One of the great things about these Jack-O’-Lantern Mac and Cheese Cups is their make-ahead potential and how well they store. This means less stress, and more time for spooky fun!
Storage:
- Refrigerator: Once fully cooled, transfer the mac and cheese cups to an airtight container. They will keep well in the refrigerator for up to 3-4 days. For best results, place parchment paper between layers if stacking to prevent them from sticking together and preserve their cute faces.
- Freezer: These cups freeze beautifully! Allow them to cool completely. Arrange them in a single layer on a baking sheet and freeze until solid (this prevents them from sticking together) – often called “flash freezing.” Once frozen, transfer the solid cups to a freezer-safe zip-top bag or airtight container. They can be stored in the freezer for up to 2-3 months. Freezing them individually makes it easy to pull out just one or a few at a time, depending on your needs. This is a fantastic way to prepare for future Halloween events or quick weeknight meals, similar to how you might freeze zombie meatloaf portions.
Reheating:
The goal when reheating is to warm them through without drying out the cheesy goodness or making the pasta mushy.
- From the Refrigerator (Oven Method – Recommended for Best Texture):
- Preheat your oven to 350°F (175°C).
- Place the chilled mac and cheese cups on a baking sheet.
- Cover loosely with aluminum foil to prevent the tops from drying out and the cheese faces from burning.
- Bake for 10-15 minutes, or until heated through and bubbly. Remove the foil for the last few minutes if you want a slightly crispier top.
- From the Refrigerator (Microwave Method – Quickest Option):
- Place 1-2 mac and cheese cups on a microwave-safe plate.
- Cover with a damp paper towel or microwave-safe lid to help retain moisture.
- Heat on medium power for 30-60 seconds, or until heated through. Be careful not to overheat, as this can make the mac and cheese tough or rubbery.
- From the Freezer (Oven Method – Recommended):
- Preheat your oven to 350°F (175°C).
- Place the frozen mac and cheese cups on a baking sheet.
- Cover tightly with aluminum foil to trap moisture.
- Bake for 20-30 minutes, or until heated through. For the last 5-10 minutes, you can remove the foil to allow the tops to crisp up slightly.
With these storage and reheating tips, you can enjoy your adorable Jack-O’-Lantern Mac and Cheese Cups long after the Halloween festivities are over!
FAQ about Jack-O’-Lantern Mac and Cheese Cups
Here are some common questions you might have about making and enjoying these fun Jack-O’-Lantern Mac and Cheese Cups:
Q1: Can I make these ahead of time for a Halloween party?
A1: Absolutely! These Jack-O’-Lantern Mac and Cheese Cups are perfect for making in advance. You can assemble them completely, including the cheese faces, and then store them covered in the refrigerator for up to 24 hours before baking. This makes your party prep a breeze! Just add a few extra minutes to the baking time to account for starting from cold. You can even freeze them (as described in the Storage section) for longer-term planning, much like preparing easy pumpkin patch dirt cups or components of a easy graveyard taco dip days before an event.
Q2: What’s the best way to get the mac and cheese cups out of the muffin tin without them breaking?
A2: The key is two-fold: really good non-stick spray and adequate cooling time. Make sure you generously spray the muffin tin cups before filling. Once baked, let the cups cool in the tin for at least 5-10 minutes. This allows the cheese to set and firm up, making them much sturdier. A small, thin offset spatula or a butter knife run carefully around the edges can also help release them with ease.
Q3: My cheese sauce is lumpy, what went wrong?
A3: Lumpy cheese sauce usually happens if the roux wasn’t fully incorporated, or if the milk was added too quickly and wasn’t warm enough. When making the roux (flour and butter paste), ensure it cooks for a full minute or two until smooth. When adding the milk, do it gradually, whisking constantly to create a smooth base. Also, ensure your milk is warm, not cold, as this helps prevent lumps and promotes smooth melting of the cheese, just like when making any creamy sauce or dessert such as easy creamy pumpkin cheeseball.
Q4: Can I use different types of pasta?
A4: Yes, absolutely! While elbow macaroni is classic, small pasta shapes like medium shells, ditalini, or even farfalle (bow-tie pasta) can work well. The key is to choose a pasta that’s small enough to fit nicely into the muffin cups and can hold the creamy sauce effectively. Avoid very large pasta shapes.
Q5: What if I don’t have ground mustard?
A5: Ground mustard (or dry mustard powder) is a secret ingredient in many mac and cheese recipes because it heightens the cheesy flavor without adding a distinct mustard taste. If you don’t have it, you can omit it. The mac and cheese will still be delicious, but the ground mustard truly makes the cheese flavor pop in these Jack-O’-Lantern Mac and Cheese Cups.
Final Thoughts on Jack-O’-Lantern Mac and Cheese Cups.
As we wrap up our culinary exploration, it’s clear that these Jack-O’-Lantern Mac and Cheese Cups are far more than just a recipe; they are an invitation to infuse joy, creativity, and delicious comfort into your Halloween season. We’ve journeyed through the simple steps, uncovered the secrets to their perfect texture, and explored endless possibilities for customization and serving.
From the moment you whip up that creamy, dreamy cheese sauce to the final flourish of creating those adorable jack-o’-lantern faces, this recipe promises to be a delightful experience for both the chef and the connoisseurs. It’s a dish that speaks to the heart – nostalgic, undeniably comforting, and brimming with festive charm. Imagine the smiles, the laughter, and the sheer delight as friends and family discover these personal, perfectly portioned Halloween treats. They’re designed to be a conversation starter at any gathering, a whimsical addition to a spooky spread alongside skull veggie platter, or simply a fun, special dinner for your little monsters.
These Jack-O’-Lantern Mac and Cheese Cups truly embody the spirit of Halloween: a little bit spooky, a whole lot of fun, and deliciously memorable. So, whether you’re hosting a grand ghoulish gala or simply enjoying a quiet autumn evening with your loved ones, let these vibrant, cheesy cups be a beacon of culinary joy.
Don’t let this delightful recipe get lost in the digital graveyard! If you loved this idea, please take a moment to save it to your favorite Pinterest board so you can easily find it year after year. We’d also absolutely adore hearing from you! Leave a comment below with your experiences, your favorite variations, or any spooky serving ideas you come up with. And to ensure you never miss out on our latest festive concoctions, comforting classics, and innovative kitchen hacks, be sure to subscribe to our newsletter. Join our community of home cooks who love to make mealtime an adventure! Happy Halloween, and happy cooking!
Jack-O’-Lantern Mac and Cheese Cups
Ingredients
Equipment
Method
- Preheat oven to 375°F (190°C). Lightly spray two 12-cup muffin tins with non-stick cooking spray.
- Cook pasta in salted boiling water until al dente, about 7-9 minutes. Drain and set aside.
- Melt butter over medium heat in a saucepan. Add flour and whisk for 1-2 minutes to form a roux.
- Gradually whisk in warm milk, stirring until thickened (5-7 minutes). Add salt, black pepper, ground mustard, and smoked paprika.
- Reduce heat to low. Stir in 3 cups sharp cheddar, Monterey Jack, and 1/4 cup Parmesan until melted and smooth.
- Mix cooked pasta into cheese sauce until well coated.
- Fill muffin cups three-quarters full with mac and cheese, pressing down gently to compact.
- Create jack-o’-lantern faces on top using finely grated orange cheddar cheese shaped as eyes, nose, and mouth.
- Bake for 15-20 minutes until bubbly and tops are lightly crisp. Remove and cool in tins 5-10 minutes.
- Carefully remove cups from tins and serve warm. Enjoy your festive Halloween treat!