The Sweet Magic of a Pointed Hat: More Than Just a Cupcake
Does the scent of vanilla and melting chocolate instantly transport you back to childhood Halloweens? For me, it’s the smell of anticipation. It’s the sound of the front door creaking open and shut, of little feet rushing down the sidewalk, and the collective, joyful shout of “Trick or Treat!” Here in Bend, Oregon, when the pine-scented air turns crisp and the days grow shorter, my kitchen becomes a little cauldron of its own. My husband, Ethan, gets his camera ready, knowing that soon there will be magic to capture. This year, the magic begins with these Witch Hat Cupcakes. I’ve seen countless recipes online, some incredibly complex and others wonderfully simple. But what I’ve found is that the best recipes aren’t just about the final product; they’re about the memories you bake into them.
These aren’t just cupcakes. They are an invitation to slow down. They are a story you can taste, a tiny edible memory of a season that’s all about playful spookiness and shared delight. We’re not aiming for pastry-chef perfection here. We are chasing connection, one chocolate cookie and swirl of frosting at a time. The first time I made these, my daughter Olivia, with her face dusted in cocoa powder, announced that each hat needed its own personality. James, my youngest, was more interested in quality control, testing every fallen sprinkle. That’s the heart of this recipe. It’s a wonderfully messy, perfectly imperfect project that brings everyone to the kitchen counter. It’s one of my favorite DIY Halloween Cupcakes, a simple joy that tastes like nostalgia and feels like home. This Easy Witch Hat Cupcakes Recipe is more than a dessert; it’s an experience waiting to happen in your kitchen.
Why You’ll Love This Witch Hat Cupcakes Recipe
There’s a special kind of alchemy that happens when you combine simple ingredients to create something truly magical. These Witch Hat Cupcakes are the perfect example of that kitchen chemistry. They’re a cornerstone of our family’s Halloween traditions, and I have a feeling they’ll become one of yours, too. Ethan loves photographing them; their whimsical shapes and vibrant colors are a dream to capture. But beyond their picture perfect charm, there’s a deeper reason why these treats are so beloved by our readers and our family. They represent everything I cherish about home cooking: simplicity, creativity, and the joy of sharing. This is one of those foundational Halloween Dessert Ideas that everyone can get excited about, from the littlest goblins to the grown up ghouls.
Here’s why you’ll find yourself coming back to this recipe every October:
- Incredibly Easy and Fun for All Ages: This is the ultimate family baking project. The steps are simple enough for little hands to help with, from unwrapping the chocolate kisses to placing them on the frosted cookies. There’s no complicated technique, just pure, creative fun. You don’t need any fancy equipment. If you can stir batter and squeeze a piping bag (or even just spread frosting with a knife), you can make these haunt-acular treats. It’s a recipe that builds confidence in young bakers and reminds us that the best moments are often the messiest.
- Classic Flavors Everyone Adores: We start with a moist, deeply flavorful vanilla cupcake, a true crowd pleaser that provides the perfect canvas. The rich, creamy chocolate frosting adds a layer of indulgence, and the hat itself—a crisp chocolate cookie topped with a solid milk chocolate kiss—offers a delightful textural contrast. I’ve found that even my friends who claim not to have a sweet tooth can’t resist the simple perfection of this classic trio of flavors. It’s familiar, it’s comforting, and it tastes exactly like a celebration should.
- Customizable and Creative: While I’ve given you a classic green and orange color scheme, these cupcakes are a blank slate for your imagination. Want to make a coven of colorful witches? Use purple, black, or even pink frosting. You can experiment with different sprinkles for the hat’s “buckle” or even try different cookie and chocolate combinations. This flexibility makes it a fantastic option if you’re looking for unique Halloween Dessert Ideas. You could even turn them into friendly wizard hats with blue frosting and star sprinkles. For a different but equally spooky treat, consider making some Witch Finger Cookies to serve alongside them.
- Perfect for Parties and Gifting: These cupcakes are visually stunning and travel well, making them ideal for school parties, potlucks, or as a sweet gift for neighbors. Imagine arriving at a Halloween gathering with a platter of these whimsical treats. They are an instant conversation starter and a guaranteed hit. They look impressive, but only you will know how delightfully simple they were to create. They’re a thoughtful, homemade touch that stands out among store bought candies. They also pair wonderfully with savory snacks like my Easy Mummy Hot Dogs for a complete party spread.
Ingredients for Witch Hat Cupcakes
The magic of these cupcakes lies in their simplicity. We’re using pantry staples to create something extraordinary. I believe in using whole ingredients that you can feel good about, but this recipe is also wonderfully flexible.
For the Vanilla Cupcakes:
- 1 ½ cups all purpose flour
- 1 ½ teaspoons baking powder
- ¼ teaspoon salt
- ½ cup unsalted butter, softened to room temperature
- 1 cup granulated sugar
- 2 large eggs, room temperature
- 1 teaspoon pure vanilla extract
- ¾ cup whole milk, room temperature
For the Chocolate Frosting & Witch Hats:
- 1 cup unsalted butter, softened
- 2 ½ cups powdered sugar
- ½ cup unsweetened cocoa powder
- 2 to 3 tablespoons heavy cream or milk
- 1 teaspoon vanilla extract
- Pinch of salt
- Green and orange food coloring (gel works best)
- 24 thin chocolate wafer cookies (like Nabisco Famous Chocolate Wafers)
- 24 Hershey’s Kisses, unwrapped
- Halloween sprinkles or a small tube of yellow or orange decorating gel for the buckle
Substitutions:
- Gluten Free: You can substitute the all purpose flour with a 1 to 1 gluten free baking flour blend.
- Dairy Free: Use a plant based butter substitute and a dairy free milk like almond or oat milk for the cupcakes and frosting.
- Time Saver: If you’re short on time, a good quality boxed vanilla cake mix works beautifully. The real magic is in the decorating! This transforms it into one of the quickest DIY Halloween Cupcakes you can make.
How to Make Witch Hat Cupcakes
There’s a quiet rhythm to baking that I find so soothing. It starts with the gentle click of the oven preheating and the soft crinkle of a cupcake liner. This recipe is a dance of simple steps, a melody of mixing and piping that ends in a chorus of delighted smiles. So, put on some music, take a deep breath, and let’s create some edible magic together. Remember, we’re not chasing perfection; we’re chasing connection.
Step-by-Step Instructions
- Prepare for the Magic: First, preheat your oven to 350°F (175°C). Line a standard 12 cup muffin tin with festive Halloween cupcake liners. This small step always makes me smile; it’s like setting the stage for the fun to come. In a medium bowl, whisk together the all purpose flour, baking powder, and salt. This step is more important than it seems; it ensures your cupcakes rise evenly and have a tender crumb.
- Cream the Butter and Sugar: In the bowl of a stand mixer fitted with the paddle attachment, or in a large bowl with a hand mixer, beat the softened butter and granulated sugar on medium high speed until light and fluffy. This should take about 3 to 4 minutes. You’re whipping air into the mixture, which is the secret to a light cupcake. The color will lighten from a pale yellow to nearly white.
- Add the Eggs and Vanilla: Add the eggs one at a time, beating well after each addition until fully incorporated. Scrape down the sides of the bowl as needed to make sure everything is mixing evenly. The mixture might look a little curdled at this point, but don’t worry, it will all come together. Stir in the vanilla extract. Its warm fragrance is the first promise of the deliciousness to come.
- Combine Wet and Dry: Reduce the mixer speed to low. Add the flour mixture in three parts, alternating with the milk in two parts, beginning and ending with the flour. Mix only until the last streaks of flour disappear. Overmixing develops the gluten and can lead to tough cupcakes, so be gentle here. The batter should be smooth and have a lovely, thick consistency.
- Bake the Cupcakes: Carefully divide the batter evenly among the 12 prepared cupcake liners, filling each about two thirds full. An ice cream scoop is a wonderful tool for this, ensuring each cupcake is the same size. Bake for 18 to 22 minutes, or until a wooden skewer inserted into the center comes out clean. Let the cupcakes cool in the pan for a few minutes before transferring them to a wire rack to cool completely. This is crucial—never frost a warm cupcake unless you want a soupy mess!
- Whip Up the Chocolate Frosting: While the cupcakes cool, let’s make the frosting. In your mixing bowl, beat the softened butter until creamy and smooth, about 2 minutes. Sift in the powdered sugar and cocoa powder to avoid lumps, then beat on low speed until combined. Increase the speed to medium high and beat for another 3 minutes until light and fluffy. Add the vanilla, salt, and 2 tablespoons of cream, mixing until smooth. If the frosting seems too stiff, add the remaining tablespoon of cream.
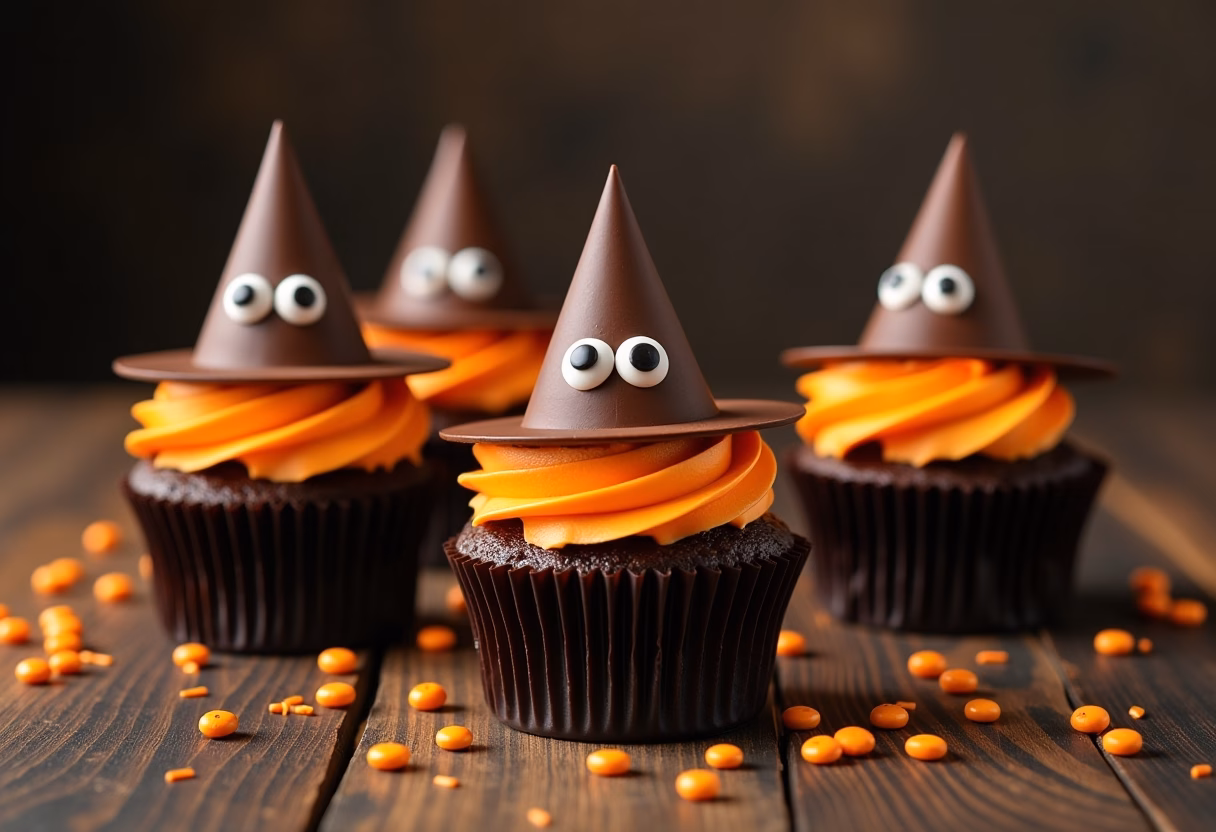
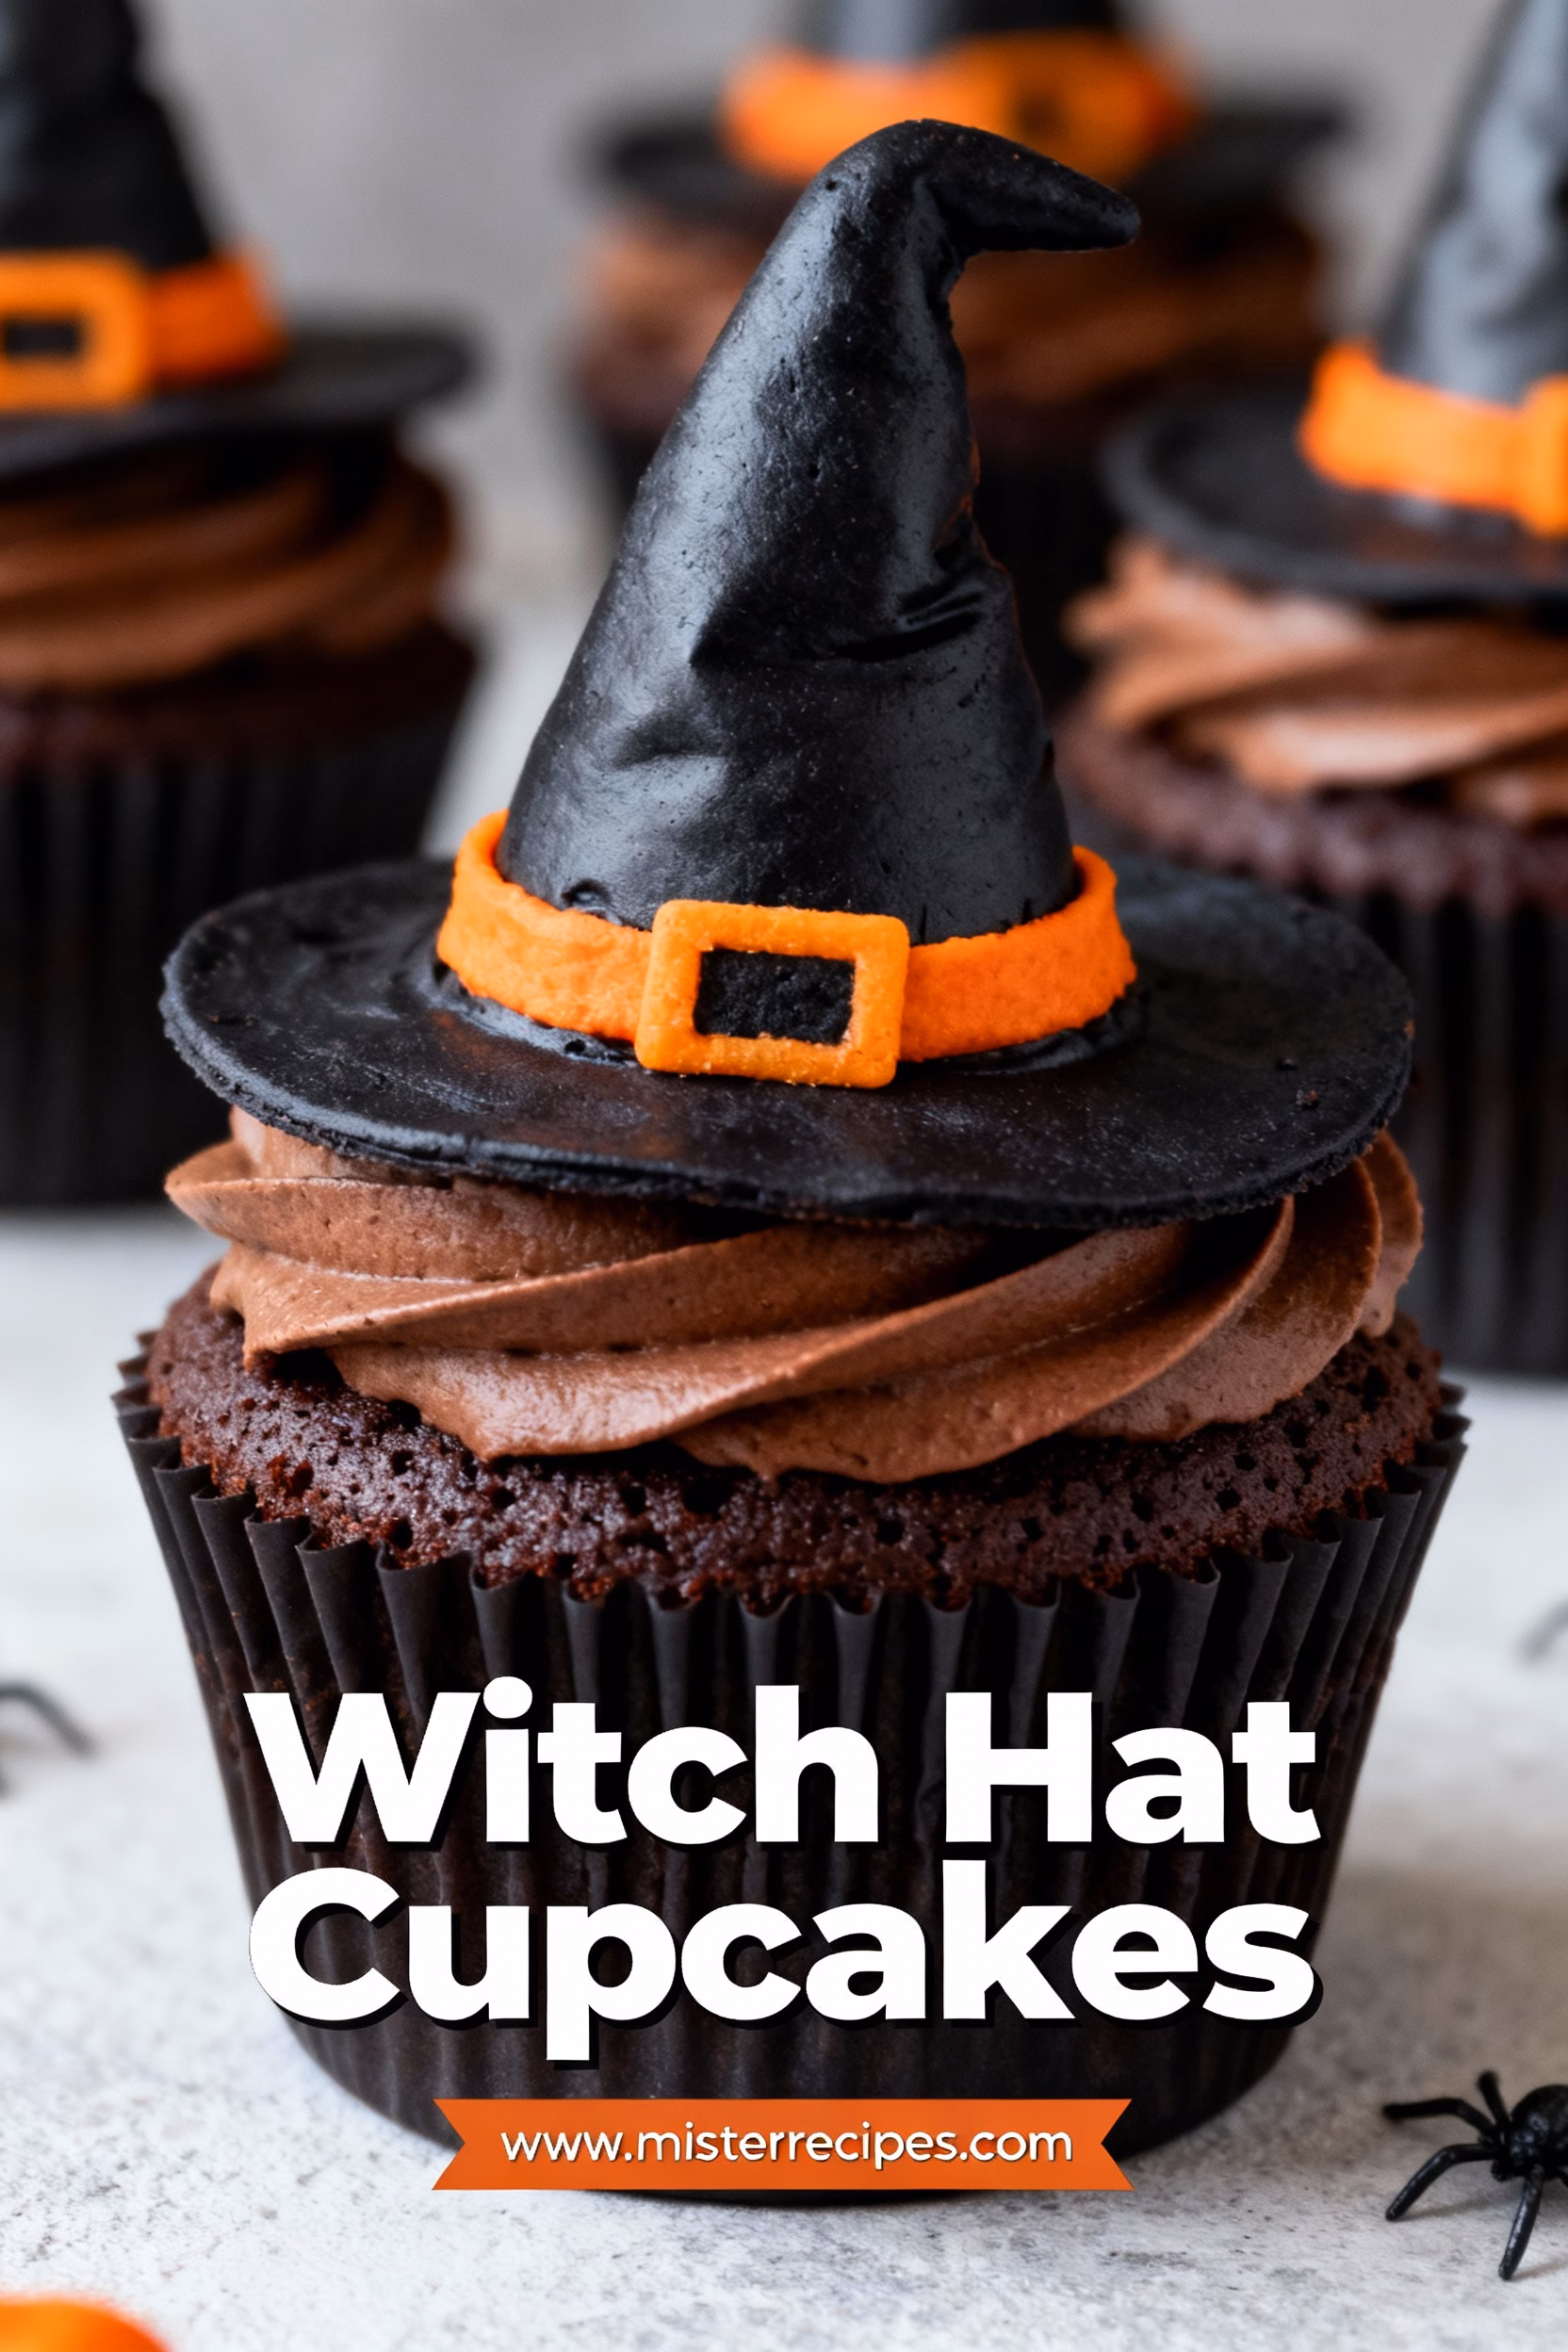
- Create the Witch Hat Toppers: This is where the real fun begins! Set aside about ½ cup of the chocolate frosting. Divide the remaining frosting into two bowls. Tint one bowl with green food coloring and the other with orange. Now, let’s build the hats. Spread a small amount of the reserved (uncolored) chocolate frosting onto the center of each chocolate wafer cookie. This acts as the glue. Gently press a Hershey’s Kiss onto the frosting. Voila! You have a tiny, perfect witch hat.
- Assemble Your Coven: Once the cupcakes are completely cool, frost them with the green and orange frosting. You can use an offset spatula for a rustic look or pipe it on with a star tip for a fancier swirl. Place one finished Witch Hat on top of each frosted cupcake. For the final touch, use a tiny bit of decorating gel or a few carefully placed sprinkles to create a “buckle” on the band of frosting where the cookie meets the kiss.
Pro Tips & Variations
Over the years, I’ve made these Witch Hat Cupcakes dozens of times, and I’ve learned a few little secrets that make the process smoother and the results even more delightful. Cooking is a conversation, and these tips are my way of sharing what the ingredients have taught me. My kitchen in Bend has seen many batches, some perfect, some a little lopsided, but all of them made with love.
- The Room Temperature Rule: I know it’s tempting to pull your eggs, butter, and milk straight from the fridge, but please don’t skip the step of bringing them to room temperature. It’s the single most important factor for a smooth, emulsified batter, which leads to a perfectly tender and moist crumb. Cold ingredients can cause the butter to seize up, resulting in a dense, heavy cupcake. Just set them on the counter for about 30 to 60 minutes before you begin. It’s a small act of patience that pays off beautifully.
- The Secret to Perfect Frosting: For the creamiest, dreamiest chocolate frosting, always sift your powdered sugar and cocoa powder. This removes any tiny lumps and makes the final texture incredibly smooth and luscious. Also, don’t be afraid to whip it! Beating the butter first, and then the final frosting, for a few extra minutes incorporates air and makes it wonderfully light and fluffy. If your frosting seems too stiff, add milk or cream one teaspoon at a time. If it’s too thin, add more powdered sugar a tablespoon at a time until you reach the perfect consistency.
- Hat Assembly Line: Decorating is the most joyful part, but it can get messy if you don’t have a plan. I like to set up a little assembly line. Line a baking sheet with parchment paper. Lay out all your chocolate wafer cookies. Place your unwrapped Hershey’s Kisses in a bowl. Have your reserved chocolate frosting and a small knife or spatula ready. This way, you can create all 24 hats efficiently without getting chocolate everywhere. It turns a potentially chaotic step into a mindful, rhythmic process. For some truly inspiring witch cupcake decorating tips, the detailed guide from Simply Recipes is a fantastic resource.
- Get Creative with Variations:
- Gingerbread Witch Hat Cupcakes: For a warm, spicy twist perfect for a chilly autumn day, add 1 teaspoon of ground ginger, ½ teaspoon of cinnamon, and a pinch of cloves to your dry ingredients. The spicy cupcake with the rich chocolate frosting is a match made in Halloween heaven.
- Frosting Free Halloween Treats: If you’re not a fan of heavy frosting, you can make a simple chocolate ganache instead. Gently heat ½ cup of heavy cream until it just begins to simmer, then pour it over 4 ounces of chopped semi sweet chocolate. Let it sit for 5 minutes, then whisk until smooth. Let it cool and thicken slightly before dipping the tops of your cupcakes. It’s an elegant and less sweet alternative.
- Monster Cupcakes Mashup: Why stop at witches? Use the same vanilla cupcake base and green frosting to create other creatures. Add some candy eyeballs and a chocolate sprinkle mouth to make Frankenstein’s monster, or use white frosting and a black gel pen to draw ghostly faces. Let your imagination run wild! These are fantastic Halloween dessert ideas for a mixed-monster mash party.
Serving Suggestions
A great recipe is like a beloved friend—it plays well with others. While these Witch Hat Cupcakes are certainly the star of the show, they shine even brighter when surrounded by a supporting cast of other spooky and delicious treats. When I plan a Halloween get together, I love creating a table that tells a story, a landscape of flavors and colors that invites everyone to gather and graze. Ethan always sets up a little photo booth corner nearby, because when the food looks this fun, people can’t help but want to capture the moment.
Here are a few of my favorite ways to serve these Witch Cupcakes:
- A Spooky Sweets Board: Arrange the cupcakes on a large platter or wooden board. In the spaces between, create little pockets of other festive goodies. Think a bowl of candy corn, gummy worms, and chocolate eyeballs. Add a pile of my gooey Monster Rice Krispie Treats cut into squares, and a few spooky Zombie Popcorn Mix. The mix of colors, textures, and shapes creates a visually stunning centerpiece that’s also a communal dessert experience.
- Savory Balance: To cut through the sweetness, it’s always a good idea to have some savory bites on hand. These cupcakes are the perfect finale after a warm bowl of chili or some fun, themed appetizers. I often serve them alongside Spider Web Pizzas or a platter of Jalapeno Popper Mummies. The contrast between the savory, spicy starters and the sweet, whimsical dessert is pure comfort.
- Witches’ Brew Pairing: What’s a witch-themed treat without a proper brew? Serve these cupcakes with a warm, spiced apple cider simmered with cinnamon sticks and star anise. For the adults, a dark and stormy cocktail or a pumpkin spice liqueur feels wonderfully on theme. For the kids, a “potion” made from green Hawaiian Punch mixed with lemon lime soda and a few gummy worms dropped in is always a massive hit.
- Themed Dessert Table: If you’re going all out for a party, create a full dessert table featuring a variety of creative Halloween cupcake designs. You can find amazing inspiration for different themes, like spooky ghosts or graveyard scenes, to complement your witch hats. A curated gallery like the one on Delish often sparks my creativity for building a cohesive and impressive display.
Storage & Reheating
These cupcakes are best enjoyed the day they are made, when the frosting is soft and the cupcake is perfectly moist. However, life happens, and sometimes you need to bake ahead or save leftovers. Here’s how to keep your little witches looking and tasting their best.
Storing:
- Room Temperature: If you plan to serve them within 24 hours, you can store the fully assembled cupcakes in an airtight container at room temperature. A tall container is best to avoid smushing the hats.
- Refrigerator: For longer storage, you can keep them in an airtight container in the refrigerator for up to 3 days. The butter in the frosting and cupcakes will firm up, so I recommend letting them sit at room temperature for about 20 to 30 minutes before serving to allow them to soften. The cookie on the hat may soften slightly in the fridge due to the moisture, but they will still be delicious.
Freezing:
- You can freeze the unfrosted cupcakes with great success. Once they have cooled completely, place them in a single layer on a baking sheet and freeze until solid. Then, transfer them to a freezer safe bag or container. They will keep for up to 2 months.
- I do not recommend freezing the fully assembled cupcakes, as the cookie and Hershey’s Kiss can become discolored or develop an unpleasant texture upon thawing. It’s best to frost and decorate them after you’ve thawed the cupcakes.
Reheating/Thawing:
- To thaw frozen cupcakes, simply take them out of the freezer and let them sit on the counter for a couple of hours until they reach room temperature. Then, you can proceed with frosting and decorating as if they were freshly baked.
FAQ about Witch Hat Cupcakes
Can I make these cupcakes ahead of time?
Absolutely! To save time, you can bake the vanilla cupcakes up to two days in advance. Store them in an airtight container at room temperature. You can also make the frosting ahead of time and store it in an airtight container in the refrigerator for up to a week. Just be sure to let it come to room temperature and give it a good whip with your mixer to restore its fluffy texture before using. I recommend assembling the hats and frosting the cupcakes on the day you plan to serve them for the best texture.
What’s the best food coloring to use for the frosting?
I highly recommend using gel food coloring. It’s much more concentrated than liquid food coloring, so you only need a tiny amount to achieve vibrant green and orange hues. Using too much liquid food coloring can alter the consistency of your frosting, making it too thin or watery. You can find gel food coloring at most craft stores or in the baking aisle of larger grocery stores.
My witch hats keep falling off the cupcakes! What can I do?
This usually happens for one of two reasons: either the frosting is too soft, or the cupcake has a very high dome. To fix this, make sure your frosting is a good, stiff consistency. If it feels too loose, you can beat in a little more powdered sugar. When you frost the cupcakes, try to create a flatter surface on top. If your cupcakes baked with a significant dome, you can use a serrated knife to carefully level the tops before frosting. This creates a stable base for your Witch Hat to sit on.
Are there other cookie options for the hat brim?
Yes, you can get creative here! While thin chocolate wafers are classic, you could also use chocolate sandwich cookies (like Oreos, with the filling scraped out), small, thin chocolate chip cookies, or even cookies you’ve baked yourself. The key is to choose a cookie that is relatively flat and sturdy enough to hold the chocolate kiss. This is a great way to use up leftover cookies and create more DIY Halloween Cupcakes.
How can I involve my kids in making this recipe?
This is one of the best recipes for little helpers! They can help with measuring dry ingredients, unwrapping the Hershey’s Kisses, and placing the sprinkles. Older kids can help with mixing the batter and even piping the frosting with supervision. My favorite part to do with Olivia and James is the hat assembly line. Giving them a specific job, like being in charge of placing the kisses on the cookies, makes them feel so proud and involved. It’s a wonderful way to create those sweet kitchen memories.
Final Thoughts on Witch Hat Cupcakes
In the end, this recipe is about so much more than just sugar and flour. It’s about the stillness of a late afternoon in October, with golden light slanting through the kitchen window. It’s about the sound of my children’s laughter as they debate which sprinkle color makes the best buckle. It’s about Ethan, leaning against the counter, camera in hand, capturing the fleeting, beautiful mess of it all. These Witch Hat Cupcakes are a vessel for those moments. They are a tangible piece of the magic we create for our families during this enchanting season.
I believe that a good story, like a good soup, needs time to simmer. And a good recipe, like a good story, should make you feel something. My hope is that when you bake these cupcakes, you feel a sense of joy, of creative play, and of connection to the people you’re sharing them with. I don’t chase perfection in food, I chase connection. And there is so much connection to be found in the simple act of baking together.
If you make these Witch Hat Cupcakes, I would be overjoyed to hear about it. Please leave a comment below and let me know how they turned out, or share a photo on social media and tag us. And if you loved this recipe, please consider saving it to your favorite Pinterest board so you can find it again next year. Thank you for welcoming me into your kitchen. Happy Halloween
Witch Hat Cupcakes
Ingredients
Equipment
Method
- Preheat your oven to 350°F (175°C). Line a standard 12-cup muffin tin with festive Halloween cupcake liners.
- In a medium bowl, whisk together the flour, baking powder, and salt. Set aside.
- In the bowl of a stand mixer (or large bowl with a hand mixer), beat the softened butter and granulated sugar on medium-high until light and fluffy, about 3–4 minutes.
- Add the eggs, one at a time, beating well after each. Scrape down the sides of the bowl. Stir in the vanilla extract.
- Reduce the mixer speed to low. Add the flour mixture in three parts, alternating with the milk in two parts, beginning and ending with flour. Mix until just combined.
- Divide the batter evenly into the muffin tin, filling each cup about two-thirds full. Bake for 18–22 minutes, or until a skewer inserted in the center comes out clean.
- Allow cupcakes to cool in the pan for a few minutes, then transfer to a wire rack to cool completely before frosting.
- While the cupcakes cool, make the frosting: Beat the softened butter until creamy. Sift in powdered sugar and cocoa powder, then beat until smooth. Add vanilla, salt, and 2 tablespoons of cream. Beat until light and fluffy. Add more cream if needed for desired consistency.
- Divide the frosting into three portions, keeping one plain and tinting the others green and orange with gel food coloring.
- To make the witch hats: Place a dab of plain frosting on the center of each chocolate cookie. Press a Hershey’s Kiss on top to create the hat.
- Once the cupcakes are fully cooled, frost each one with green and orange frosting using a spatula or piping bag.
- Place one witch hat on top of each frosted cupcake. Add a small dab of decorating gel or sprinkles as the hat buckle.