
The Easiest, Most Luxurious Christmas Red Velvet Cheesecake with Oreo Crust
Do you ever stop to think about why certain desserts become essential to the holidays? For me, it usually comes down to color, texture, and the kind of nostalgia that hits you right in the gut. Christmas morning at our house is always a whirlwind of wrapping paper and Adams (12) trying to guess what’s in the biggest box. But the previous night, Christmas Eve, that’s when the truly essential magic happens in the kitchen. This year, I knew I needed a showstopper. Something rich, beautifully red, and decadent enough to withstand the competition from Emily’s famous sugar cookies.
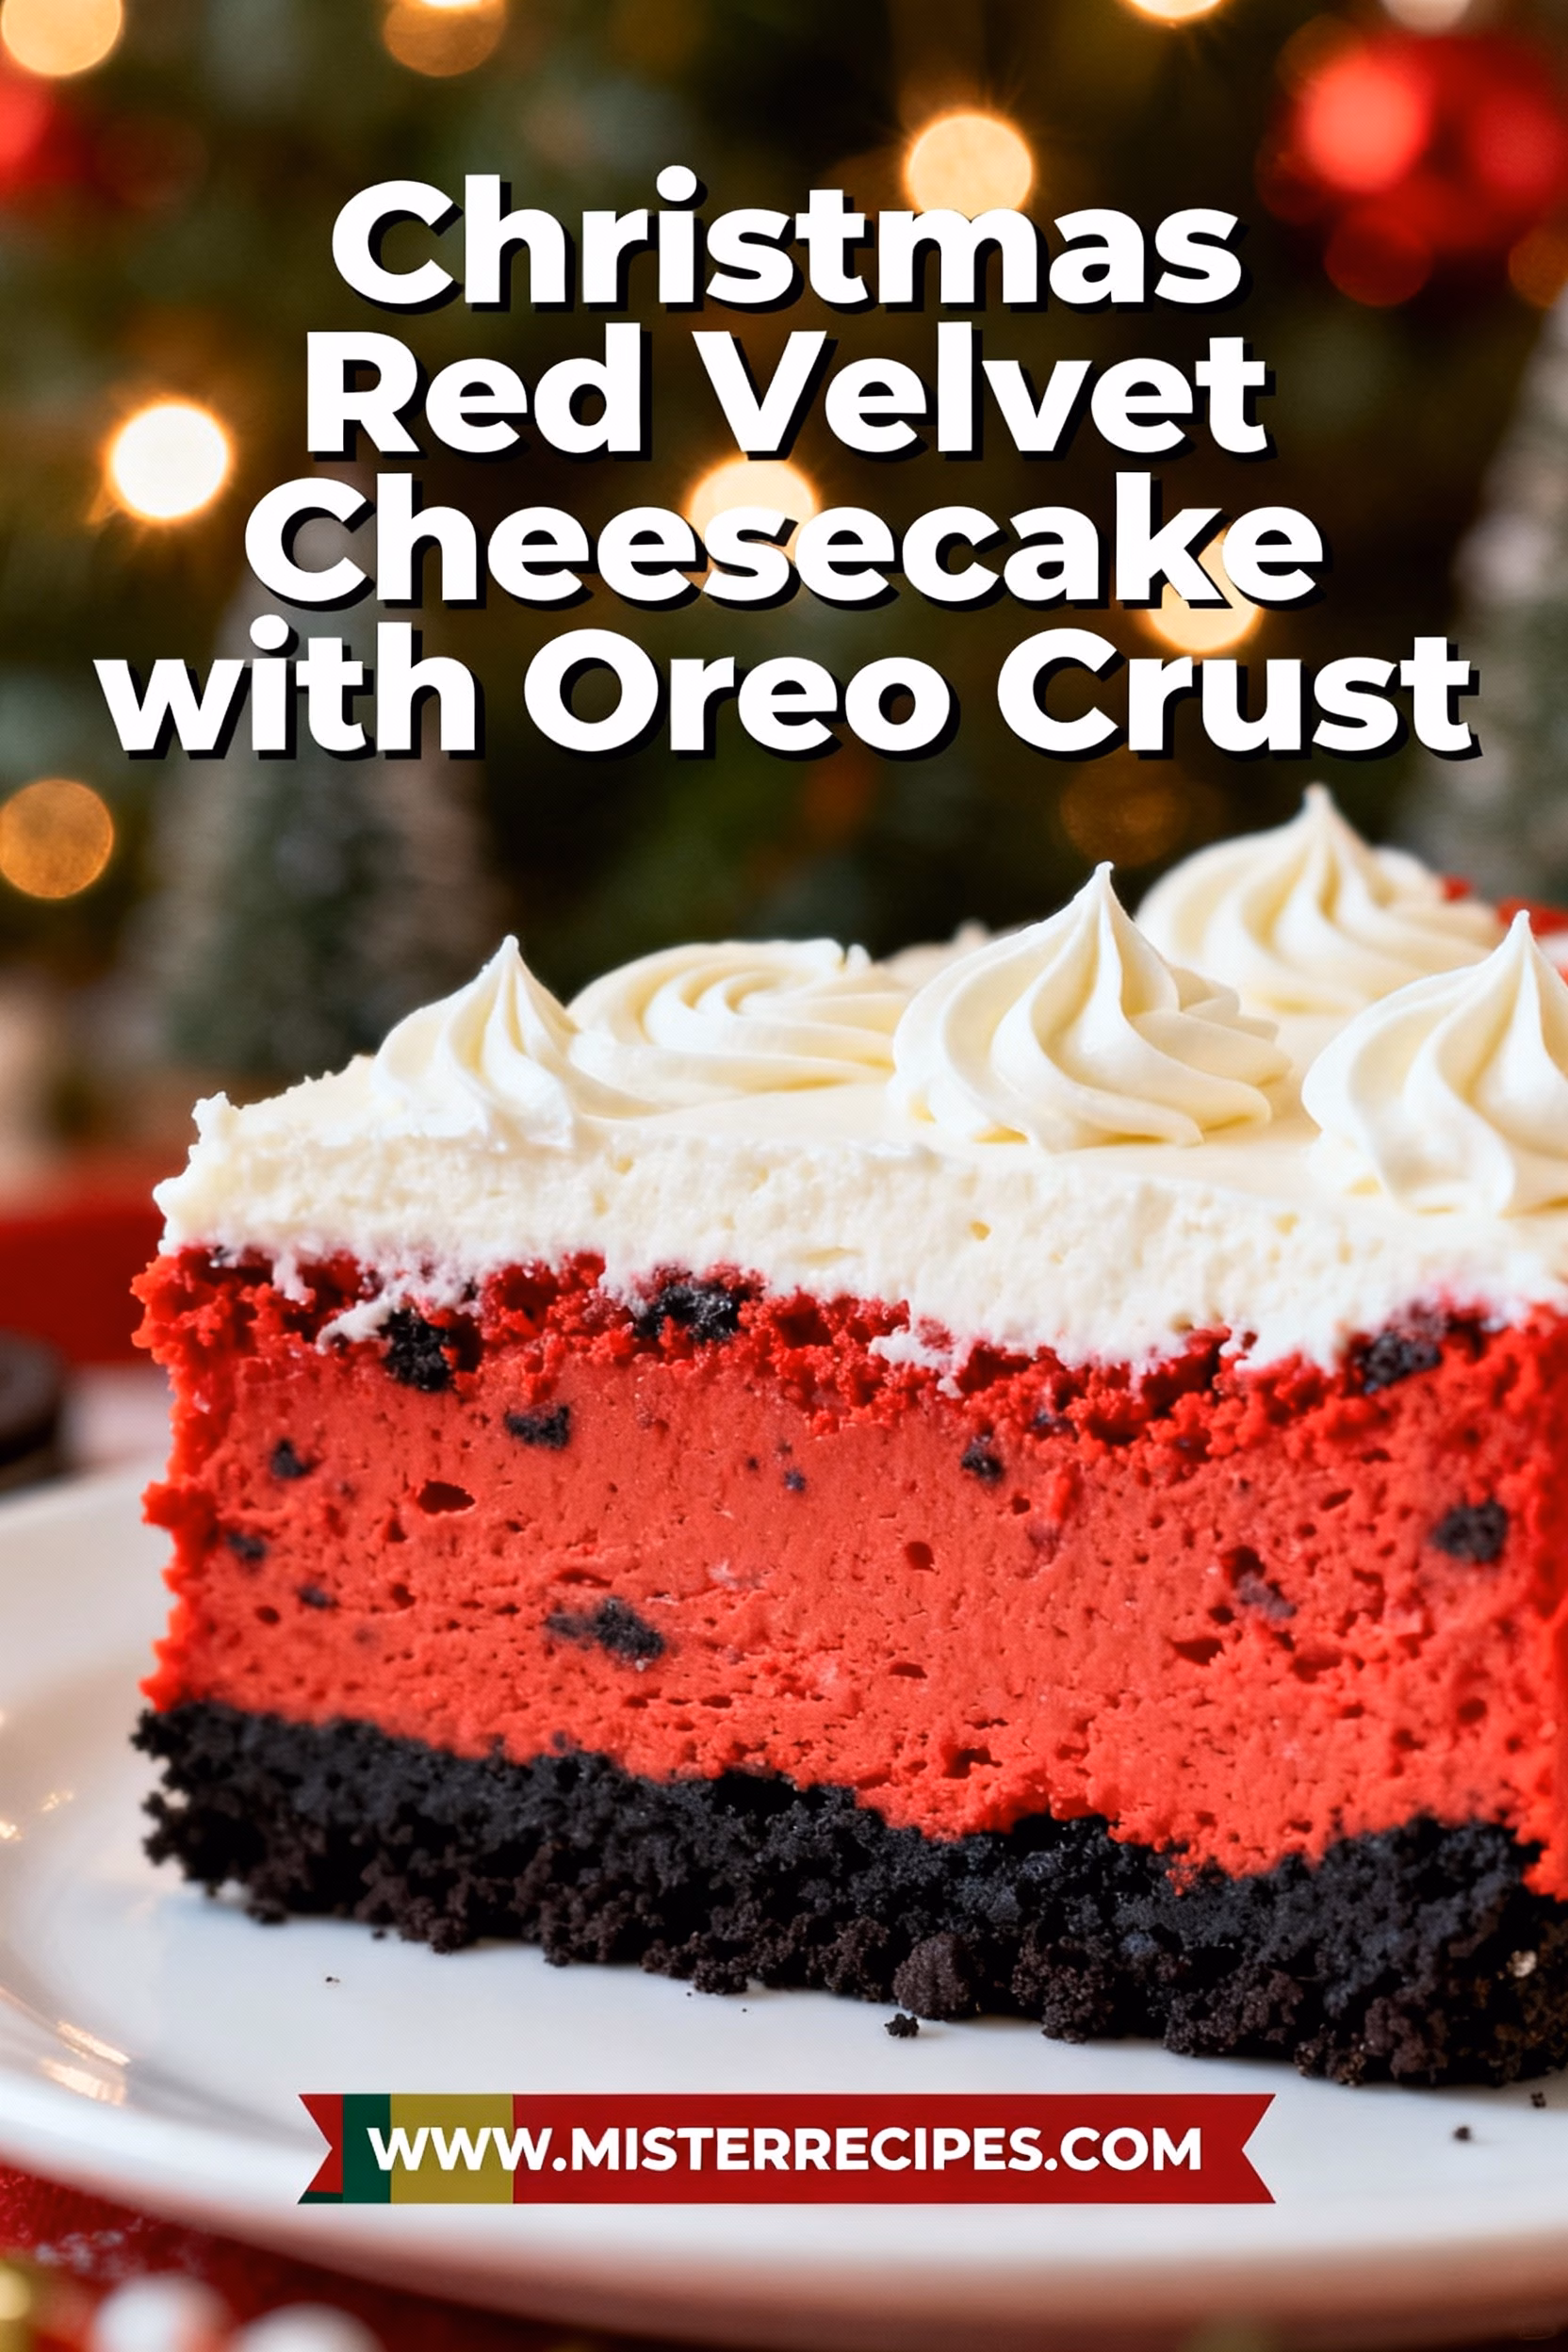
That’s how this perfect Christmas Red Velvet Cheesecake with Oreo Crust was born. It merges the deep, tangy cocoa flavor of a classic Red Velvet Cake with the velvety smoothness of a New York-style cheesecake. And that crust? We skipped the usual graham cracker routine and went straight for the chocolate heaven of an Oreo crust cheesecake. It’s the perfect backdrop for that striking red filling, making it a spectacular Christmas dessert recipe. If you’ve been searching for the best red velvet cheesecake recipe, one that is easy to manage (yes, even the dreaded water bath!) and delivers maximum flavor, grab your apron! We are going to make some happy memories tonight.
I remember my Grandmother, bless her heart, always told me, “Benjamin, if you can make a good crust, you’ve conquered half the dessert.” While she was usually talking about her Texas BBQ peach cobbler, the philosophy holds true here. This Homemade Red Velvet Cheesecake recipe is engineered for success, turning out a deep, moist, and perfectly baked cheesecake that screams holiday cheer. You’ll see why this is going to replace a certain traditional yule log on our table this year.
Why You’ll Love This Christmas Red Velvet Cheesecake with Oreo Crust
We all need those anchor recipes during the stressful holiday season, the ones we know will turn out perfectly every time, taste incredible, and look great on the sideboard. This Easy Red Velvet Cheesecake is just that recipe. It’s got everything the family needs encapsulated in one beautiful, festive dessert. Even nine-year-old Jana, who is usually focused on the magical candy cane cookies recipe, has declared this her new favorite.
It’s the Ultimate Holiday Showstopper
- Stunning Visual Appeal: The contrast between the jet-black Oreo crust and the dramatic, rich red cheesecake filling is breathtaking. When topped with a delicate cream cheese frosting swirl, it instantly elevates your dessert table, making it ideal for special occasions like Christmas or even Valentine’s Day.
- Deep, Complex Flavor: Traditional Red Velvet Cheesecake recipe relies on a slight tang provided by buttermilk or sour cream, balanced with the subtle richness of cocoa powder. This recipe uses sour cream in the filling and a touch of vinegar, activating that authentic red velvet flavor without it tasting simply like chocolate.
- Simple, Foolproof Baking: While cheesecake can intimidate some cooks, I’ve simplified the process. We use the water bath cheesecake method, but I include clear instructions on how to use a heavy-duty foil barrier to keep the water out, guaranteeing a crack-free surface. This means a perfect, creamy texture every single time.
- Freezer-Friendly Flexibility: Need to bake ahead? This is a fantastic option. You can make this Red Velvet Cheesecake days, or even weeks, in advance and then follow the simple Red Velvet Cheesecake freezer instructions. You won’t even notice the difference once it’s thawed and garnished.
- The Perfect Texture Combination: The Oreo crust provides a satisfying crunch and deep chocolate flavor, which transitions perfectly into the smooth, dense cream cheese filling. This is a textural masterpiece that is far superior to standard cake-based red velvet desserts.
When you combine the ease of assembly with the sheer joy of watching people bite into this bright red treat, you realize that cooking truly is about making people happy. This recipe captures the essence of that simple philosophy.
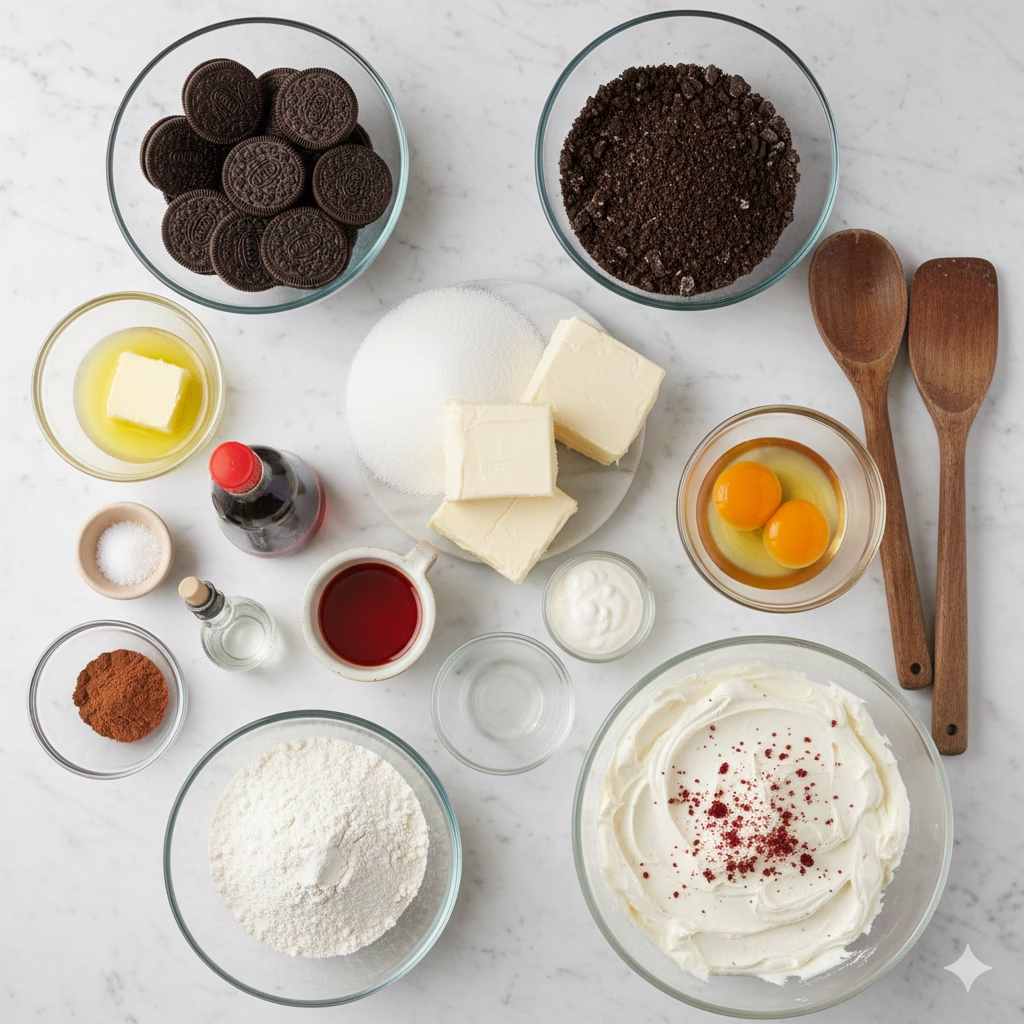
Ingredients for Christmas Red Velvet Cheesecake with Oreo Crust
Here’s what you need to make the ultimate holiday desert. Remember, high-quality full-fat cream cheese is crucial for a dense, delicious cheesecake.
For the Oreo Crust:
- 2 1/2 cups Oreo cookies (about 30 cookies, whole, including the filling)
- 6 tablespoons unsalted butter, melted
- 1/4 teaspoon sea salt (optional, but enhances flavor!)
For the Red Velvet Cheesecake Filling:
- 4 (8 oz) blocks of cream cheese (32 oz), softened to room temperature
- 1 1/2 cups granulated sugar
- 1/2 cup sour cream (full-fat is best, or you can substitute with heavy whipping cream)
- 4 large eggs, room temperature
- 2 tablespoons unsweetened cocoa powder (Dutch-process preferred for depth)
- 1 teaspoon pure vanilla extract
- 1 teaspoon white vinegar (this is traditional for activating the red velvet flavor!)
- 1–2 tablespoons Red food coloring (gel food coloring provides the most vibrant red)
- 1 tablespoon all-purpose flour
- Pinch of sea salt
Optional Frosting & Garnish:
- Classic cream cheese frosting (use your favorite recipe or see my quick version in the tips below)
- Whipped cream topping or additional crushed Oreos.
How to Make Christmas Red Velvet Cheesecake with Oreo Crust
Even though this cake looks fancy, the process for How to make red velvet cheesecake is straightforward. Follow these steps for a perfectly smooth, non-cracked, professional-grade dessert. Remember the mantra: room temperature ingredients blend better!
Step-by-Step Instructions
- Prep the Pan and Preheat: Preheat your oven to 350°F (175°C). Use a 9-inch springform pan. To prepare for the water bath method, wrap the outside bottom and sides of the springform pan tightly with heavy-duty aluminum foil, creating a barrier that goes up past the rim. This prevents water seepage during baking.
- Create The Oreo Crust: Take the entire Oreo cookies (filling included) and pulse them in a food processor until you have fine crumbs. Pour the crumbs into a medium bowl and mix them thoroughly with the melted butter and salt until they resemble wet sand. Press the mixture firmly into the bottom and slightly up the sides (about 1 inch) of the prepared springform pan. Use the bottom of a measuring cup to compact it tightly.
- Pre-Bake the Crust: Bake the Oreo crust for 8–10 minutes. This helps set the crust and prevents it from getting soggy. Remove from the oven and set aside to cool while you make the filling. Reduce the oven temperature to 325°F (160°C).
- Mix the Cheesecake Base: In a large mixing bowl or the bowl of a stand mixer fitted with the paddle attachment, beat the softened cream cheese (32 oz) on medium-low speed until it is completely smooth and lump-free (about 3 minutes). Scrape down the bowl frequently. Add the granulated sugar and mix well until combined.
- The Red Velvet Flavor Layer: In a separate small bowl, whisk together the cocoa powder, flour, and salt. Add this cocoa mixture to the cream cheese mixture, beating until just incorporated. Next, add the sour cream, vanilla extract, and the critical white vinegar. Finally, stir in the red food coloring until you achieve a bright, uniform red velvet shade.
- Add Eggs Gently: Add the eggs one at a time, mixing on very low speed, only until each egg is just combined. **Overmixing the eggs is the reason most cheesecakes crack.** The mixture should be velvety and thick. Adams loves watching this part because the color is so vibrant, it looks like melting candy.
- Fill and Prepare the Water Bath: Pour the creamy Red Velvet Cheesecake filling over the cooled Oreo crust. Place the foil-wrapped springform pan inside a larger roasting pan. Carefully pour boiling water into the roasting pan, making sure the water level comes about halfway up the sides of the springform pan.
- Bake The Cheesecake: Bake at 325°F (160°C) for 60 to 75 minutes. The center should still have a slight jiggle (like thick jello) when you gently tap the pan, but the edges should be set.
- Cool Gradually: Turn the oven off, leave the cheesecake inside, and crack the oven door open slightly using a wooden spoon. Let the cheesecake cool in the oven for 1 hour. This slow cooling prevents cracking.
- Chill and Serve: Remove the cheesecake from the water bath and the foil. Allow it to cool completely on a wire rack before transferring it to the refrigerator. Chill for at least 6 hours, or ideally overnight (this is crucial for setting). Once chilled, apply your garnish, like a simple cream cheese frosting swirl, and share your beautiful Red Velvet Cheesecake with Oreo Crust!
Pro Tips & Variations for Your Holiday Cheesecake
Over the years, cooking for Emily and the kids, I’ve picked up a few tricks that simplify the cheesecake process and help customize this amazing dessert for any dietary need. Getting that perfect, crack-free surface is all about patience and precision.
1. Temperature Control is Key
- Using Room Temperature Ingredients: This tip is worth repeating: ensure your cream cheese, eggs, and sour cream are at true room temperature. Cold ingredients will leave lumps in your filling, which you will then be tempted to beat out, leading to overmixing and cracks.
- The Water Bath Secret: The water bath cheesecake method provides a gentle, moist heat that ensures even baking and prevents the top from drying out and cracking. Use heavy-duty foil for wrapping your springform pan. I personally prefer triple-wrapping the outside for peace of mind.
2. Achieving Vibrant Red Velvet Color
- Gel vs. Liquid Coloring: If you want that deep, dramatic red that makes this a perfect Christmas dessert, use gel food coloring. Liquid coloring adds too much moisture and dulls the color. Start with one tablespoon of gel coloring, mixing, and add more until you reach your desired saturation.
- A Note on Natural Coloring: For those who prefer a more natural approach, you can try using boiled beet puree in place of commercial food coloring. Just know the final result will be more of a deep brownish-maroon than a vibrant crimson.
3. Serving and Garnishing Suggestions
- The Best Topping: While a plain Homemade Red Velvet Cheesecake is divine, the classic pairing must be a tangy, sweet cream cheese frosting. Use a piping bag to create simple swirls or rosettes around the edge. For pure indulgence, drizzle with a dark chocolate ganache before adding the frosting.
- Make it Mini: To avoid needing the water bath altogether, try scaling this recipe down for Mini Red Velvet Cheesecakes using a muffin tin and paper liners. These bake faster and are great for portion control at a holiday party.
4. Variations and Substitutions
- Crust Swap: If Oreos aren’t your thing, you can easily use chocolate graham cracker crumbs, or even crushed chocolate crinkle cookies to make the crust. The substitution ratio remains the same: 2 1/2 cups of crumbs mixed with 6 tablespoons of melted butter.
- Nut-Free Option: This recipe is naturally nut-free (always check your specific Oreo packaging). It’s an excellent choice when you are serving guests with nut allergies, unlike many other holiday cookies like our peanut butter blossoms.
- A Little Extra Chocolate: For a decadent twist, sprinkle mini chocolate chips into the filling just before baking to create a Chocolate Cheesecake effect within the red velvet base.
Christmas Red Velvet Cheesecake with Oreo Crust Serving Suggestions
A dessert this rich and decadent should be paired with something that balances its heavy texture and deep flavor. Think contrasting temperatures, textures, and aromas. This isn’t just about the main event; it’s about the full experience you provide your loved ones.
1. The Perfect Warm Beverage Pairings
Nothing complements the creamy, cool texture of a great cheesecake like a piping hot beverage. Forget the after-dinner coffee machine and think cozy:
- Spicy Hot Chocolate: A dark, bittersweet hot chocolate infused with a pinch of cayenne pepper contrasts beautifully with the sweetness of the cream cheese filling.
- Cranberry-Orange Tea: The tart, acidic notes of cranberry and brightness of orange cut through the richness of the cheesecake, making each bite feel lighter.
2. Complementary Texture and Fruit
Because the Red Velvet Cheesecake with Oreo Crust is so smooth and uniform, adding fresh fruit or a sauce provides textural excitement. This is especially true at Christmas when the weather is cold and fresh berries feel like a luxury.
- Raspberry Coulis: A simple, slightly tart raspberry or strawberry sauce poured over individual slices adds moisture and a tangy counterpoint. The vibrant red of the coulis enhances the festive theme.
- Fresh Berries and Mint: This is a simple but effective technique. Toss some fresh raspberries, a few halved strawberries, and a tiny sprig of fresh mint onto the plate. The mint aroma elevates the chocolate notes in the Oreo crust.
3. Dessert Wine Paring (For the Adults!)
If you have older guests, consider an after-dinner pairing. The sweetness and acidity are essential here.
- Port Wine: A rich Ruby Port pairs traditionally well with strong cheese and cocoa flavors. It’s sweet enough to match the dessert without being cloying.
- Moscato d’Asti: If the cheesecake is still slightly warm (which I sometimes serve, letting it sit out for 30 minutes), a slightly bubbly, low-alcohol Moscato d’Asti provides a fun, light contrast to the dense filling.
When Emily and I serve this Holiday Cheesecake, especially after a big meal, we like to keep the portions modest, focusing instead on the ritual: getting comfortable by the fire, maybe a little instrumental Christmas music, and enjoying the quiet moments of the season. Cooking isn’t just about food; it’s about making people happy and anchoring them to the moment. If you look at this recipe and want to explore more holiday treats, this external resource on Red Velvet Cheesecakes offers some great inspiration for toppings!
Christmas Red Velvet Cheesecake with Oreo Crust Storage & Reheating
One of the best things about making a baked Cheesecake Recipe like this is how well it stores. This is a crucial element of stress-free holiday entertaining. You can absolutely make this dessert 2-3 days ahead of time.
Refrigeration
- Before Topping: If storing the whole cake, cover the springform pan (after cooling completely) tightly with plastic wrap and aluminum foil. It will keep beautifully in the refrigerator for up to 5 days.
- Slicing: Slices should be transferred to an airtight container. Keep the slices separated by parchment paper if you stack them to prevent marring the cream cheese filling.
Freezing Instructions
Yes, you absolutely can freeze Red Velvet Cheesecake storage! This is an ideal solution for preparing ahead.
- How to Freeze Red Velvet Cheesecake: Once the cake is completely chilled and set (at least overnight), remove it from the springform pan. Wrap the entire cheesecake tightly, first in plastic wrap, then in heavy-duty aluminum foil. Label the package with the date. It will keep for 1–2 months.
- Thawing: Remove the foil and plastic wrap while the cheesecake is still frozen. Place the uncovered cheesecake back into the refrigerator to thaw slowly overnight or for at least 12 hours. Do not thaw at room temperature, as this can affect the texture. Only add frosting or garnish after the cake is fully thawed.
FAQ about Christmas Red Velvet Cheesecake with Oreo Crust
I get a lot of questions about cheesecake baking, particularly concerning the texture and that dramatic color. Here are the answers to the most common baking questions!
Q: How do I ensure my cheesecake doesn’t crack?
A: Cracking is usually caused by sudden temperature changes or overmixing. The surest way to prevent cracks is using the water bath method, ensuring all ingredients are room temperature before mixing, and most importantly, letting the cheesecake cool gradually inside the switched-off oven for a full hour before chilling it.
Q: What kind of red food coloring should I use for the best color?
A: For a truly vibrant, deep red that rivals store-bought desserts, always opt for a high-quality gel food coloring. You need less of it, and it won’t thin out your batter like liquid coloring can. The goal is to make this Red Velvet Dessert look beautifully festive for Christmas.
Q: Can I use graham crackers instead of Oreos for the crust?
A: Absolutely. While the Red Velvet Oreo Cheesecake combination is spectacular, you can substitute graham crackers for Oreo crust using the same measurements (2 1/2 cups crumbs to 6 tbsp butter). However, remember the chocolate notes of the Oreo are part of what deepens the overall flavor profile of the red velvet.
Q: Does the white vinegar in the recipe matter?
A: Yes! The white vinegar, along with the sour cream and cocoa, is critical for achieving the authentic Red Velvet Cake flavor profile. It provides that signature slight tang and reacts with the cocoa powder to enhance its color and depth, preventing the cheesecake from just tasting like plain chocolate.
Q: What is the best way to slice the cheesecake cleanly?
A: The secret to clean slicing is heat. Fill a tall container with hot water. Dip a long, sharp slicing knife into the hot water, wipe it clean, and make one slice. Repeat this process, dipping and wiping the knife before every single cut. Serve immediately! For extra holiday flair, pair this with some Red Velvet Kiss Cookies.
Final Thoughts
There’s something simple and profoundly honest about baking a cheesecake. It demands patience and attention, but the reward, that first clean slice and the delighted faces around the table, is immeasurable. This Christmas Red Velvet Cheesecake with Oreo Crust isn’t just a recipe, it’s a centerpiece. It’s the promise of a quiet evening after the chaos of Santa, the anchor of a family tradition. I hope you bring this gorgeous, deeply flavored cake into your home this year.
From my kitchen to yours, may your holidays be full of flavor and happy memories. Don’t forget to tag me when you make this! Share the joy, subscribe to our newsletter for more holiday comfort food, and remember: Cooking isn’t just about food; it’s about making people happy. Cheers!
Christmas Red Velvet Cheesecake with Oreo Crust
Ingredients
Equipment
Method
- Preheat oven to 350°F (175°C). Wrap the outside bottom and sides of a 9-inch springform pan tightly with heavy-duty aluminum foil to create a water bath barrier.
- Make the Oreo crust: Pulse 2 1/2 cups Oreo cookies in a food processor until finely ground. Mix with melted butter and salt until resembling wet sand.
- Press the Oreo mixture firmly into the bottom and 1 inch up the sides of the prepared springform pan. Bake for 8–10 minutes, then cool. Reduce oven temperature to 325°F (160°C).
- In a large bowl, beat softened cream cheese on medium-low speed until smooth and lump-free (about 3 minutes). Add sugar and mix well.
- In a small bowl, whisk together cocoa powder, flour, and salt. Add to cream cheese mixture and beat until just combined.
- Add sour cream, vanilla extract, and white vinegar to the batter. Mix until smooth. Stir in red food coloring until achieving a bright, uniform red color.
- Add eggs one at a time on very low speed, mixing just until incorporated. Do not overmix to prevent cracking.
- Pour the red velvet batter over the cooled Oreo crust. Place the foil-wrapped pan inside a larger roasting pan. Carefully pour boiling water into the roasting pan until it reaches halfway up the springform pan.
- Bake at 325°F (160°C) for 60–75 minutes. The center should have a slight jiggle when gently tapped, but edges should be set.
- Turn off oven and crack the door open with a wooden spoon. Let cheesecake cool inside for 1 hour to prevent cracking.
- Remove from water bath and foil. Cool completely on a wire rack, then refrigerate for at least 6 hours or overnight.
- Run a sharp knife under hot water, wipe dry, and slice cleanly. Serve with optional cream cheese frosting, whipped cream, or crushed Oreos.


