Have you ever wondered what truly separates a good piece of French toast from a truly unforgettable one? We’ve all been there. You follow a recipe, you dip the bread, you fry it in the pan, and what you get is… fine. It might be a little soggy in the middle, or slightly eggy, or just lacking that golden, custardy richness you dream about. But what if I told you the secret to the most divine, soul warming Classic French Toast isn’t locked away in a complicated chef’s technique or a rare ingredient? What if it’s simply about patience, about giving the bread just enough time to drink in the fragrant batter, a simple act of slowing down that transforms breakfast into an experience. This is more than just a French toast recipe; it’s a morning ritual.
Here in our little home in Bend, Oregon, the scent of cinnamon and vanilla is the gentlest alarm clock on a Saturday morning. Before the sun has fully climbed over the pine trees, I find myself in the quiet kitchen, the house still hushed. It’s in these moments, whisking the French toast batter in my favorite ceramic bowl, that I feel most connected to the rhythm of my family. My husband, Ethan, will wander in, drawn by the aroma, ready with his camera to capture the morning light hitting the pan. Soon after, the patter of little feet signals that Olivia and James are awake, their sleepy smiles appearing in the doorway, knowing what’s for breakfast. This homemade French toast is a cornerstone of our family story. It’s simple, it’s forgiving, and it’s a recipe that invites everyone to the table. It’s a testament to the idea that the most beautiful meals aren’t about perfection, but about connection. So let’s forget the rush. Let’s make something together that feels like a hug on a plate. This is the Classic French Toast that has become a legend in our home, and I have a feeling it will in yours, too.
Why You’ll Love This Classic French Toast
This recipe has been a fixture in my kitchen for over a decade, evolving from my early kitchen experiments into the foolproof version I’m sharing today. It’s the one my kids ask for by name and the one I turn to when I need a dose of simple comfort. Here’s why I know you’ll fall in love with it just as much as we have.
Incredibly Simple and Forgiving: This is truly an easy French toast recipe. You don’t need any special equipment or advanced culinary skills. The ingredients are staples you likely already have. It’s the perfect recipe for a lazy Sunday morning or even a quick weeknight “brinner” (breakfast for dinner!). I’ve had my share of kitchen mishaps, believe me, but this recipe is so resilient. If you let the kids “help” and they soak the bread a few seconds too long, it’s okay. If you get distracted and the pan gets a little too hot, the next slice will be better. It’s a recipe that encourages you to relax and enjoy the process, which is exactly what home cooking should be about. It teaches patience without demanding perfection, a lesson I’m always trying to remember in motherhood and in the kitchen.
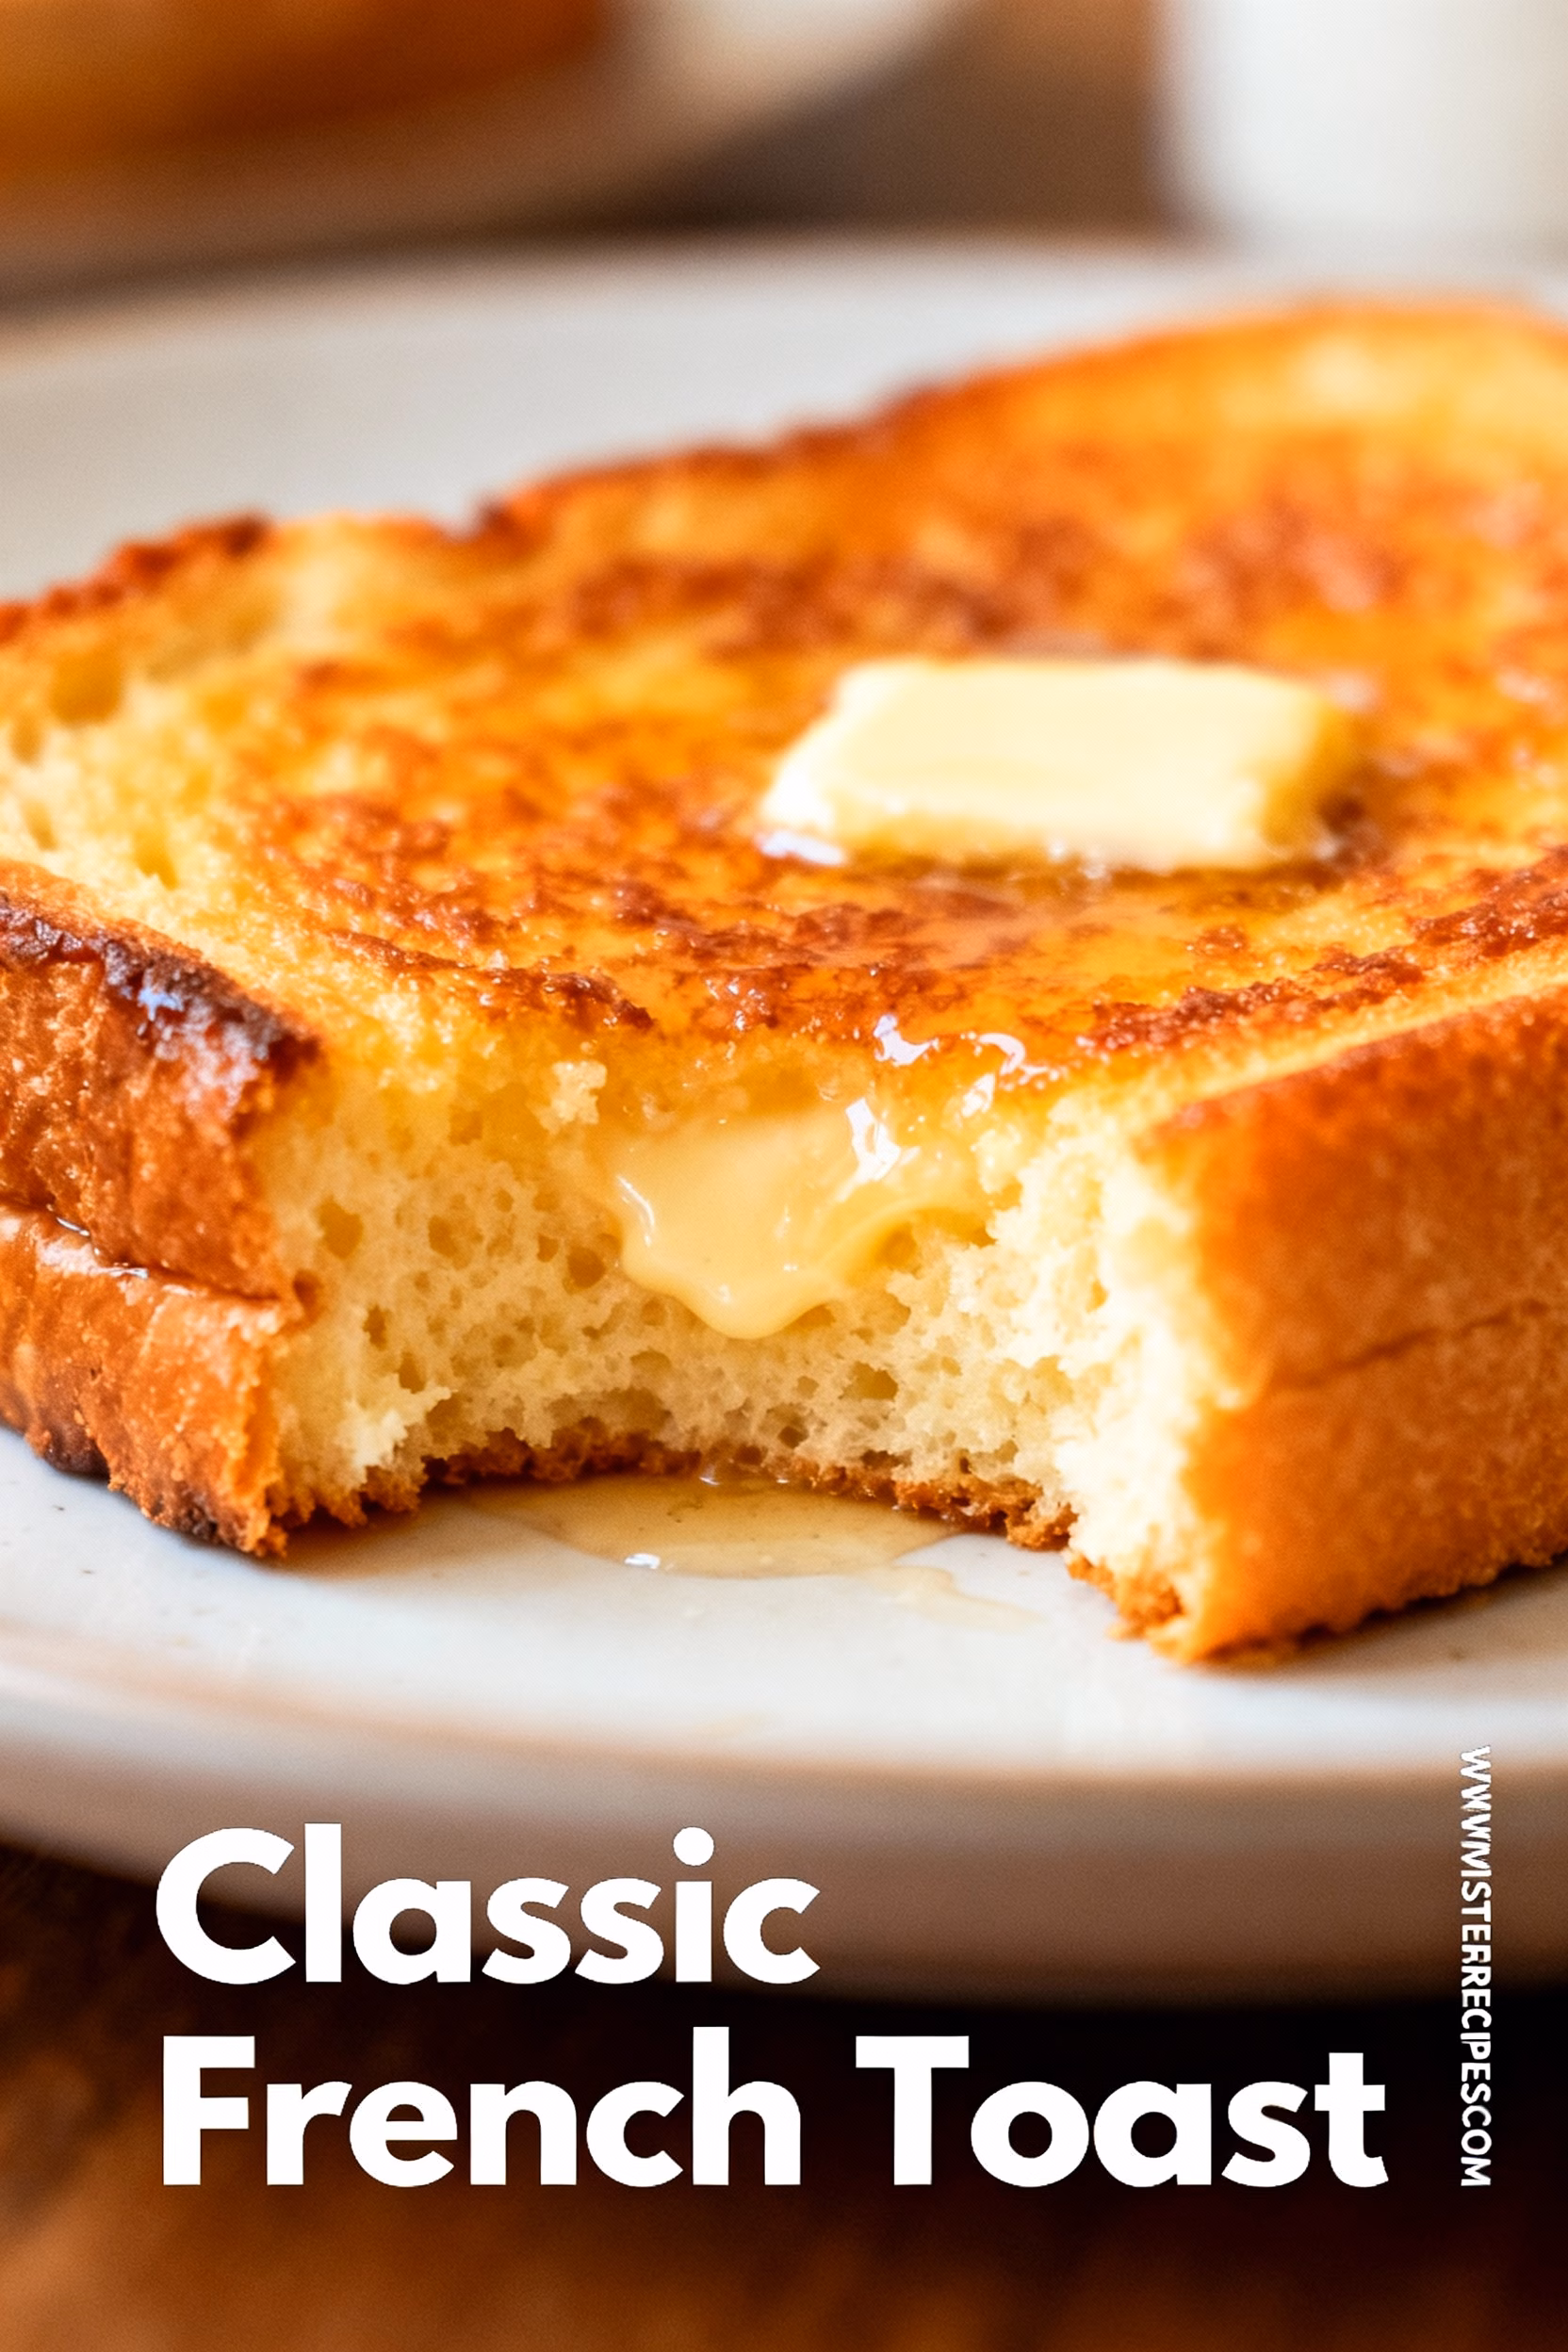
The Perfect Custardy Texture (Never Soggy!): The true hallmark of the best French toast is that magical texture. A crisp, golden brown exterior that gives way to a soft, creamy, almost pudding like center. The key is in the ratio of our French toast ingredients and the type of bread we use. Thick slices of a sturdy bread like brioche or challah act like a sponge, soaking up the rich eggs and milk custard without falling apart. So many recipes result in a flat, eggy slice, but this method ensures every single bite is rich and custardy. It’s the kind of texture that makes you close your eyes for a second when you take the first bite. Ethan always says he can tell it’s going to be a good batch just by the way it sizzles in the pan, a gentle, confident sound that promises a perfect result.
A Beautiful Canvas for Creativity: While this is a Classic French Toast recipe at its heart, think of it as your starting point. It’s a blank canvas waiting for your personal touch. This is where the fun really begins! In the summer, we pile ours high with fresh berries from the local Bend farmer’s market. In the fall, a sprinkle of pumpkin spice in the batter and some sautéed apples on top feels just right. The list of French toast toppings is endless: a dusting of powdered sugar, a drizzle of rich maple syrup, a dollop of yogurt, a spread of nut butter, or even a sprinkle of toasted nuts for crunch. You can explore all sorts of French toast variations, from adding a splash of orange zest to the batter to trying our family’s favorite Savory French toast for a completely different meal.
Family Friendly and Full of Heart: This recipe isn’t just about food; it’s about creating memories. There’s something so special about gathering in the kitchen to make a meal together. Olivia loves cracking the eggs, and James insists on being the one to sprinkle the cinnamon. These small moments are what build a family food culture. It’s a recipe that smells like home, tastes like love, and brings everyone to the table with a smile. It’s quick enough that it doesn’t feel like a chore, but special enough to make any morning feel like a celebration. It’s the taste of a slow weekend, of shared stories, and of the simple joy of being together.
Ingredients for Classic French Toast
- 8 slices thick cut bread (about 1 inch thick). Brioche, challah, or a sturdy French loaf work best. Day old bread is ideal as it soaks up the custard better.
- 4 large eggs
- ¾ cup milk or heavy cream. For a richer custard, use whole milk or cream. Dairy free alternatives like oat milk or almond milk also work well.
- 2 tablespoons granulated sugar (optional, depending on the sweetness of your toppings)
- 1 teaspoon vanilla extract
- ½ teaspoon ground cinnamon
- ¼ teaspoon ground nutmeg
- Pinch of salt
- 2 tablespoons unsalted butter, for the pan

How to Make Classic French Toast
Step-by-Step Instructions
Making this Classic French Toast is a gentle dance of simple steps. It’s all about giving each ingredient the space to shine and creating a batter that will turn humble bread into something truly luxurious. I like to set everything out on the counter before I begin, a little ritual that calms my mind and makes the process feel seamless. This recipe is a practice in mindfulness as much as it is a method for breakfast.
Prepare Your Custard Batter: Find a shallow dish that’s wide enough to comfortably fit a slice of your bread. A pie plate or a square baking dish is perfect. Crack your four large eggs into the dish. Whisk them gently with a fork or a small whisk just until the yolks and whites are broken up and combined. You don’t need to whip them into a frenzy; a gentle mix is all it takes.
Infuse with Flavor: Now, pour in your milk or cream. This is what will give your French toast its soft, custardy interior. Add the granulated sugar if you’re using it, the pure vanilla extract, the ground cinnamon, the nutmeg, and that all important pinch of salt. The salt might seem small, but it works wonders to balance the sweetness and enhance all the other flavors. Whisk everything together until the batter is a uniform, fragrant, pale brown liquid. The scent alone will start to make your kitchen feel like home. This is your French toast batter, the heart of the recipe.
The Gentle Soak: This step is the most important, the one that separates good French toast from great French toast. Take one slice of your thick cut bread and lay it flat in the batter. Let it soak for about 20 to 30 seconds. You want the bread to have enough time to drink up that delicious custard, but not so long that it becomes overly saturated and falls apart. Gently flip the slice over and let the other side soak for another 20 to 30 seconds. You’ll see the bread plump up slightly. Lift it carefully, allowing any excess batter to drip back into the dish for a moment. Set the soaked slice aside on a wire rack or a plate while you repeat with the remaining slices.
Heating the Pan: Place a large skillet or griddle over medium heat. Let the pan get properly warm before you add the butter. A good way to test this is to flick a tiny drop of water onto the surface; if it sizzles and evaporates immediately, you’re ready. Add about a tablespoon of butter to the pan and swirl it around until it’s melted and bubbling gently. The bubbling sound is your cue that the pan is at the perfect temperature for a golden crust.
Cooking to Golden Perfection: Carefully place two to three slices of the soaked bread into the hot, buttery pan, making sure not to overcrowd it. Let them cook undisturbed for about 2 to 4 minutes on the first side. This is where patience pays off. Resisting the urge to peek too soon allows a beautiful, caramelized crust to form. You’ll know it’s ready to flip when the edges look golden brown and crisp. Use a thin spatula to flip the slices and cook for another 2 to 4 minutes on the second side, until it’s equally golden and the center feels slightly firm to the touch but still has a gentle give.
Serve and Repeat: As the first batch finishes, transfer the golden slices to a platter. You can keep them warm in a 200°F (93°C) oven while you cook the rest. Wipe the pan with a paper towel if needed, add the remaining butter, and continue cooking the rest of your Classic French Toast in batches. Serve immediately, warm from the pan, with all your favorite toppings.
Pro Tips & Variations
Over the years, I’ve learned a few little tricks that take this Classic French Toast from delicious to absolutely sublime. And one of the things I love most about cooking is its endless capacity for reinvention. Think of this recipe as a starting point. Once you’ve mastered the classic version, the door is open to so many wonderful French toast variations. Here are some of my favorite tips and creative twists that we enjoy in our home.
Pro Tips for the Best French Toast:
- Use Day Old Bread: This is my number one tip. Slightly stale, dry bread is much more absorbent than fresh bread. It will soak up the perfect amount of the custard batter without becoming soggy, giving you that ideal creamy center and a sturdier structure. If you only have fresh loaf, you can slice it and leave it out on the counter for a few hours, or even toast it very lightly in the oven for a few minutes to dry it out.
- Don’t Oversoak: It’s a delicate balance. You want the bread to be saturated, but not falling apart. A quick dip, about 20-30 seconds per side for a one inch thick slice, is usually perfect. If you’re using a thinner bread, you’ll need even less time. The goal is for the custard to penetrate the center without turning the entire slice to mush.
- Medium Heat is Your Friend: It can be tempting to crank up the heat to get things cooking faster, but with French toast, medium heat is the way to go. If the heat is too high, the outside will burn before the custard in the center has a chance to cook through, leaving you with a raw, eggy middle. If the heat is too low, the bread will absorb too much butter and become greasy instead of crisp. That gentle, steady sizzle is what you’re listening for. For those new to French toast, the visual and audible cues from the pan become your best guide, much like in this thoughtful guide from Serious Eats on achieving the perfect texture.
- Wipe Your Pan Between Batches: As you cook, small bits of sugar and butter can burn in the pan. To ensure every batch is as perfect as the first, give the skillet a quick but careful wipe with a paper towel between batches before adding fresh butter. This prevents any burnt flavors from transferring to your beautiful golden slices.
Fun Variations to Try:
- Baked French Toast Casserole: For a crowd or a special holiday morning, try turning this recipe into a Baked French toast casserole. Simply cube the bread, arrange it in a buttered baking dish, and pour the custard over the top. Let it soak overnight in the refrigerator, and in the morning, just pop it in the oven. It’s an effortless way to serve a stunning brunch.
- Healthy French Toast: To lighten things up, you can use whole wheat bread, replace the whole milk with a lower fat dairy or unsweetened almond milk, and skip the added sugar in the batter, relying on fresh fruit for sweetness. It will still be wonderfully satisfying.
- Vegan French Toast: This classic is easily adaptable for a plant based diet. Create a vegan French toast batter using a plant based milk (oat milk is wonderfully creamy), a bit of maple syrup for sweetness, and a thickening agent like ground flaxseed or chickpea flour to replace the eggs. Cook it in coconut oil or vegan butter for a delicious result.
- Gluten Free French Toast: The secret here is simply to use a high quality gluten free French toast bread. Look for one that is thick and sturdy, as some gluten free breads can be delicate. The rest of the recipe remains exactly the same!
- Savory French Toast: Who says French toast has to be sweet? For a savory twist, omit the vanilla extract, cinnamon, and sugar from the batter. Instead, add a pinch of black pepper, some finely chopped herbs like chives or parsley, and maybe a dash of smoked paprika. Serve it topped with a fried egg, avocado, or sautéed mushrooms. It makes for an incredible lunch or light dinner.
Serving Suggestions
One of the true joys of making Classic French Toast is dressing it up. The warm, custardy slices are a perfect foundation for a world of flavors and textures. In our house, setting out a little “toppings bar” is part of the fun, especially for Olivia and James, who love to create their own masterpieces. Here are some of our favorite ways to serve it, from the simple and timeless to the slightly more adventurous.
- The Timeless Classic: You can never go wrong with the quintessential pairing: a generous pat of soft butter melting into the warm surface and a slow, beautiful drizzle of pure maple syrup. It’s classic for a reason. The simple, earthy sweetness of the syrup perfectly complements the rich, cinnamon infused toast. Sometimes, the simplest way is truly the best.
- Fresh and Fruity: This is my personal favorite, especially when the seasons change. Piling on fresh fruits adds a burst of brightness, color, and natural sweetness that cuts through the richness of the toast. In the summer, a handful of mixed berries (strawberries, blueberries, raspberries) is divine. In the fall, thinly sliced apples or pears sautéed in a little butter and cinnamon are incredibly comforting. Sliced bananas are a year round winner, especially with a drizzle of honey or a sprinkle of toasted pecans.
- Creamy and Tangy: For an extra layer of luxury and a pleasant tang, add a dollop of something creamy. Greek yogurt is a fantastic choice, offering a bit of protein and a cool contrast to the warm toast. Whipped cream, of course, turns breakfast into a full blown dessert. And for something truly special, a spoonful of crème fraîche or mascarpone cheese adds an elegant, velvety richness.
- A Savory Counterpoint: While the French toast itself is sweet, serving it alongside something savory creates a wonderfully balanced plate, reminiscent of a classic diner breakfast. Crispy bacon or savory breakfast sausage provides that perfect salty, smoky contrast. For a lighter option, a side of scrambled eggs or fresh avocado slices sprinkled with a little sea salt and pepper is a fantastic accompaniment.
- Add Some Crunch: Texture is so important in a good meal. To add a delightful crunch, sprinkle on some toasted nuts like pecans or walnuts, a handful of your favorite granola, or even some toasted coconut flakes. This not only adds a great texture but also another layer of nutty, complex flavor. You can even consider turning them into French toast sticks for easy dipping and a fun textural experience for kids.
Storage & Reheating
While Classic French Toast is undeniably at its peak when fresh from the pan, leftovers are a wonderful thing to have on hand for a quick and easy breakfast the next day. Storing and reheating it properly will help it taste almost as good as it did on day one.
In the Refrigerator:
Allow any leftover French toast slices to cool completely to room temperature. This is important to prevent them from becoming soggy. Once cool, place them in an airtight container, separating layers with a piece of parchment paper to prevent them from sticking together. They will keep well in the refrigerator for up to 2 days.
In the Freezer:
French toast freezes beautifully! It’s a great little trick for meal prepping. Again, let the slices cool completely. Arrange them in a single layer on a baking sheet and place them in the freezer for about an hour, or until they are firm. This flash freezing step prevents them from clumping together. Once frozen, transfer the slices to a freezer safe bag or airtight container. They will last for up to 2 months.
Best Reheating Methods:
- Toaster or Toaster Oven (Recommended): This is my preferred method as it does the best job of re crisping the outside while warming the center. Simply pop a refrigerated or frozen slice directly into your toaster or toaster oven and heat until it’s warmed through and golden again.
- Oven: Preheat your oven to 375°F (190°C). Place the French toast slices in a single layer on a baking sheet and heat for 5 to 10 minutes, or until hot and slightly crisp.
- Skillet: Melt a small amount of butter in a skillet over medium heat. Add the French toast and cook for 1 to 2 minutes per side until warmed through. This method works well to bring back that fresh from the pan flavor.
- Microwave (In a Pinch): While not ideal because it can make the toast soft, the microwave is the fastest option. Place a slice on a microwave safe plate and heat in 20 second intervals until warm. It won’t be crispy, but it will still be delicious!
FAQ about Classic French Toast
What is the best type of French toast bread?
The absolute best French toast is made with a thick, sturdy, and slightly enriched bread. Brioche and challah are the top contenders because their rich, eggy crumb soaks up the custard beautifully without falling apart. A thick cut Texas toast or a day old French loaf also work very well. The key is to use slices that are about 1 inch thick and a bit dry.Can I make the French toast batter ahead of time?
Yes, you can! You can whisk together the French toast batter ingredients (eggs, milk, vanilla extract, cinnamon, etc.) and store it in an airtight container in the refrigerator for up to 24 hours. Just give it a good whisk again before you use it, as the spices will have settled at the bottom. This is a great time saver for busy mornings. If you’re planning even further ahead, you might love this Overnight French Toast Casserole from Allrecipes, which is designed to be prepared the night before.Why is my French toast soggy?
Soggy French toast is usually caused by one of two things: using bread that’s too fresh or too thin, or oversoaking the bread in the batter. Fresh bread already has a lot of moisture, so it can’t absorb the custard properly and turns mushy. Similarly, if you let the bread sit in the batter for too long, it will become overly saturated. Stick to day old, thick cut bread and a quick 20 to 30 second soak per side for that perfect custardy, not soggy, texture.Can I make vegan or gluten free French toast?
Absolutely! For vegan French toast, you can make a batter using plant based milk and a binder like ground flaxseed (a “flax egg”) or chickpea flour. For gluten free French toast, simply use your favorite thick cut gluten free bread. The method remains the same and the results are just as delicious, making this a wonderfully inclusive breakfast treat.
Final Thoughts on Classic French Toast
There it is. More than just a set of instructions, this recipe for Classic French Toast feels like a piece of my heart, a story told in cinnamon and butter and quiet weekend mornings. For me, cooking has always been less about chasing perfection and more about chasing connection. It’s about the feeling of my son James standing on his little stool, “helping” me whisk the eggs, or the smile on my daughter Olivia’s face when she takes that first perfect, syrupy bite. It’s about my husband Ethan, who captures these small moments on his camera, turning our everyday life into something beautiful. This recipe is a reminder that the most meaningful things in life are often the simplest: a warm kitchen, a shared meal, a moment to slow down and savor.
I hope this recipe brings as much warmth and joy to your table as it does to ours. I hope it becomes a backdrop for your own family memories, a tradition you turn to for comfort and celebration. Food is a language we all understand, a way of saying “I love you” without speaking a word.
If you make this homemade French toast, I would be so honored to hear about it. Please leave a comment below and let me know how it turned out, or if you added your own special twist! And if you loved it, please consider saving this recipe to your favorite Pinterest board so you can always find your way back to it. Thank you for welcoming me into your kitchen.
Classic French Toast
Ingredients
Equipment
Method
- Prepare a shallow dish that’s wide enough to comfortably fit a slice of bread. Crack the eggs into it and whisk gently with a fork or whisk, just until combined. No need to whip!
- Pour in the milk or cream. Add the sweetener if using, the vanilla extract, the ground cinnamon, the ground nutmeg, and a pinch of salt. Whisk until uniform and fragrant.
- Take one slice of bread and lay it flat in the French toast batter. Let it soak for 20–30 seconds, ensuring it’s not oversoaked. Flip and let the other side soak for the same amount of time.
- Heat a large skillet or griddle over medium heat. Once the pan is warm, add a tablespoon of butter and swirl to coat. Test with water; if it sizzles immediately, you’re ready.
- Carefully place two to three soaked slices into the pan. Cook undisturbed for 2–4 minutes on the first side until golden. Flip gently and cook for 2–4 minutes more. Transfer to a warm platter.
- Repeat with remaining slices, wiping the pan between batches and adding fresh butter. Serve immediately with your favorite French toast toppings.