
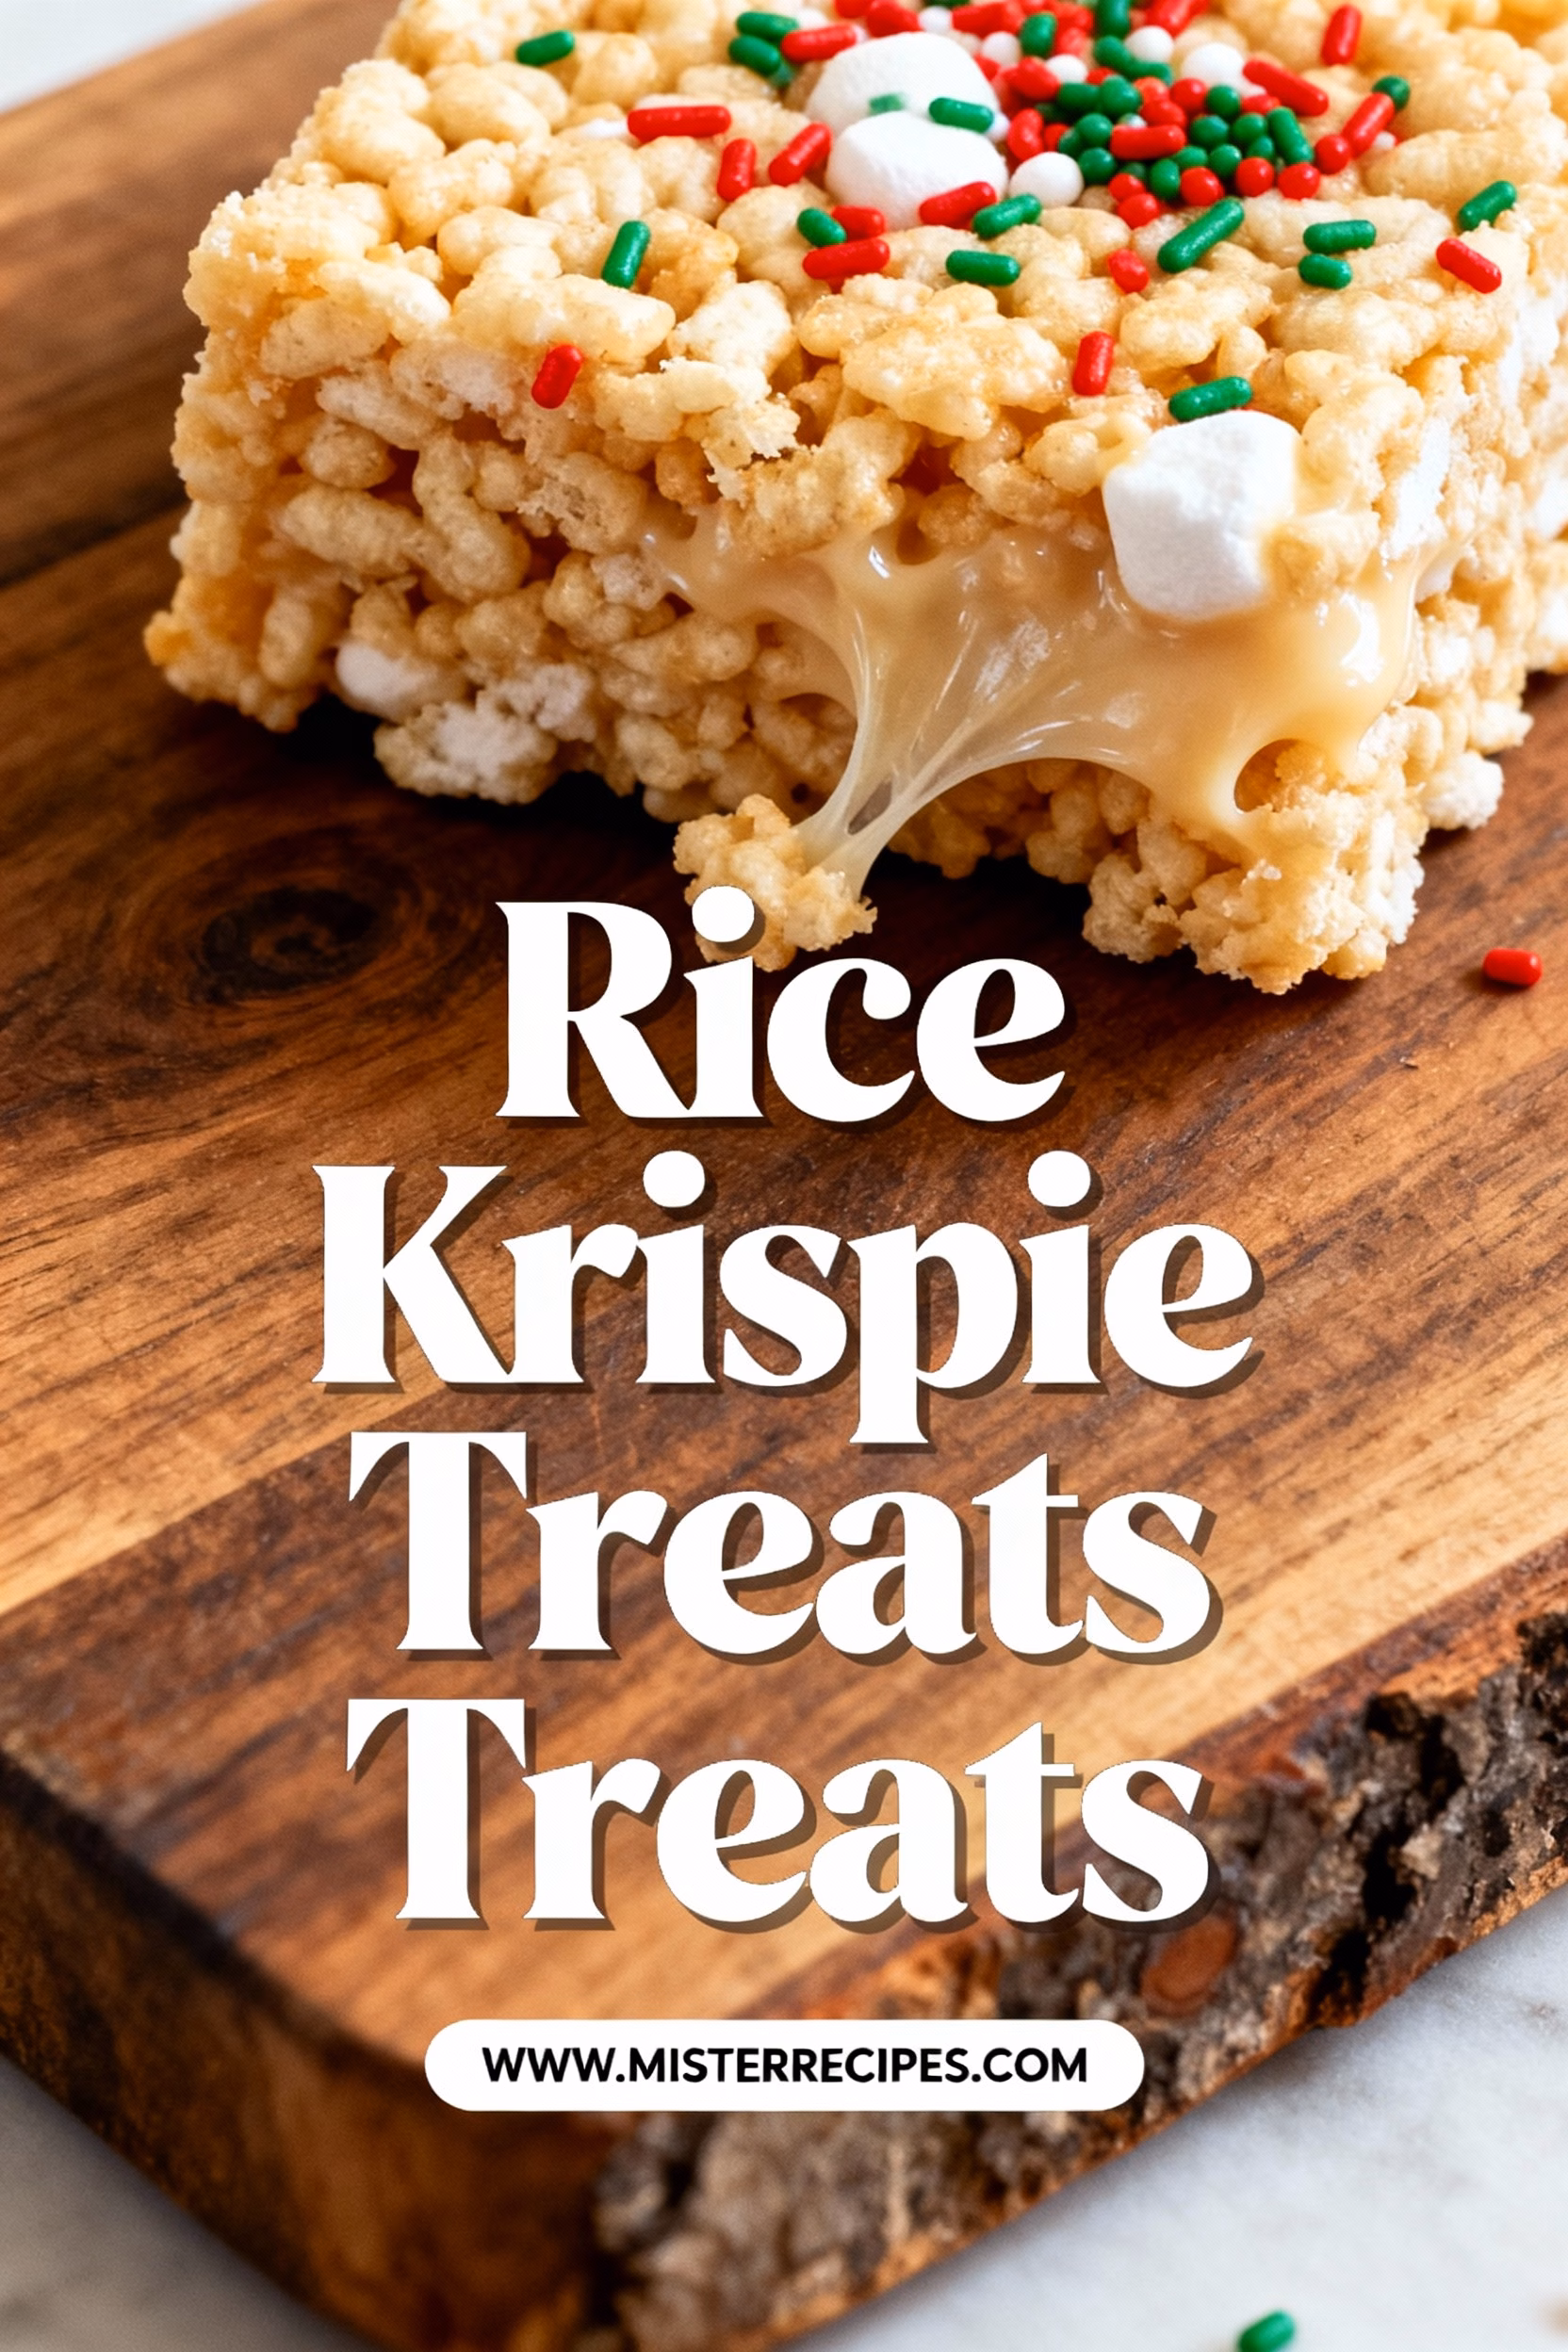
The Timeless Charm of Homemade Rice Krispie Treats
Have you ever wondered why some Rice Krispie Treats are airy and wonderfully gooey, while others turn into hard, disappointing bricks? I’ve spent countless hours in my kitchen, chasing that perfect texture, and I’ve discovered it’s not just about the ingredients. It’s about the soul you pour into them. Hi there! I’m Benjamin Sharif, the home cook behind Mister Recipes. To me, food has always been a way to connect with my family. I still remember standing in my grandmother’s kitchen, the scent of her Texas style barbecue filling the air. She taught me that cooking is about making people happy. Now, as a husband to my amazing wife Emily and a dad to Adams and Jana, our kitchen is where we make our best memories. And let me tell you, nothing brings a smile to their faces faster than a pan of these perfectly soft and chewy Rice Krispie Treats. This isn’t just a recipe; it’s a ticket back to childhood, a simple joy that’s ready in minutes and perfect for sharing. It’s the kind of treat that proves the best things in life are often the simplest.
Why You’ll Love This Rice Krispie Treats Recipe
This recipe is more than just a list of instructions; it’s a promise of a delicious, foolproof experience. When Emily and I first had the kids, I needed quick, reliable recipes that would bring a little magic to a busy weeknight. These treats became an instant classic in our home, a go to for everything from after school snacks to a sweet addition to a backyard BBQ. They are simple, classic, and consistently delicious, making them a staple you’ll turn to again and again.
- Incredibly Easy for All Skill Levels: This is one of those recipes where you barely need to measure. It’s so straightforward and forgiving that it’s the perfect opportunity to get your kids involved in the kitchen. My kids, Adams and Jana, love being my official marshmallow stirrers and sprinkle masters. It’s a fantastic way to build their confidence and make sweet memories together.
- Perfectly Soft and Gooey Texture: The number one complaint about homemade Rice Krispie Treats is that they get hard. My method ensures they stay soft and chewy for days. The secret lies in melting the marshmallows slowly over low heat and not packing the mixture into the pan. This gentle approach results in that perfect marshmallowy pull everyone loves.
- A Nostalgic, Crowd Pleasing Flavor: The simple combination of buttery marshmallows and crisp cereal is pure nostalgia. It’s a flavor that transports you right back to childhood bake sales and family gatherings. Whether you’re making them for kids or adults, they are guaranteed to be a hit. It’s a classic for a reason!
- A Blank Canvas for Creativity: While amazing on their own, these treats are also incredibly versatile. Think of this base recipe as your starting point. You can add anything from chocolate chips and sprinkles to different extracts or even a swirl of peanut butter. This makes it easy to customize for holidays, parties, or just to use up what you have in the pantry.
- Ready in Under 30 Minutes: As a busy parent, I know that time is precious. This recipe is a lifesaver when you need a last minute dessert for a school function or a quick treat to satisfy a sweet tooth. From start to finish, you can have a pan of these delicious squares ready in no time.
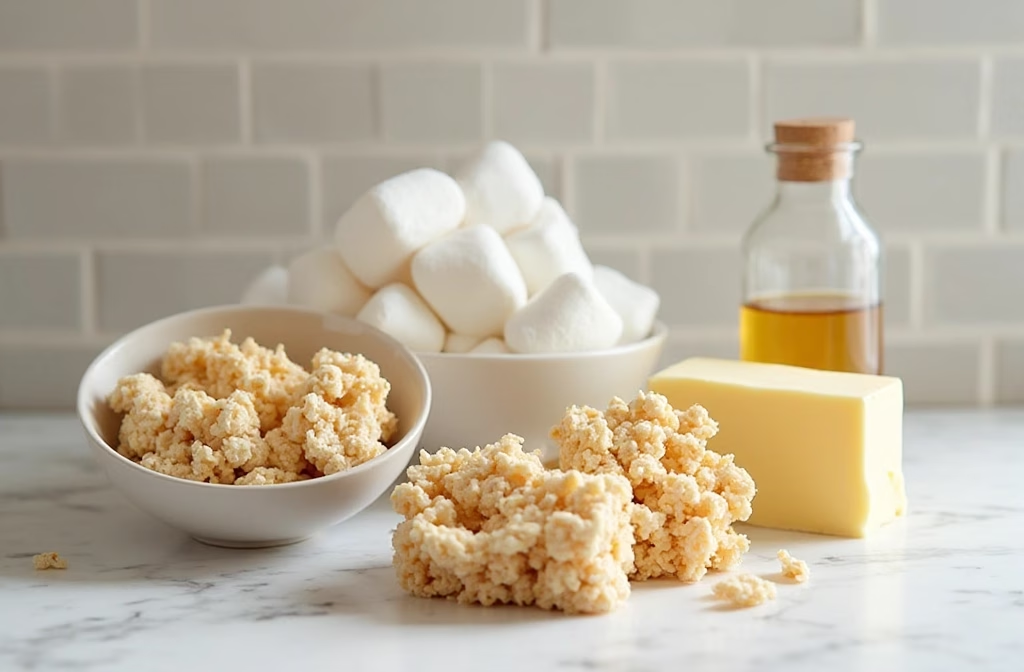
Ingredients for Rice Krispie Treats
This recipe uses simple, classic ingredients that come together to create something truly special. For the best results, always use fresh marshmallows, as they melt more smoothly and create a better texture.
- 6 cups crisp rice cereal
- 1 (10 ounce) package of marshmallows (about 40 large)
- 3 tablespoons unsalted butter
- 1 teaspoon vanilla extract
- A pinch of salt
Substitutions: For a gluten free version, ensure you are using certified gluten free crisp rice cereal. You can also experiment with other cereals like cocoa puffs or Chex for a different flavor and texture. For a fun twist, try using different flavored marshmallows, like strawberry or chocolate.
How to Make Rice Krispie Treats
The key to perfect treats is in the technique. It’s less about what you do and more about how you do it. Cooking is about connection, and this simple process is one I love sharing with my kids. The gentle stirring, the sweet aroma filling the kitchen, the excitement as we press the mixture into the pan it’s all part of the fun. Follow these steps closely, especially the tip about low heat, to achieve that signature soft and gooey texture.
Step by Step Instructions
- Prepare Your Pan: The first step is always preparation. Lightly grease a 9×13 inch baking pan with butter or nonstick cooking spray. This will prevent the treats from sticking and make them much easier to remove later. You can also line the pan with parchment paper, leaving some overhang on the sides to act as handles for easy lifting.
- Melt the Butter: In a large saucepan or Dutch oven, melt the butter over low heat. It’s crucial to keep the heat low to prevent the butter from browning too quickly, which would change the flavor. This gentle melting is the foundation of a great treat.
- Melt the Marshmallows Slowly: Once the butter is melted, add the marshmallows. Continue to stir gently and constantly over low heat. This is the most important step! Rushing this by turning up the heat will result in crystallized sugar and hard treats. Be patient. As you stir, you’ll see them slowly transform into a smooth, creamy, and gloriously sticky liquid. For an even more decadent treat, you can learn how to make your own homemade marshmallows.
- Add Flavor: Remove the pan from the heat. Stir in the vanilla extract and the pinch of salt. The vanilla adds a wonderful depth of flavor that complements the sweetness of the marshmallows, and the salt balances everything out.
- Combine with Cereal: Add the crisp rice cereal to the pot. Using a greased spatula, gently fold the cereal into the melted marshmallow mixture until it’s just combined. Be careful not to overmix, as this can crush the cereal and make the treats too dense.
- Press Gently into the Pan: Transfer the mixture to your prepared pan. Here’s the next critical secret: do not press down firmly. Use a greased spatula or your fingertips (rubbed with a little butter) to gently guide and spread the mixture evenly into the pan. Compacting it is what leads to dense, hard squares. A light touch is all you need. For a different but equally easy no bake dessert, try these Classic No Bake Cookies.
- Let Them Set: Allow the treats to cool at room temperature for at least one hour before cutting. This gives them time to firm up just enough to hold their shape while staying soft and chewy. Don’t be tempted to put them in the fridge to speed this up, as that can also make them hard.
- Cut and Serve: Once cooled, use a sharp knife to cut them into squares. Now they are ready to be served and enjoyed by everyone!
Pro Tips & Variations
Once you’ve mastered the classic recipe, it’s time to get creative. The beauty of these treats is how easily they can be adapted. In our house, we love coming up with new combinations. It’s a fun weekend project with the kids, turning our kitchen into a little confectionery lab. Here are some of our favorite tips and variations to get you started.
Pro Tips for the Perfect Batch
- Use Fresh Marshmallows: This is a non negotiable for me. Old, stale marshmallows lose their moisture and won’t melt into that silky smooth consistency you need. Fresh marshmallows are the key to a gooey texture.
- Low and Slow Heat is Your Best Friend: I can’t stress this enough. Melting your butter and marshmallows over low heat prevents the sugar from seizing up and ensures a soft, chewy final product. Patience is the secret ingredient here.
- Don’t Overmix or Compact: When you fold in the cereal, do it gently, just until everything is coated. When you press the mixture into the pan, be gentle. An iron fist will lead to rock hard treats.
- A Pinch of Salt Makes a Difference: A small pinch of salt won’t make your treats salty. Instead, it enhances the buttery flavor and balances the sweetness of the marshmallows, making the overall taste more complex and delicious.
Flavor Variations
- Brown Butter Rice Krispie Treats: For a deeper, nuttier flavor, brown the butter before adding the marshmallows. Simply melt the butter over medium heat and continue to cook, swirling the pan, until it foams and brown specks appear at the bottom. The aroma is incredible! If you love this flavor, you should also try these Brown Butter Sugar Cookies.
- Peanut Butter Swirl: After melting the marshmallows, remove from the heat and swirl in about half a cup of creamy peanut butter before adding the cereal. The combination is irresistible. For another peanut butter treat, check out our favorite Peanut Butter Cookies.
- Chocolate Lover’s Dream: You can either stir in a cup of mini chocolate chips along with the cereal or drizzle melted chocolate over the top after they’ve cooled. Both options are divine.
- Festive Holiday Treats: Mix in some colorful sprinkles with the cereal for an instant party look. For Christmas, use red and green sprinkles. For Halloween, try orange and black. For other festive ideas, our Christmas Spritz Butter Cookies are always a hit.
Serving Suggestions
While these treats are perfect on their own, there are many ways to serve them to make them feel extra special. At home, we treat them as both a simple snack and a centerpiece dessert, depending on the occasion. They are a wonderful canvas for pairings, and presenting them thoughtfully can elevate the entire experience from a quick bite to a memorable indulgence.
One of the best and simplest pairings is a cold glass of milk. It’s a classic combination that takes me right back to my childhood. For a more adult oriented gathering, a cup of coffee or a latte works beautifully, as the bitterness of the coffee cuts through the sweetness of the treats. If you’re serving them at a party, arrange them on a platter with a mix of other easy desserts like brownies or some delicious caramel stuffed cookies. For birthday parties, I like to insert a colorful popsicle stick into each square to make them easy for little hands to grab and enjoy without getting too sticky. You can also serve them alongside a bowl of fresh berries like strawberries or raspberries. The tartness of the fruit provides a refreshing contrast to the sweet, buttery flavor of the treats, adding a touch of elegance and a burst of fresh flavor that complements the dessert perfectly.
Storage & Reheating for Rice Krispie Treats
Proper storage is essential to keep your treats soft and chewy. The best way to store them is in an airtight container at room temperature. They will stay fresh for up to three days. I often place a layer of wax paper or parchment paper between layers if I need to stack them. Avoid refrigerating them, as the cold air will draw out the moisture and make them hard and brittle. If you want to store them for longer, the freezer is a great option. To freeze, cut the treats into squares and wrap each one individually in plastic wrap. Then, place the wrapped squares in a freezer safe bag or container. They can be stored in the freezer for up to six weeks. When you’re ready to enjoy them, simply take them out of the freezer and let them thaw at room temperature for about an hour. There’s no need to reheat them; they taste perfect once they’ve thawed.
FAQ about Rice Krispie Treats
- Why are my Rice Krispie Treats always hard?
- This is the most common issue! It’s usually caused by two things: melting the marshmallows too quickly over high heat, which causes the sugar to crystallize, or pressing the mixture too firmly into the pan. Always use low heat and a gentle touch.
- Can I use stale or old marshmallows?
- I strongly recommend using a fresh bag of marshmallows. Older marshmallows tend to be dry, and they won’t melt as smoothly, which can affect the final texture and lead to harder treats.
- How do I prevent the mixture from sticking to my hands and spatula?
- The marshmallow mixture is famously sticky! The best trick is to lightly coat your spatula and your fingertips with butter or nonstick cooking spray. This creates a barrier and makes it incredibly easy to handle and press the mixture into the pan.
- Can I make this recipe gluten free?
- Absolutely! To make gluten free Rice Krispie Treats, simply ensure you are using a brand of crisped rice cereal that is certified gluten free, as some brands contain malt flavoring derived from barley.
Final Thoughts on Rice Krispie Treats
And there you have it, the secret to perfectly gooey, soft, and chewy Rice Krispie Treats every single time. It’s more than just a dessert; it’s a little piece of home, a bite of nostalgia, and a recipe that’s meant for sharing. I hope this becomes a go to favorite in your kitchen, just like it is in ours. There’s nothing better than seeing the smiles on my family’s faces when they know these are on the menu.
If you make this recipe, I’d love to hear about it! Please leave a comment below and let me know any fun variations you tried. And don’t forget to save this recipe on Pinterest so you can always find it. For more family friendly recipes and stories from our kitchen, be sure to subscribe to our newsletter. Grab your apron, and let’s get cooking!
Rice Krispie Treats
Ingredients
Equipment
Method
- Prepare Your Pan: Lightly grease a 9×13 inch baking pan with butter or nonstick cooking spray. This will prevent the treats from sticking and make them much easier to remove later. You can also line the pan with parchment paper, leaving some overhang on the sides to act as handles for easy lifting.
- Melt the Butter: In a large saucepan or Dutch oven, melt the butter over low heat. It’s crucial to keep the heat low to prevent the butter from browning too quickly, which would change the flavor.
- Melt the Marshmallows Slowly: Once the butter is melted, add the marshmallows. Continue to stir gently and constantly over low heat. Rushing this by turning up the heat will result in crystallized sugar and hard treats. Be patient. As you stir, you’ll see them slowly transform into a smooth, creamy, and gloriously sticky liquid.
- Add Flavor: Remove the pan from the heat. Stir in the vanilla extract and the pinch of salt. The vanilla adds a wonderful depth of flavor that complements the sweetness of the marshmallows, and the salt balances everything out.
- Combine with Cereal: Add the crisp rice cereal to the pot. Using a greased spatula, gently fold the cereal into the melted marshmallow mixture until it’s just combined. Be careful not to overmix, as this can crush the cereal and make the treats too dense.
- Press Gently into the Pan: Transfer the mixture to your prepared pan. Here’s the next critical secret: do not press down firmly. Use a greased spatula or your fingertips (rubbed with a little butter) to gently guide and spread the mixture evenly into the pan. Compacting it is what leads to dense, hard squares. A light touch is all you need.
- Let Them Set: Allow the treats to cool at room temperature for at least one hour before cutting. This gives them time to firm up just enough to hold their shape while staying soft and chewy.
- Cut and Serve: Once cooled, use a sharp knife to cut them into squares. Now they are ready to be served and enjoyed by everyone!


