
I. Indulge in Homemade Bliss: The Ultimate Ghirardelli Chocolate Chip Cookie Recipe
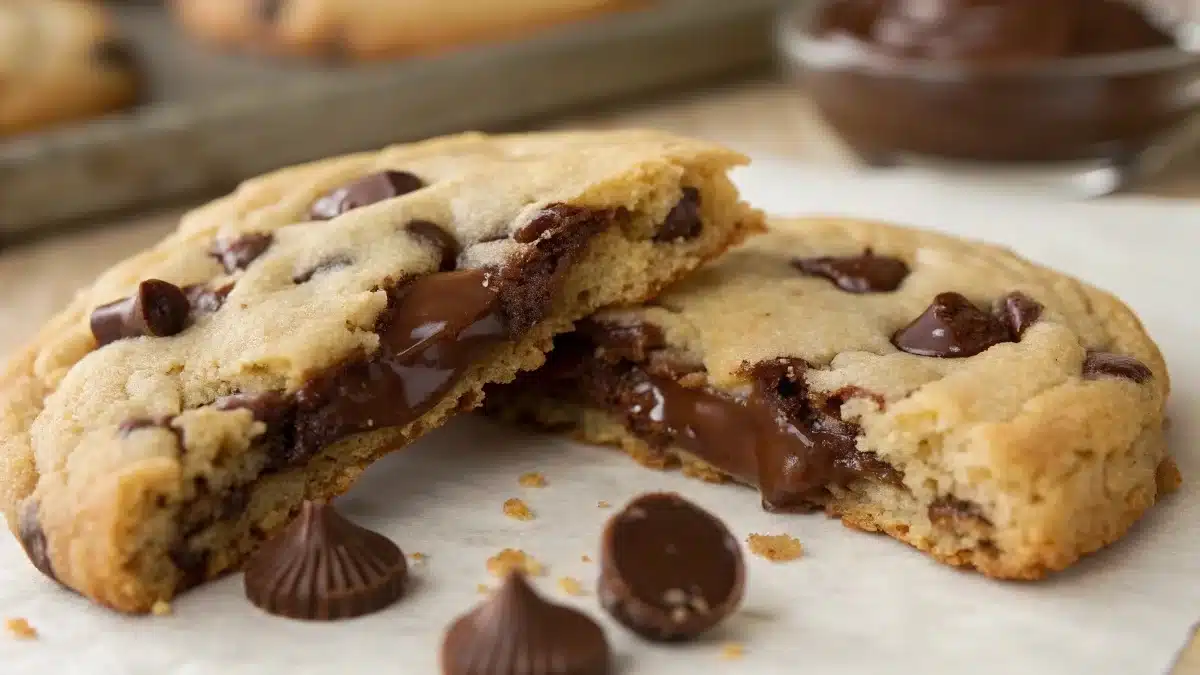
Alright, folks, welcome to the wonderful world of homemade chocolate chip cookies! But not just any chocolate chip cookies. We’re talking about Ghirardelli chocolate chip cookies. Yes, the kind that make you want to close your eyes and savor every single, melty, chocolate-y bite. You know, those cookies that are soft in the middle, slightly crisp around the edges, and bursting with rich Ghirardelli chocolate chips?
Let’s be honest. We’ve all had those moments where a store-bought cookie just doesn’t cut it. It’s too dry, or the chocolate is waxy, or it just lacks that homemade love. That’s where this recipe comes in. This isn’t just a recipe; it’s a journey. A journey to baking the perfect Ghirardelli chocolate chip cookie, a cookie that will impress your friends, delight your family, and maybe even become your signature dessert.
Why Ghirardelli, you ask? Well, the quality of your chocolate drastically impacts the overall flavor of your cookie. Ghirardelli chocolate chips offer a rich, deep cocoa flavor that elevates your cookies to the next level. They melt beautifully, creating those irresistible pools of chocolate that we all crave. Plus, they offer various types of chocolate chips milk chocolate, dark chocolate, semi-sweet, even white chocolate! Feel free to mix and match to create your dream Ghirardelli cookie!
Table of Contents
What Makes This Recipe Ultimate?
- Perfect Texture: We’re aiming for that ideal balance of a soft, chewy center and slightly crisp edges.
- Rich Chocolate Flavor: The Ghirardelli chocolate chips take center stage, providing an intense and satisfying chocolate experience.
- Easy to Follow: This recipe is designed to be straightforward and accessible, even for beginner bakers.
- Customizable: We’ll discuss how to tweak the recipe to your preferences, allowing you to create your perfect Ghirardelli chocolate chip cookie.
So, are you ready to ditch the store-bought cookies and embark on this delicious adventure? Let’s get started!
II. Secret Ingredient: Elevating Your Ghirardelli Chocolate Chip Cookies
Okay, so we’ve established that Ghirardelli chocolate chips are the star of the show. But even the best ingredients need a little help to shine. That’s where our “secret ingredient” comes in. Now, before you imagine some exotic, hard-to-find spice, let me reassure you: it’s something simple, something you probably already have in your pantry. We are talking about – brown butter.

Looking for more dinner inspiration? Check out our Delicious Easy Dinners for simple and tasty recipes!
Yes, brown butter. Simple, yet transformative. Brown butter (also known as beurre noisette, French for “hazelnut butter”) is simply butter that has been cooked until the milk solids toast and turn a beautiful golden-brown color, imparting complex nutty and toffee-like flavors. This seemingly small step adds a depth of flavor to your cookies that will knock your socks off.
Why Brown Butter?
- Enhanced Flavor: The nutty, caramelized notes of brown butter complement the rich chocolate flavor of the Ghirardelli chips perfectly, creating a more complex and satisfying taste.
- Improved Texture: Brown butter adds a subtle chewiness to the cookies, enhancing their texture and making them even more irresistible.
- Aromatic Delight: The aroma of browning butter is simply divine, filling your kitchen with a warm and inviting scent that will instantly put everyone in a good mood.
How to Brown Butter: A Step-by-Step Guide
- Use a Light-Colored Pan: This allows you to easily see when the butter is browning. A stainless steel saucepan is ideal.
- Cut the Butter: Cut your butter into tablespoon-sized pieces. This helps it melt evenly.
- Melt Over Medium Heat: Place the butter in your saucepan and melt it over medium heat.
- Watch Carefully: Once melted, the butter will begin to bubble and foam. Swirl the pan occasionally to ensure even cooking.
- Toast the Milk Solids: As the butter continues to cook, the milk solids at the bottom of the pan will begin to turn golden brown. This is where the magic happens! Be careful not to burn the butter. You’ll smell a nutty aroma.
- Remove from Heat: As soon as the butter reaches a rich golden-brown color and the nutty aroma is strong, remove the pan from the heat immediately.
- Transfer to a Heatproof Bowl: Pour the brown butter into a heatproof bowl to stop the cooking process. Scrape all of the browned milk solids from the bottom of the pan into the bowl – that’s where the flavor is!
- Cool Completely: Allow the brown butter to cool completely and solidify slightly before using it in your cookie dough. This will help prevent the cookies from spreading too thin. You can even chill it in the fridge if you’re short on time.
- Get the right Texture: The butter should become solid enough to be considered as a solid butter, a soft and pliable solid. It shouldn’t be very hard, in that case, try leaving your mixture in the counter for it to warm it up.
Important Tips for Brown Butter Success:
- Don’t Walk Away: Brown butter can go from perfectly browned to burnt in a matter of seconds, so stay vigilant!
- Trust Your Senses: Rely on your sight and smell to determine when the butter is ready. Look for a rich golden-brown color and a nutty aroma.
- Scrape the Bottom: Be sure to scrape all of the browned milk solids from the bottom of the pan into the bowl. These are essential for adding flavor to your cookies.
- Cool Completely: Allow the browned butter to cool completely before using it in your cookie dough. This will prevent the cookies from spreading too thin.
Once you’ve mastered the art of browning butter, you’ll be amazed at the difference it makes in your Ghirardelli chocolate chip cookies. It’s a simple step that elevates the flavor and texture to a whole new level. Get ready to impress!
III. Step-by-Step Guide: Baking Perfect Ghirardelli Chocolate Chip Cookies
Alright, now for the fun part! We’ve talked about the star ingredient (Ghirardelli chocolate) and our secret weapon (brown butter). Now it’s time to put it all together and bake some seriously delicious cookies. This step-by-step guide will walk you through the entire process, from gathering your ingredients to pulling those golden-brown beauties out of the oven.

Is comfort food your thing? Dive into our Comfort Food Recipes to warm your soul with every bite.
Ingredients:
- 1 cup (2 sticks) unsalted butter
- 3⁄4 cup granulated sugar
- 3⁄4 cup packed light brown sugar
- 1 large egg
- 1 teaspoon vanilla extract
- 2 1⁄4 cups all-purpose flour
- 1 teaspoon baking soda
- 1 teaspoon salt
- 2 cups Ghirardelli chocolate chips (milk chocolate, dark chocolate, semi-sweet – your choice!)
Equipment:
- Mixing bowls (at least 2)
- Electric mixer (stand mixer or hand mixer)
- Measuring cups and spoons
- Rubber spatula
- Baking sheets
- Parchment paper or silicone baking mats
Instructions:
- Brown the Butter: Follow the instructions in Section II to brown the butter. Remember to cool it completely before moving on to the next step. The butter should have a subtle, nut aroma!
- Cream Together Sugars and Brown Butter: In a large mixing bowl, combine the cooled brown butter, granulated sugar, and brown sugar. Use an electric mixer to cream the ingredients together until light and fluffy (around 3-5 minutes). This step is crucial for creating a tender cookie.
- Add Egg and Vanilla: Beat in the egg and vanilla extract until well combined. Make sure to scrape down the sides of the bowl to ensure everything is evenly mixed.
- Combine Dry Ingredients: In a separate bowl, whisk together the flour, baking soda, and salt. Whisking is important to make sure that the baking soda and salt are evenly distributed through your batter, allowing the cookies to have good texture and flavor.
- Gradually Add Dry Ingredients to Wet Ingredients: Gradually add the dry ingredients to the wet ingredients, mixing on low speed until just combined. Be careful not to overmix, as this can lead to tough cookies. Over mixing leads to gluten formation, which we would like to avoid.
- Stir in Ghirardelli Chocolate Chips: Gently fold in the Ghirardelli chocolate chips until they are evenly distributed throughout the dough.
- Chill the Dough (Important!): Cover the bowl with plastic wrap and chill the dough in the refrigerator for at least 30 minutes, or even better, several hours or overnight. This allows the flavors to meld together and prevents the cookies from spreading too thin during baking. Chilling the dough also makes the dough easier to handle. Ideally, we would leave the dough for 24 hours.
- Preheat Oven: Preheat your oven to 375°F (190°C).
- Prepare Baking Sheets: Line your baking sheets with parchment paper or silicone baking mats. This prevents the cookies from sticking and makes cleanup a breeze.
- Scoop and Arrange Dough: Use a cookie scoop or spoon to drop rounded tablespoons of dough onto the prepared baking sheets, leaving about 2 inches of space between each cookie. For a uniform look, measure an equal distance between cookies!
- Bake: Bake for 9-11 minutes, or until the edges are golden brown and the centers are still slightly soft.
- Cool: Remove the baking sheets from the oven and let the cookies cool on the baking sheets for a few minutes before transferring them to a wire rack to cool completely. It is important that the cookies cool on the baking sheet for a bit so they don’t fall apart.
- Enjoy: Once the cookies are completely cooled, grab a glass of milk (or your beverage of choice!) and enjoy your homemade Ghirardelli chocolate chip cookie masterpiece!
Baking Tips for Success:
- Room Temperature Butter (Wait, I Thought We Used Brown Butter?): While we used brown butter, make sure it’s cooled to a semi-solid state and not too melty, which should resemble the texture of butter at room temperature!
- Measure Flour Accurately: Too much flour can result in dry, crumbly cookies. Use the spoon and level method to measure your flour accurately. This means using a spoon to fluff up the flour in its container, then spooning it into your measuring cup and leveling it off with a knife.
- Don’t Overbake: Overbaked cookies will be dry and hard. Err on the side of slightly underbaked for a soft and chewy texture. Cookies will also continue baking as they cool down on the baking sheet, so don’t worry if when hot, they have more moisture.
- Space Cookies Properly: Leaving enough space between cookies on the baking sheet prevents them from running into each other during baking.
- Rotate Baking Sheets: Rotating the baking sheets halfway through baking ensures that the cookies bake evenly. This is important because the heat in your oven will not always be the same in all the locations, so rotating will provide the cookies with equal amounts of heat throughout the baking process.
Congratulations! You’ve now baked your own batch of perfect Ghirardelli chocolate chip cookies. Enjoy the fruits (or should I say, cookies!) of your labor, and don’t be afraid to experiment and customize the recipe to your liking. Happy baking!
IV. Variations and Customization: Making Your Ghirardelli Cookies Unique
Alright cookie adventurers! You’ve mastered (or are about to master!) the basic Ghirardelli chocolate chip cookie. Now, let’s get creative! Baking is an art, and the best part is that you can customize it to your heart’s content. Let’s explore some mouthwatering variations that will turn your already amazing Ghirardelli cookies into something truly special.

Love baking? Our Baking Recipes will bring your kitchen to life with the best homemade pastries and bread.
Spice It Up!
Don’t underestimate the power of spices to transform a simple cookie. A pinch of this or a dash of that can bring a whole new dimension to your baked goods. Try these ideas:
- Cinnamon: A classic for a reason! Add 1/2 to 1 teaspoon of ground cinnamon to the dry ingredients for a warm, comforting flavor. I love this combo especially during fall and winter.
- Nutmeg: A little goes a long way with nutmeg, but a 1/4 teaspoon will add a subtle, nutty depth to your cookies.
- Cardamom: For a more exotic twist, try 1/4 teaspoon of ground cardamom. It has a fragrant, slightly citrusy flavor that pairs beautifully with chocolate.
- Chili Powder (seriously!): Don’t be afraid! Just a tiny pinch (1/8 teaspoon or less) of chili powder can add a surprising warmth and complexity that complements the Ghirardelli chocolate magnificently. It’s a secret ingredient that will have everyone wondering what makes your cookies so uniquely good.
Nutty Delights
Nuts and chocolate are a match made in heaven. Adding some chopped nuts can boost both the flavor and texture of your Ghirardelli cookies.
- Walnuts: The classic choice! Roughly chopped walnuts provide a slightly bitter, earthy counterpoint to the sweetness of the chocolate. Use about 1/2 to 3/4 cup.
- Pecans: For a richer, sweeter option, pecans are perfect. Toast them lightly before chopping to enhance their flavor. Use about 1/2 to 3/4 cup.
- Almonds: Slivered or chopped almonds offer a delicate crunch and a subtle nutty flavor. Try about 1/2 to 3/4 cup.
- Hazelnuts: If you’re feeling fancy, try using toasted and skinned hazelnuts. Their rich, distinctive flavor will elevate your cookies to gourmet status. Use abou 1/2 to 3/4 cup.
Pro-Tip: Toasting your nuts before adding them to the cookie dough enhances their flavor and creates a more satisfying crunch.
Fruity Fun
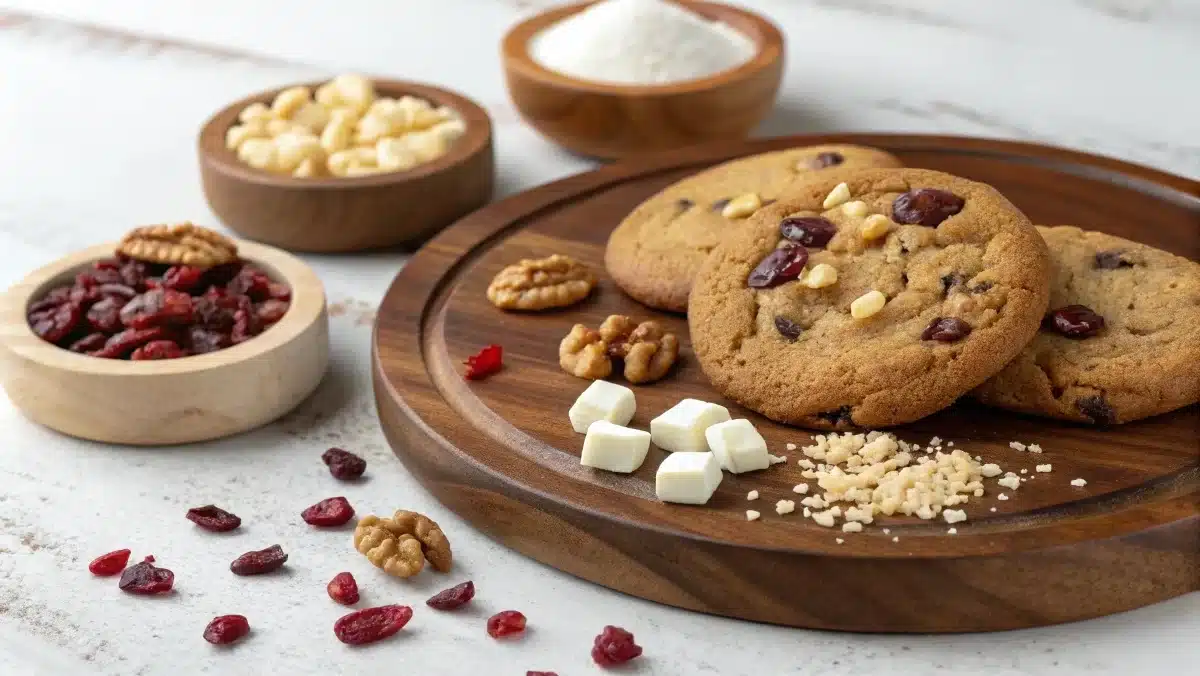
Dried fruits can add a chewy texture and a burst of sweetness to your cookies. Just make sure to chop them into small pieces so they distribute evenly throughout the dough.
- Dried Cranberries: For a festive, tart-sweet flavor, add about 1/2 cup of dried cranberries. These pair especially well with white chocolate Ghirardelli squares.
- Raisins: Another classic addition! Golden raisins or dark raisins both work well. Use about 1/2 cup. Soak them in warm water or rum for 15 minutes before adding to the dough for extra plumpness.
- Dried Cherries: For a luxurious treat, try adding 1/2 cup of dried cherries. They have a deep, rich flavor that complements dark chocolate perfectly.
- Orange Zest: For a burst of citrusy goodness, add the zest of one orange to your dough. The fragrant oils will infuse your cookies with a bright, refreshing flavor.
Beyond Chocolate Chips: Ghirardelli Bar Bonanza
Don’t limit yourself to just chocolate chips! Ghirardelli makes a beautiful array of chocolate bars that can be chopped and used in your cookies. This allows you to control the size and shape of the chocolate pieces, creating a more visually appealing and texturally interesting cookie.
- White Chocolate: Chop a Ghirardelli White Chocolate bar and combine it with dried cranberries and chopped macadamia nuts for a truly decadent treat.
- Sea Salt Caramel: Chop a Ghirardelli Sea Salt Caramel bar for a sweet and salty flavor explosion. The slightly melty caramel adds a fantastic texture.
- Dark Chocolate: Use a Ghirardelli 72% or 86% Dark Chocolate bar to create intense, rich chocolate cookies that will satisfy even the most dedicated chocoholics.
Experiment with Extracts
A few drops of extract can add a subtle yet noticeable flavor boost to your cookies.
- Vanilla Extract: Stick with a high-quality pure vanilla extract for the best flavor. Don’t be tempted to skimp!
- Almond Extract: Use sparingly, as it can be quite strong. A 1/4 teaspoon is usually sufficient.
- Peppermint Extract: Add a 1/4 teaspoon for a festive, minty twist, especially around the holidays. Combine with chopped dark chocolate and crushed candy canes for a real holiday treat.
Ultimately, the best way to find your perfect Ghirardelli chocolate chip cookie variation is to experiment! Don’t be afraid to try new things and get creative with your ingredients. Happy baking!
V. Tips for Storage and Freshness: Keeping Your Ghirardelli Cookies Delicious
You’ve baked a batch of heavenly Ghirardelli chocolate chip cookies. Now what? Properly storing your creations is key to maintaining their delightful texture and flavor. Nobody wants a stale cookie, right? Let’s dive into the best storage practices to keep your cookies tasting just as amazing as the day they came out of the oven.

Cooling is Crucial
Before you even think about storing your cookies, make sure they are completely cool. Transfer them to a wire rack after baking and let them cool thoroughly. Storing warm cookies will trap moisture, leading to soggy cookies rather than that perfect crisp-chewy texture we’re after. It’s tempting to sneak one straight from the oven (and I won’t judge!), but resist the urge to store them until they’re completely cooled.
The Airtight Container is Your Friend
The key to keeping cookies fresh is to prevent them from drying out. The best way to do this is to store them in an airtight container. Here are a few good options:
- Plastic Tupperware-style Containers: These are readily available and work well. Ensure the lid seals tightly to prevent air from getting in.
- Cookie Jars with a Tight Seal: A classic choice that also adds a touch of charm to your kitchen. Look for jars with a rubber gasket around the lid for a better seal..
- Zip-Top Bags: While not as sturdy as containers, zip-top bags are a good option if you don’t have containers on hand. Be sure to squeeze out as much air as possible before sealing.
Layering Your Cookies
If you’re storing multiple layers of cookies in a container, place a sheet of parchment paper or wax paper between each layer. This will prevent the cookies from sticking together and help to maintain their shape.
Short-Term Storage (1-2 Days)
For cookies you plan to eat within a day or two, storing them at room temperature in an airtight container is perfectly fine. Keep them away from direct sunlight or heat sources, as this can cause the chocolate to melt or the cookies to dry out faster. A cool, dark pantry or cupboard is ideal.
Long-Term Storage (Up to a Week)
If you want to keep your cookies fresh for longer than a couple of days, consider adding a slice of bread or an apple slice to the container. The bread or apple will release moisture, which will help to keep the cookies soft. Just be sure to check the bread or apple daily and replace it if it starts to dry out or mold. Only use white bread for this trick to avoid flavor transfer to your cookies.
Another option is to freeze them! See below for freezing instructions!
Freezing for Future Enjoyment
Freezing is a great way to preserve your Ghirardelli chocolate chip cookies for weeks, or even months. Here’s how to do it:
- Freeze Individually: Place the cooled cookies on a baking sheet lined with parchment paper. Make sure the cookies aren’t touching. Freeze for about 1-2 hours, or until solid. This prevents them from sticking together during long-term storage.
- Transfer to an Airtight Container or Freezer Bag: Once the cookies are frozen solid, transfer them to an airtight container or freezer bag. Label the container with the date so you know when you froze them.
- Thawing: To thaw the cookies, simply remove them from the freezer and let them sit at room temperature for about 30 minutes. This will allow them to soften up without becoming soggy. You can also thaw them in the refrigerator overnight for a more gradual thaw.
- Reheating (Optional): If you want to enjoy a warm, gooey cookie, you can pop them in the microwave for a few seconds (start with 5-10 seconds) or reheat them in a preheated oven at 350°F (175°C) for a few minutes. Watch them carefully to prevent them from burning.
Important Note: Frozen cookies are best enjoyed within 2-3 months for optimal flavor and texture. After that, they may start to lose some of their quality.
With these storage tips in mind, you can enjoy your delicious Ghirardelli chocolate chip cookies for days to come! Happy snacking!
VI. Troubleshooting Common Issues: Solving Ghirardelli Cookie Problems
Okay, let’s be real. Baking doesn’t always go perfectly. Sometimes, even with the best recipe and intentions, things can go a little sideways. But don’t worry! I’m here to help you troubleshoot some common Ghirardelli chocolate chip cookie problems and turn those baking blunders into baking triumphs.
Problem: Flat, Thin Cookies
Flat cookies are a common cookie conundrum. Here’s what might be going wrong:
- Too Much Butter: Double-check your measurements and make sure you’re not accidentally adding too much butter. Use a kitchen scale for accuracy.
- Butter Too Soft/Melted: The butter should be softened but still cool. If it’s melted, the cookies will spread too much. Try chilling the dough for at least 30 minutes before baking.
- Oven Temperature Too Low: An inaccurate oven temperature can also cause cookies to spread. Use an oven thermometer to ensure your oven is heating properly.
- Too Much Sugar: Sugar contributes to the spread of cookies. Again, be precise with your measurements.
- Not Enough Flour: If you don’t have enough flour, the cookies won’t have enough structure to hold their shape.
- Baking Sheet Too Greasy: A greased baking sheet can encourage cookies to spread. Use parchment paper or a silicone baking mat instead.
Solution: Chill the dough for at least 30 minutes, or even up to a few hours. This will help the butter to firm up and prevent the cookies from spreading too much.
Problem: Dry, Crumbly Cookies
Dry cookies are no fun. Here are some possible causes:
- Too Much Flour: The opposite of the problem above! Too much flour can make cookies dry and crumbly.
- Overbaking: Overbaking is the biggest culprit of dry cookies. Keep a close eye on your cookies and take them out of the oven as soon as the edges are golden brown.
- Not Enough Butter or Fat: Fat adds moisture to cookies. Ensure you’re using the correct amount of butter or shortening called for in the recipe.
- Dry Ingredients Not Properly Measured: Make sure your measurements are exact. Use the spoon and level method to measure flour, gently spooning flour into the measuring cup and then leveling with a knife. Scooping directly from the flour container can compact the flour, leading to too much flour in the recipe.
Solution: Reduce the baking time by a minute or two. You can also try adding a tablespoon or two of milk or water to the dough to add some moisture.
Problem: Hard, Crunchy Cookies
Hard cookies can be caused by:
- Overbaking: Similar to dry cookies, overbaking will also give you a hard cookie
- Too Little Fat: A lack of fat results in a less pliable, harder cookie.
- Cold Oven: If the oven is not hot enough when the cookies are put in, it can mess with even distribution of the ingredients.
Solution: Reduce the baking time. Use more butter or fat.
Problem: Cookies Daon’t Spread Enough
Sometimes cookies stay stubbornly puffy and don’t spread out as they should.
- Too Much Flour: Too much dry ingredients.
- Cold Butter: If the butter isn’t soft enough, it won’t properly incorporate into the dough, resulting in cookies that don’t spread.
- Not Enough Sugar: This could have the cookies not have enough liquid to spread while baking.
Solution: Make sure all ingredients are properly mixed.
Problem: Uneven Baking
Some cookies on the baking sheet are perfectly done, while others are underbaked or overbaked.
- Uneven Oven Temperature: Like said before check your oven!
- Crowded Baking Sheet: Overcrowding the baking sheet restricts airflow and can lead to uneven baking. Give the cookies plenty of space.
Solution: Rotate and Check!
Problem: Chocolate Chips Melt Too Much
Large puddles of melted chocolate instead of distinct chocolate chips?
- Low Quality Chocolate Chips: Cheaper chocolate chips often contain more stabilizers and less cocoa butter, making them more prone to melting. Use high-quality Ghirardelli chocolate chips!
- Oven Too Hot: If the oven is too hot, the chocolate chips will melt too quickly.
Solution: Cool it down and elevate the chocolate!
Baking is a journey of experimentation and learning. Don’t be discouraged if you encounter a few bumps along the way. By understanding the potential causes of common cookie problems, you can adjust your technique and ingredients to achieve consistently delicious results. Happy baking, and remember, even “failed” cookies usually taste pretty good!
Frequently Asked Questions: Ghirardelli Chocolate Chip Cookies
1. Why use Ghirardelli chocolate chips in my cookies?
Ghirardelli chocolate chips elevate your cookies to the next level. Consequently, they add a rich, deep cocoa flavor. Moreover, these high-quality chocolate chips melt beautifully, creating irresistible pools of chocolate. Plus, they offer various types, too.
2. What’s the secret to soft and chewy Ghirardelli Chocolate Chip Cookies?
The key is proper technique.
First, Don’t overmix the dough. Over mixing develops gluten, leading to a tough cookie. Second, Underbake slightly. This is a good tip. Remove the cookies when the edges are golden but the center still looks a little soft. Third, chilling the dough for at least 30 minutes (or preferably longer) helps to hydrate the flour
3. How can I prevent my Ghirardelli Chocolate Chip Cookies from spreading too thin?
- Chill the dough. This solidifies the butter and prevents excessive spreading.
- Use the right amount of flour. Too little flour can result in flat cookies. Spoon and level your flour to avoid over measuring .
- Don’t use melted butter. The butter should be softened, not melted.
4. What are some fun variations I can try with my Ghirardelli Chocolate Chip Cookies?
Get creative! Consider these additions to customize your signature cookie:
- Nuts: Walnuts, pecans, or almonds create a delightful crunch. For example, you can toast them before adding.
- Spices: Cinnamon, nutmeg, or even a pinch of chili powder enhance the flavor profile.
- Dried Fruits: Cranberries or raisins add a chewy texture and sweetness. As a rule of thumb, chop them into small pieces.
- Extracts: A tiny amount of Almond or peppermint extracts create exciting new flavor dimensions.
5. How do I store my Ghirardelli Chocolate Chip Cookies to keep them fresh?
Proper storage is important. Here are some essential tips:
- Cool completely: Before storing, allow the cookies to cool to room temperature.
- Airtight container: Store in an airtight container at room temperature or freezer.
- Layering: Place parchment paper between layers to prevent sticking.
- Freezing: For longer storage, freeze cookies individually before placing them in a container.
Best Ever Ghirardelli Chocolate Chip Cookies
Ingredients
Equipment
Method
- Preheat your oven to 375°F (190°C).
- In a skillet, cook the ground beef over medium heat until browned. Drain the fat.
- Add the marinara sauce to the cooked beef, stirring until combined. Simmer for 10 minutes.
- In a bowl, combine ricotta cheese, mozzarella, Parmesan, egg, salt, and pepper. Mix well.
- Spread a thin layer of meat sauce in the bottom of a 13×9-inch baking dish.
- Place the lasagna noodles on top of the sauce, followed by a layer of the cheese mixture, then more sauce. Repeat layers, ending with sauce on top.
- Cover with aluminum foil and bake for 25 minutes. Remove foil and bake for an additional 20 minutes until bubbly and golden.
- Let it rest for 10 minutes before slicing and serving.
Notes
- No-boil noodles: Ensure you are using the no-boil lasagna noodles for the recipe to work as intended. These noodles soften and cook as the lasagna bakes.
- Meat options: Feel free to substitute ground beef with other proteins, such as turkey or chicken, for a leaner version.
- Extra flavor: Add some fresh basil or garlic to the sauce for additional flavor.
- Rest time: Let the lasagna sit for about 10 minutes after baking. This helps set the layers and makes it easier to slice.
Conclusion
Ghirardelli chocolate chip cookies present a canvas for baking creativity. Hence, mastering a few fundamental steps like chilling the dough and utilizing high-quality ingredients allows for consistent results. Ultimately, experimentation remains a key component, whether it’s adding personalized touches or resolving common baking challenges.


Comments are closed.